Stenciltryck på papper –
Stencil printing on paper

Stencil printing on paper - by Craft & Creativity

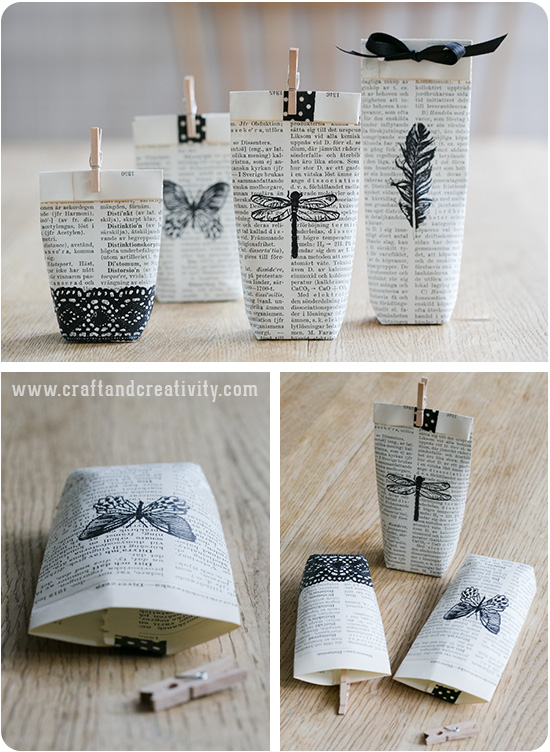
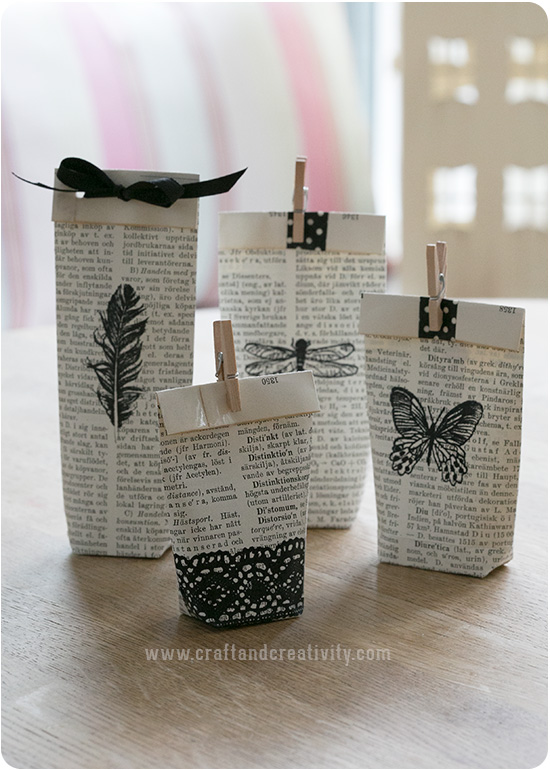
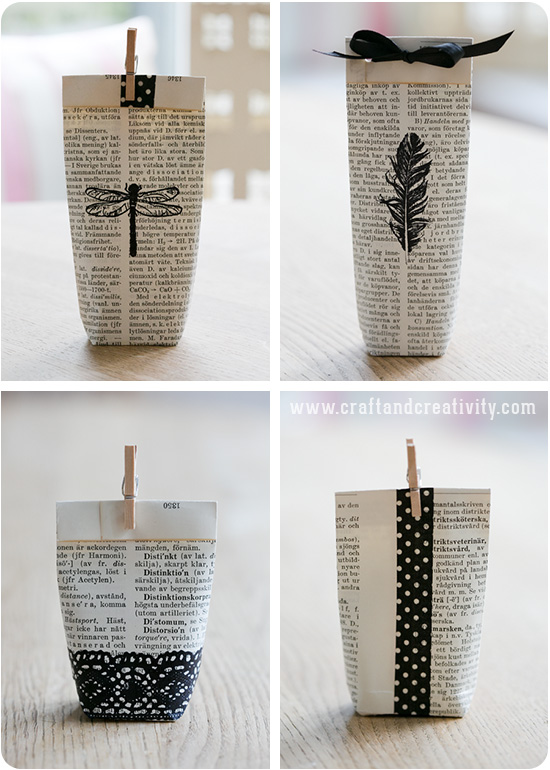
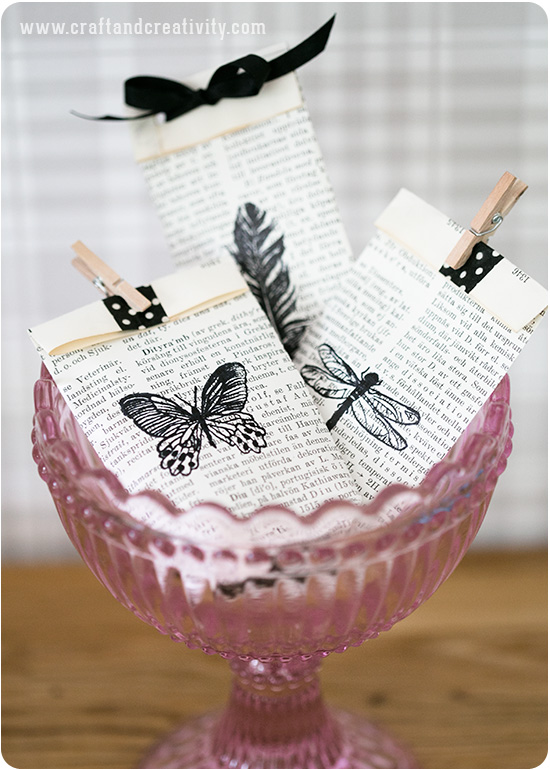
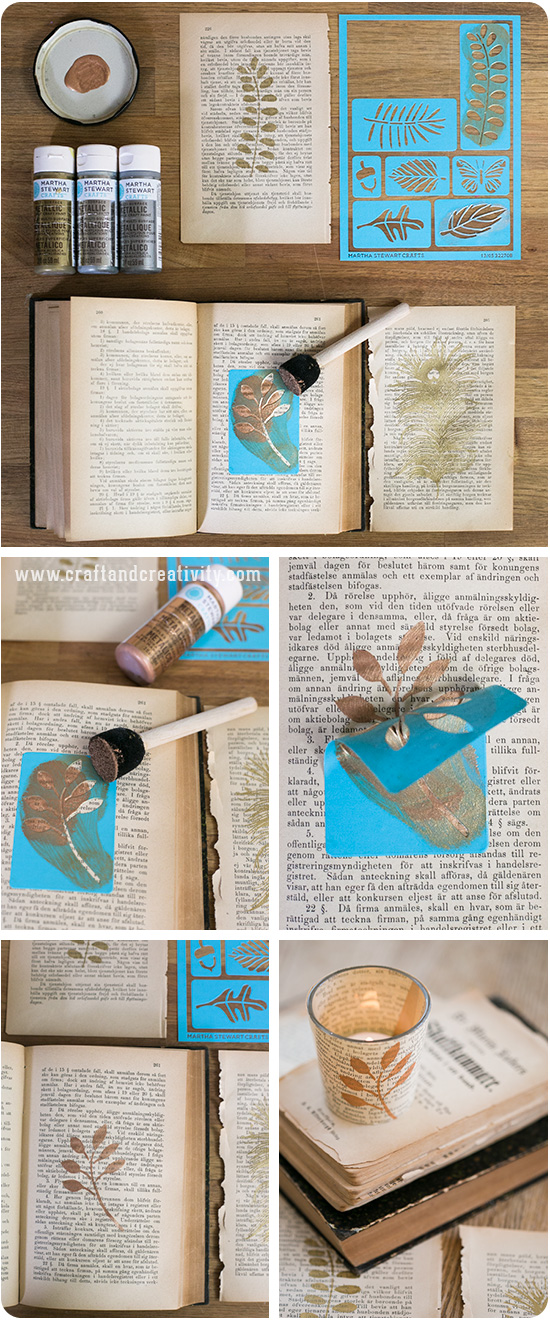
Jag har tidigare visat hur man kan använda stämplar på gamla boksidor. Nu har turen kommit till stenciltryck på papper. Stencilerna som jag har använt är lätt självhäftande för att enkelt kunna appliceras på t ex rundade glas-, tyg- trä eller plåtföremål men det fungerade även på papper. Var dock försiktig när du drar bort motivet så att inte papprets ytskikt följer med. I mitt fall var det inga problem och då använde jag ändå riktigt gamla böcker med poröst papper.
————
I have previously shown you how you can use stamps on old book pages. Now the turn has come to try stencil printing on paper. The stencils I used has adhesive backing and is therefor simple to apply on curved surfaces, such as glass, fabric, wood or tin but also works on paper. However, be careful when removing the stencil so that you don’t damage the paper. In my case it wan’t a problem even though I used really old books with porous paper. 

Stencil printing on paper - by Craft & Creativity

Till de flesta av mina stenciltryck använde jag metallicfärg. Guld- och kopparfärgen gav en vacker glans till trycken och jag tycker att den matchar fint med det lite gulnade pappret.
———–
For most of my stencil printing, I used metallic paint. The gold and copper paint gives a lovely shine to the prints and I think it goes well with the aged paper. 

Stencil printing on paper - by Craft & Creativity

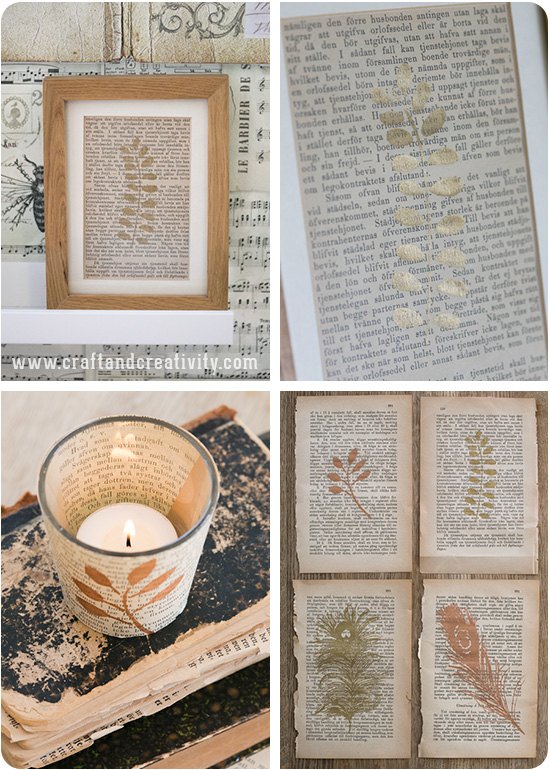
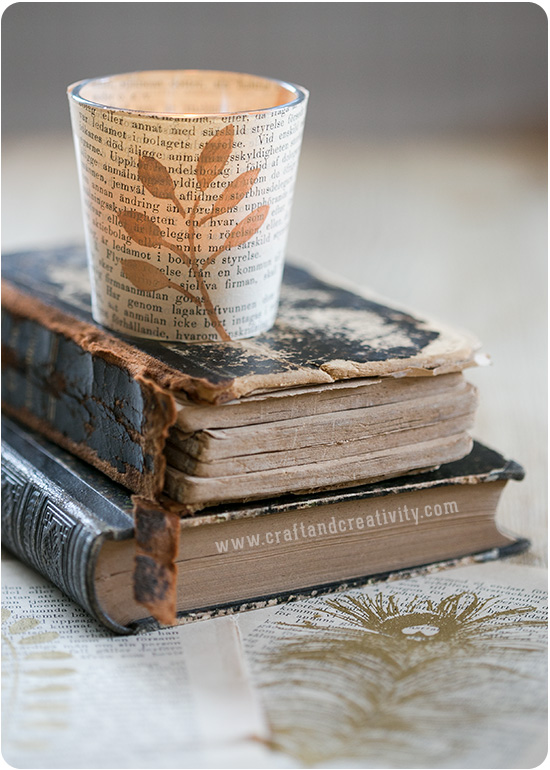
Jag använde mitt stenciltryckta papper till att täcka ljuslyktor av glas och några ramade jag in. Gamla böcker och lexikon är enkla att hitta på loppis för en billig peng. Mina höll på att ramla sönder så det kändes ok att använda dem. De sprider mer glädje på det här sättet.
———–
I used some of my stencil printed paper to cover votives and some I framed. Old books and dictionaries are easy to find at a flea marked at a low cost. My books were falling into pieces so it felt ok to use them. This way they spread more joy. 

Stencil printing on paper - by Craft & Creativity

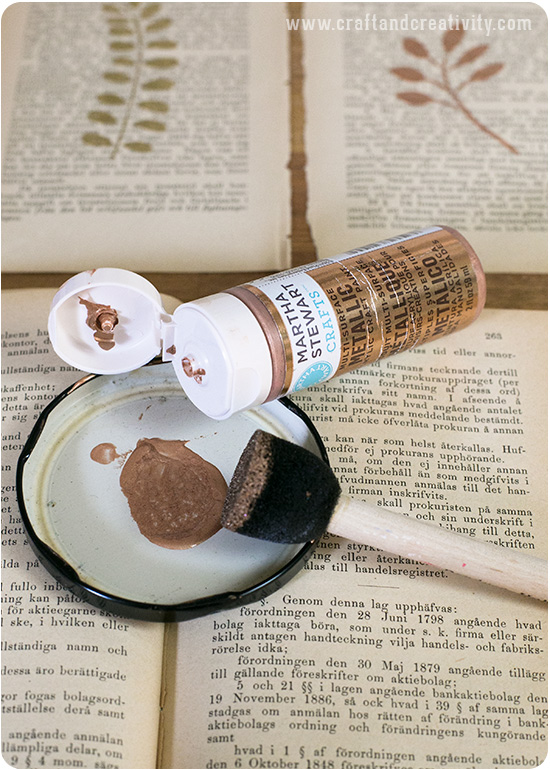
Jag brukar använda mig av gamla burklock som paletter. Det är en billig lösning som fungerar utmärkt. Om det blir rester av färgen kvar så kan man enkelt dra bort den när den torkat och återanvända locket om och om igen.
———–
I usually use old jar lids as palettes. It’s a cheap solution that works great. If there is any residual paint left you can let it dry, peel it off and use the lid over and over again. 

Stencil printing on paper - by Craft & Creativity

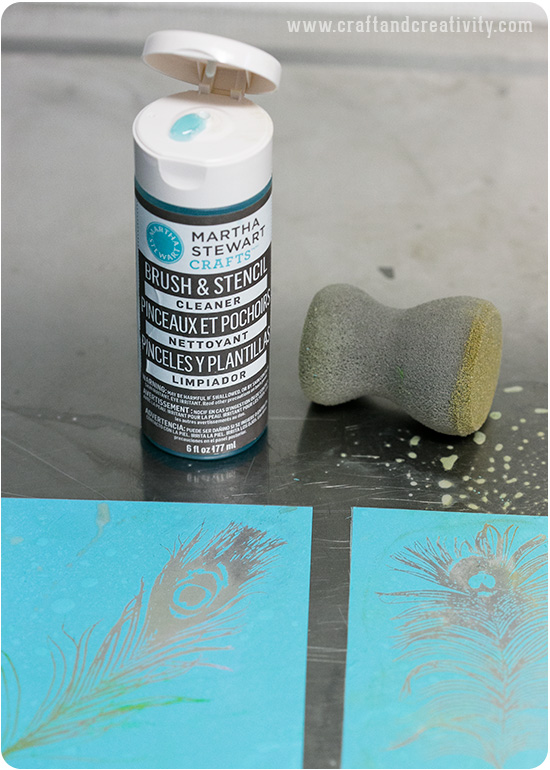
Stencilerna går att återanvända många gånger men ett tips är att göra rent stencilerna och svamparna på en gång efter att du använt dem. Det är extra viktigt när det gäller silkscreens eftersom de har små små hål som inte får täppas igen. Det finns speciell pensel- och stencilrengöring som är bra men det går även bra med vanligt vatten.
————
The stencils can be reused many times but I recommend that you rinse the stencils and pouncers immediately after use to remove excess paint. This is especially important when it comes to silkscreens because they have small holes that must not be clogged with paint. Use a special brush and stencil cleaner or plain water.

Stencil printing on paper - by Craft & Creativity

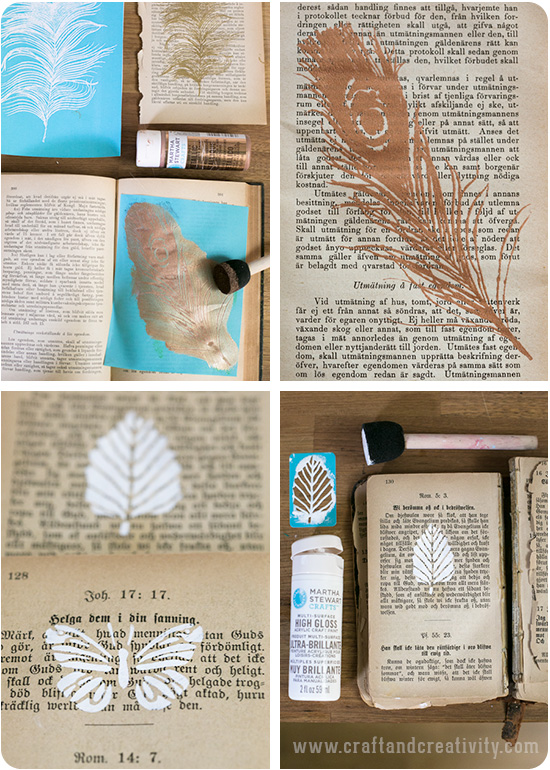
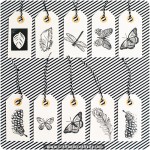
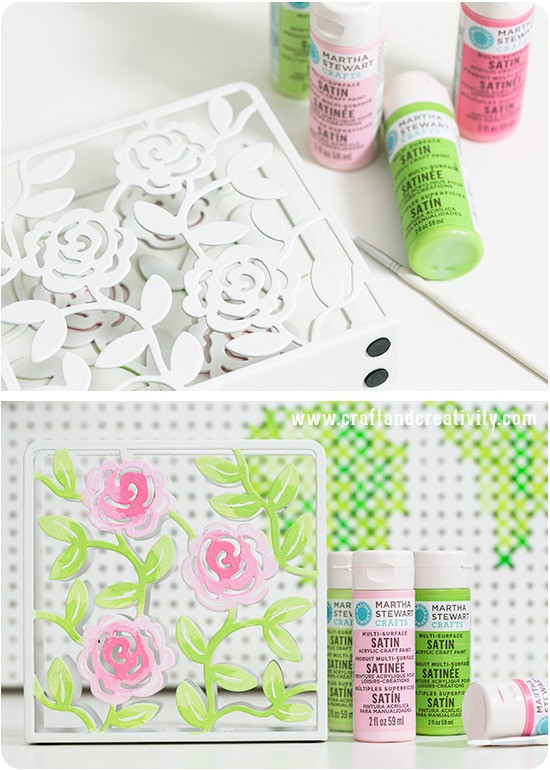
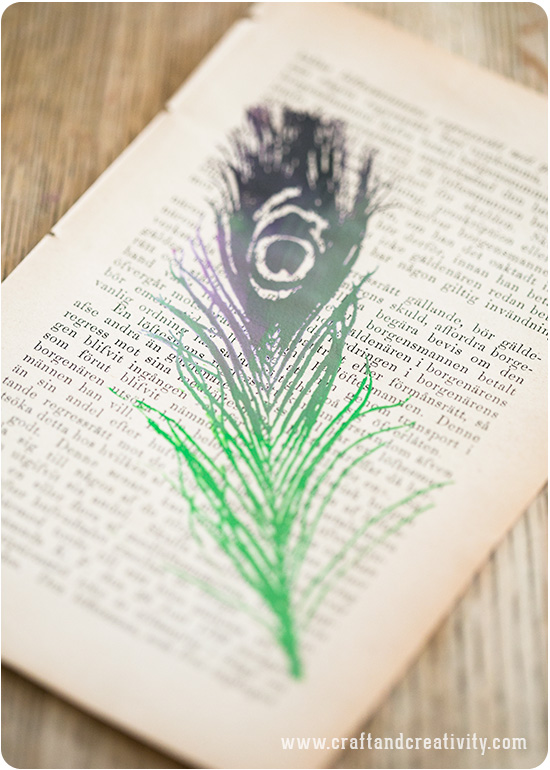
Ovan ser ni ett silkscreen-tryck av en påfågelfjäder. Silkscreens är mer detaljerade än vanliga stenciler. Se skillnaden mellan den detaljerade fjädern och den vita fjärilen, som är nog så fin men inte lika detaljerad. Jag använde en skumstencilpensel för att lägga på färgen men finns även bra duttsvampar.
————-
Above you can see a silkscreen print of a peacock feather. The silkscreens are more detailed then regular stencils. See the difference between the fine detailed feather and the white butterfly, which is really pretty but not as detailed. I used a stencil foam pouncer when applying paint but you could also use Foam Pouncers from Martha Stewarts Crafts for example. 

Stencil printing on paper - by Craft & Creativity

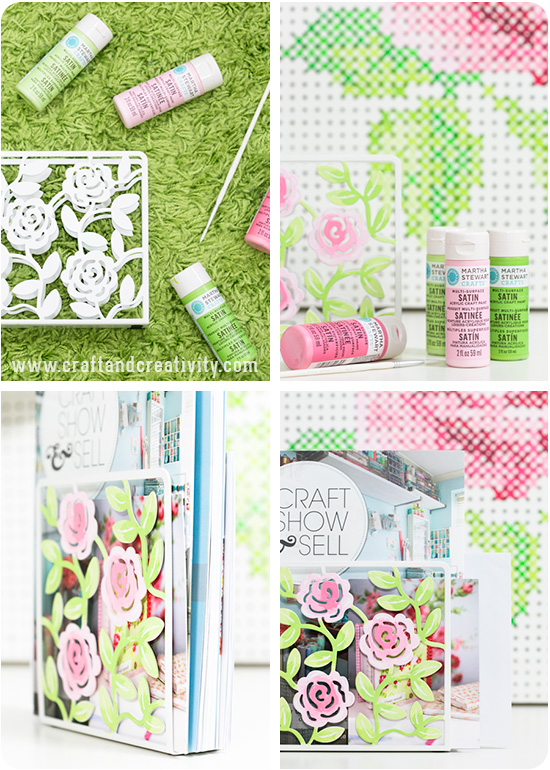
Det går också att mer färg förstås och även att blanda olika färger. Nedan ser ni ytterligare exempel på fina stenciler.
—————-
You can add more color and also mix different colors. Below you can see further examples of pretty stencils. 

Vinylfolie på brevlåda –
Vinyl decals for mailbox

Vinyl Decals for Mailbox - by Craft & Creativity

Vår brevlåda behövde ett lyft då den gamla lappen med våra namn för länge sedan hade bleknat. Ett bra tillfälle att testa min inlånade Silhouette Cameo tillsammans med dekorplast, tänkte jag. Förutom att pimpa brevlådan har vi sedan dess gjort en namndekal till dotterns cykel och väggdekaler till båda tjejernas rum. Vi har även gjort väggdekaler med namn på några av barnens vänner och gett bort dekalerna i present, vilket har uppskattats. Att göra väggdekaler/väggord med en Silhouette skärmaskin fungerar på precis samma sätt som med texten till brevlådan. Läs vidare så ska jag förklara hur man gör.
————
Our mailbox needed a make-over as the old paper sign with our name had long since faded. A great opportunity to try my borrowed Silhouette Cameo together with decor vinyl. In addition to pimping the mailbox, we have since tagged my daughter’s bike and made vinyl wall decals for both the girls’ rooms. We have also made wall decals with the names of friends of our daughters and gave them away as gifts, which was very much appreciated. Making vinyl wall decals works exactly the same way as with the text on our mailbox. Continue reading and I’ll explain how. 

Vinyl Decals for Mailbox - by Craft & Creativity

1. Typsnitt/Font: Pacifico, 2. Inställningar/settings, 3. Silhouette Cameo,
4. Applicationstejp/application tape, 5. Självhäftande vinyl/decor vinyl.

  • Du behöver: En skärmarskin (t ex Silhouette Cameo eller Silhouette Portrait), appliceringstejp, en plastskrapa (eller liknande), rensningsverktyg (förenklar jobbet) och självhäftande vinyl/dekorplast i önskad färg.
  • Gör så här: Öppna Silhouette Studio. Skriv texten med önskat typsnitt och storlek. Jag valde ett typsnitt som heter Pacifico.
  • Klicka på Cut Settings och välj Cut Edge. Skärmaskinen skär på så sätt längst ytterkonturen, vilket är extra viktigt om man väljer ett typsnitt där bokstäverna överlappar varandra. Välj Material Type: Vinyl. Dubbelklicka på Vinyl för att få upp mer inställningar. Notera hur kniven (Silhouette Ratchet Blade) ska vara inställd och vrid till rätt siffra på kniven i skärmaskinen.
  • Mata in vinylen/dekorplasten i din Silhouette Cameo eller Silhouette Portrait. Gör gärna en s k “Test cut” först, eftersom knivbladets inställningar kan behöva ändras beroende på om kniven är slö/vass och på vilket märke av dekorplast du använder. Kniven ska skära igenom dekorplasten men inte igenom skyddspappret på baksidan, den s k “bäraren”.
  • När maskinen skurit klart så matar du ut dekorplasten och drar bort den överflödiga dekorplasten som är runt motivet, men lämna själva texten kvar på skyddspappret. För att ta bort små bitar av vinyl, t ex inuti bokstäver så går det enklare med ett rensningsverktyg. Klipp ut en bit appliceringstejp (den gör det mycket lättare att applicera motivet där du vill ha det) och placera tejpen över texten. Stryk ut eventuella bubblor med en plastskrapa. Klipp rent runt motivet/texten men lämna gärna lite marginal. Nu är det dags att placera texten där du vill ha den.

———

  • You will need: A cutting machine (for example Silhouette Cameo or Silhouette Portrait), application tape, a Silhouette Scraper Tool (or similar), a Silhoutte hook (simplifies your work) and self-adhesive decor vinyl in the color of you choice. 
  • Do like this: Open Silhouette Studio. Enter your text in the font and size you want. I chose a font called Pacifico. 
  • Click on Cut Settings and select Cut Edge. The Cameo will thus cut the outer contour, which is especially important if you choose a font where the letters overlap. Select Material Type: Vinyl. Double-click on the text Vinyl to view the settings. Note how the blade (Silhouette Ratchet Blade) should be set and turn the blade to match the same number in the cutting machine. 
  • Feed the vinyl into your Silhouette Cameo or Silhouette Portrait. I recommend do a “Test Cut” first, because the knife’s settings may need some adjusting depending on sharp/new your knife is and on the brad of the vinyl you are using. The knife is supposed to cut through the vinyl but not the backing paper.
  • When the machine has finished cutting, remove the vinyl and remove all excess vinyl around the text, but leave the text itself on the backing paper. When removing small pieces of vinyl, it’s easier if you use a Silhouette hook. Cut a piece of application tape (it makes it easier to transfer the text to the surface of your choice) and place the tape over the text. Smooth out any air bubbles with a plastic scraper. Trim around the text but leve some margin. Now it’s time to place the text where you want it. 

Vinyl Decals for Mailbox - by Craft & Creativity

Själva appliceringen är också enkel. Dra bort appliceringstejpen från skyddspappret och vinyltexten kommer att följa med. Placera texten där du vill ha den. Skrapa slätt med en plastkrapa för att få bort eventuella luftbubblor. Ta bort appliceringstejpen och du är klar! Jag har avvänt en flyttbar dekorplast som fungerar både inom- och utomhus.
—————
The application is also simple. Peel the application tape from the backing paper and the vinyl text will follow. Position the text where you want it. Scrape it smooth with a plastic scrape to remove any air bubbles. Remove the application tape and you’re done! I used a removable decor vinyl that works both indoors and outdoors. 

Vinyl Decals for Mailbox - by Craft & Creativity

Nu går det inte att missa vilka som bor här! 🙂
————–
Now it’s impossible to miss who lives here! 🙂 

Dekorerad fågelholkask –
Decorated birdhouse box

Decorated birdhouse box - by Craft & Creativity

Miniature dollhouse - by Craft & CreativityDen är söta fågelholken i trä har jag dekorerat på samma sätt som hushyllan i våras – d v s med tegelmönstrat decoupagepapper och självhäftande tyg och tygtejp som jag hade kvar sedan tidigare projekt.
————
I decorated this cute little birdhouse box much in the same way as as the house shelf last spring – that is, with some tile patterned decoupage paper and self-adhesive fabric and fabric tape that I had left over from previous projects.  

Decorated birdhouse box - by Craft & Creativity

Först målade jag insidan av asken och pinnen med vit färg från Martha Stewart Crafts. Färgen torkar snabbt. Med hjälp av decoupagelack täckte jag taket och takets kanter med decoupagepapper och lackade även ytan ett varv med samma lack. Sedan klippte jag till bitar och remsor av det självhäftande tyget och täckte utsidan av fågelholken plus botten.
————-
First I painted the inside of the box and the stick with white paint from Martha Stewart Crafts. The paint dries quickly. Using decoupage lacquer I then covered the roof and the roof edges with decoupage paper and added a layer of lacquer on top. I cut pieces of the self-adhesive fabric and covered the outside of the birdhouse and the bottom plate. 

Decorated birdhouse box - by Craft & Creativity

I asken kan man lägga småpengar eller förvara smycken. I bakgrunden står mitt smyckesträd som jag dekorerade med decoupagepapper för några månader sedan.
———–
You can put pennies or store jewelry in the box. In the background is the jewelry tree that I decorated a few months ago

Klistermärken av kraftpapper –
DIY Craft paper stickers

Craft paper stickers - by Craft & Creativity

Jag tänkte visa ännu ett enkelt projekt med min inlånade Silhouette Cameon (ej sponsrat inlägg). Här har jag använt självhäftande kraftpapper från Silhouette och skurit ut fåglarklistermärken med skärmaskinen. Fåglarna har jag sedan använt för att dekorera kort med. Enkelt men effektfullt. Motivet med fågeln har jag laddat ner från Silhouette Online Store (ID #27480). Du kan även göra egna motiv i Silhouette Studio (går att ladda ner gratis för den som vill testa) eller importera bildfiler (jpg, png, bmp, gif eller tif) och lägga till egna skärmärken.
————
I thought I’d show you another quick and simple project with my borrowed Silhouette Cameo (I’m not sponsored). Here I’ve used adhesive kraft paper from Silhouette and cut out bird stickers with the cutting machine. The birds I then used to decorate cards. Simple but effective. I downloaded the bird design from Silhouette Online Store (ID #27480). You can also make your own designs in Silhouette Studio (free download here) or import image files (jpg, png, bmp, gif or tif) and add custom cut marks. 

Craft paper stickers - by Craft & Creativity

  1. Du behöver: En skärmaskin (t ex Silhouette Cameo eller Silhouette Portrait), självhäftande kraftpapper och en skärmatta (ingår när du köper skärmaskinen). Korten jag använde är kvadratiska brevkort och kuvert med lite struktur.
  2. Gör så här: Öppna Silhouette Studio. Ställ in rätt pappersstorlek under Page Settings. För självhäftande kraftpapper från Silhouette heter storleken Letter 8,5×11 in. Placera ut ditt motiv på skärmen, duplicera och storleksförändra om du vill.
  3. Placera kraftpappret på skärmattan och mata in skärmattan i din Silhouette Cameo/Portait.
  4. Under Cut Settings väljer du Material Type: Kraft Paper. För att se inställningarna för valt papper dubbeklickar du på Kraft Paper. Dessa ändras automatiskt när du väljer papper men kniven får du justera själv i maskinen (i detta fall vrider du den till 3).
  5. Klicka på “Cut”.
  6. Mata ut kraftpappret. Nu kan du ta loss klistermärkena från skyddspappret. Om alla inställningar är rätt så skär maskinen i kraftpappret men inte igenom skyddspappret på baksidan, se mina bilder ovan. Använd klistermärkena för att dekorera kort, paket, askar eller anteckningsböcker t ex.

—————-

  1. You will need: A cutting machine (for example Silhouette Cameo or Silhouette Portrait), adhesive kraft paper and a cutting mat (included when you buy the cutting machine). The cards I used are blank letter cards and envelopes with a hammer finish.  
  2. Do like this: Open Silhouette Studio. Go to Page Settings and select the correct paper size. Adhesive kraft paper from Silhouette is 8.5×11 in. Place your design on the screen, duplicate and resize if you want. 
  3. Place the kraft paper on the cutting mat and feed it into your Silhouette Cameo/Portrait. 
  4. Go to Cut Settings and select Material Type: Kraft Paper. To view the settings, double-klick on the text Kraft Paper. Note how the blade (Silhouette Ratchet Blade) should be set and turn the blade in the cutting machine to match the same number.
  5. Click “Cut”.
  6. Eject the cutting mat and remove the kraft paper from the cutting mat. Peel the stickers from the backing paper. If all settings are correct, the cutting machine has cut the kraft paper but nog through the backing paper, as shown in my pictures above. Use the stickers to decorate cards, gifts, boxes or notebooks for example. 

Gammal bok blir presentpåsar –
Turn old book into gift bags

Old book turned into gift bags - by Craft & Creativity

Ett av mina mest lästa och mest kommenterade blogginlägg sedan starten hösten 2011 handlar om hur man viker egna kalaspåsar. Fler än jag verka tycka att det är roligare och mer prisvärt att göra egna påsar istället för att köpa färdiga. Det var just denna teknik jag använde när jag vek dessa presentpåsar av ett gammalt loppisfyndat lexikon. Klicka här för att läsa vik-beskrivningen.
————-
One of my most read and most commented blog posts since I started blogging in 2011 is a tutorial on how to fold your own party bags. It seems like I’m not the only one who think it’s more fun and more affordable to make your own bags instead of buying ready-made. I used the same technique when folding these gift bags out of an old dictionary found at the flea market. Please click here for the tutorial. 

Old book turned into gift bags - by Craft & Creativity

För att piffa upp påsarna lite extra stämplade jag på boksidorna med silikonstämplar/clear stamps på akrylblock och en svart stämpeldyna. Jag rekommenderar att stämpla först och vika sedan. Stämplarna känner ni kanske igen sedan tidigare, då jag använt dem för andra pyssel:
Stamped gift wrapping paper - by Craft & Creativity       shrinkplastic2       Stamped gift tags - by Craft & Creativity
For decoration I stamped the book pages with silicon stamps on acrylic blocks and a black ink pad. I recommend you stamp the paper before folding. You may recognize the stamps from before, I used them for several other craft projects. 

Old book turned into gift bags - by Craft & Creativity

För att försegla påsarna vek jag ner kanten och klämde dit miniklädnypor (25 mm). Med en av påsarna gjorde jag två hål upptill med en håltång (hålslag fungerar också), trädde igenom ett satinband och knöt en rosett. När man tejpar ihop påsen kan man antingen använda vanlig klar tejp eller mönstrad washitejp.
—————
To seal the bags I folded the top and pinned it down with a small clothes pin (25 mm). With one of the bags I used a punch to make two holes at the top, threaded a satin ribbon and tied a bow. When taping the gift bag you can either use regular clear tape or patterned washi tape. 

Old book turned into gift bags - by Craft & Creativity

Storleken på påsarna beror förstås på storleken på boksidorna. Mina blev ganska små men skulle kunna fyllas med ett presentkort, ett smycke eller något annat litet. Hos bloggen Vintage with Laces kan ni se fler exempel på fina saker man kan göra med gamla böcker. Ta t ex en titt på Julias julgran tillverkad av bokryggar. Hon har också stämplat på boksidor och gjort påsar men hon valde att sy ihop sina påsar. Jättefint! Det var därifrån jag fick min inspiration.
———–
The size on the bags depends on the size of your book papers. Mine are quite small but could be filled with a gift card, a piece of jewelry or other small gifts. On the blog Vintage with Laces you can see more examples of pretty things you can make with old books. Take for example Juilas Christmas tree made of book spines. She has also stamped on book pages and made gift bags but she chose to sew them togheter. Very pretty! It was from her blog I got the inspiration for my bags. 

Kalasaskar med djurmotiv –
Animal party boxes

Animal Party Boxes - by Craft & Creativity

På 7-åringens kalas i somras fick barnen var sin djurask med godis med sig hem. Askarna är tillverkade av Bazzill-kartong (cardstock) med canvasstruktur och utskurna med en inlånad Silhouette Cameo (jag är inte sponsrad). Äldsta dottern ansvarade för fiskdammen och nöp fast askarna med en klädnypa som fick fungera som fiskekrok. När det nappade så barnen fiska upp var sin ask men även diverse sockor, slipsar och annat smått och gott vilket framkallade fnitter och skratt.
———
At one of this summer’s birthday parties, the kids got a treat each in the form of animal boxes filled with candy to bring home. The boxes are made of Bazzill card stock and cut with a borrowed Silhouette Cameo (I’m not sponsored). My oldest daughter was responsible for the fishing game and pinched the boxes with a clothes pin that worked as a fishing hook. Apart from candy boxes we also had socks, ties and other small stuff as bate… which made the kids giggle. 

Animal Party Boxes - by Craft & Creativity

Vi fyllde askarna med lite godis och en ballong men askarna skulle även kunna användas som presentaskar för små gåvor. Färdigmonterade är de 9 cm breda, 5,5 cm djupa och 10 cm höga. Jag laddade ner djurmallarna från Silhouette Online Store där de kostade $0.99 = ca 7 kr/st. Mallarna går att använda hur många gånger som helst.
———
We filled the boxes with candy and balloons but the boxes might as well be used as gift boxes for small gifts. Assembled they measure 9 cm wide, 5,5 cm deep and 10 cm high (3.5″x2.2″x3.9″). I downloaded the animal box templates from Silhouette Online Store where they cost $0.99 each. The templates can be used as many times as you like. 

Animal Party Boxes - by Craft & Creativity

Ovan ser du hur mallen ser ut med alla delar för att bygga hundasken och hur delarna ser ut när de är utskurna, respektive monterade.

  • Du behöver: Silhouette Cameo skärmaskin.
  • Skärmatta (ingår när du köper skärmaskinen).
  • Askmallar från Silhouette Online Store (eller rita egna i Silhouette Studio). En värdecheck på $10 ingår när du köper en ny maskin.
  • Bazzill-kartong 30,5×30,5 cm i olika färger (eller annan kartong).
  • Limstift och ev dubbelhäftande tejp.
  • 3D-kuddar för montering av tassar och huvud (eller dubbelhäftande tejp).
  • Silhouette spakel (förenklar men är inget måste).

———
Above you can see what the template looks like with all the parts to build a dog box and how the parts look when cut and fitted. 

  • You will need: Silhouette Cameo cutting machine. 
  • Cutting mat (included when you buy the cutting machine). 
  • Box design from Silhouette Online Store (or draw your own boxes in Silhouette Studio). A $10 gift card is included when you buy a new machine. 
  • Bazzill card stock 12″x12″ in different colors (or cardstock of other brand).
  • Glue stick and/or dubble-sided tape.
  • 3D foam pads for mounting the paws and head (or double-sided tape).
  • Silhouette spatula (simplifies but is not a must).

Animal Party Boxes - by Craft & Creativity

Eftersom jag skulle göra flera olika djuraskar samlade jag alla delar som skulle vara svarta på ett ark (se ovan) och skar ut dem först. Sedan fortsatte jag med alla bruna delar, alla vita delar o s v. Använd en skärmatta när du skär ut kartongen i skärmaskinen. När motiven är utskurna är det enklast att först ta bort pappret runt om och sist lossa själva delarna från skärmattan (som är lite klibbig). Ett bra hjälpverktyg för att göra detta är en spakel från Silhouette.
—————
Since I was making several different animal party boxes I collected all the parts for the black card stock on one sheet (as shown above) and cut them first. I then continued with the all the brown parts, all white parts etc. Use a cutting mat when cutting the card stock in the cutting machine. After cutting the parts, first remove the paper around the parts and save the actual parts for last. Peel the parts from the cutting mat last. The cutting mat is a bit sticky and a great tool for doing this is a Silhouette spakula. 

Animal Party Boxes - by Craft & Creativity

Tips: I Silhouette Studio finns ett utrymme runt själva dokumentet där man kan placera och samla objekt som inte ska skrivas ut på en gång.
——–
Tip: In Silhouette Studio there is space around the actual document where you can collect and place items that you want to save and print later. 

Animal Party Boxes - by Craft & Creativity

Gå in på Page Settings och välj Page Size: 12″x12″ och Cutting Mat: Cameo 12×12 in. Gå in på Cut Settings och välj Material Type: Cardstock. Dubbelklicka på Cardstock för att få upp alla inställningar och se hur du ska ställa in knivbladet, i detta fall använde jag storlek 4. Knivens inställning kan behöva justeras beroende på hur ny din kniv är. Jag rekommenderar att göra en “Test Cut” för att säkerställa att kniven skär igenom kartongen ordentligt utan att göra för djupa märken i skärmattan.
————
Go to Page Settings and choose Page Size: 12″x12″ and Cutting Mat: Cameo 12×12 in. Go to Cut Settings and choose Material Type: Cardstock. Double click on the word Cardstock to view all settings and how the blade is to be set. In this case I set the ratchet blade to 4. The blade settings may need to be adjusted depending on how new and sharp your blade is. I recommend doing a “Test Cut” to ensure that the knife cuts through the cardboard properly, but without making too deep marks in the cutting mat. 

Animal Party Boxes - by Craft & Creativity

När alla delar är utskurna är det dags att montera. Börja med asken och vik ihop den längst med alla linjer som har små hål för bigning. Tejpa ihop längst med ena långsidan, använd dubbelhäftande tejp eller limma med limstift. Limma fast framsida, baksida och sidor på asken. Limma ihop alla smådelar till huvud och tassar. Fäst huvud och tassar på framsidan av asken. Här använde jag dubbelhäftande 3D-kuddar för att skapa en 3D-effekt. Fyll med godis, nyttigheter eller en present!
———–
When all parts have been cut, it’s time to assemble everything. Start with the box and fold it along the dotted creasing lines. Tape the box together along one of the sides, using double-sided tape or a glue stick. Glue the front, back and sides to box. Glue together all small parts of the head and paws. Attach the head and feet to the front of the box. I used 3D foam pads to create a 3D effect. Fill the box with candy, healthy snacks or a gift! 

Animal Party Boxes - by Craft & Creativity

I Silhouette Online Store finns hundratals söta askar att ladda ner. Jag sökte på “Cute box” för att hitta mina. Motiven laddas ner via Silhoutte Studio men då behöver man först installera programmet. Det går att ladda ner gratis, för den som vill testa programmet innan eventuellt köp av själva skärmaskinen.
———-
There are hundreds of cute boxes to be downloaded in Silhouette Online Store. I searched for “Cute box” to find mine. The designs are downloaded via Silhouette Studio, but you have to download the program first. It can be downloaded for free, for those of you who want to try it out prior to buying the actual cutting machine. 

Pysselkalas, del 2 – Craft party, part 2

Craft Party ideas - by Craft & Creativity

Förutom att göra Foam clay monster på sommarens pysselkalas så fick barnen måla och dekorera var sin träram.
———-
In addition to making Foam Clay monsters at this summer’s craft parties the kids were able to paint and decorate wooden frames. 

Craft Party ideas - by Craft & Creativity

Barnen använde satinfärger från Martha Stewart Crafts® och Plus color hobbyfärg. Båda varianterna är snabbtorkande, giftfria och vattenbaserade. Ramarna dekorerades med knappar och filtblommor som limmades fast med limpistol. Jag hjälpte 7-åringarna med limpistolen men 10-åringarna klarade det galant själva.
———
The kids used satin paint from Martha Stewart Crafts® and Plus color craft paint. Both are fast-drying, non-toxic and water based. The frames were then decorated with buttons and felt flowers that were glued in place with a glue gun. I helped the 7-year-olds with the glue gun, but the 10-year-olds could handle the hot glue them selves. 

Pysselkalas, del 1 – Craft party, part 1

Craft Party ideas - by Craft & Creativity

I sommar har vi haft två roliga pysselkalas för våra tjejer som fyllt år. En av aktiviteterna var att täcka tygfigurer med Foam Clay. Det här var det absolut populäraste pysslet, både bland 7- och 10-åringarna! Många gjorde olika bak- & framsida på sina gubbar som ni ser på den lila/gröna figuren ovanför. Det gröna monstret har min äldsta dotter gjort och den kan man vända upp- och ned och då får den vita ögon istället för röda 🙂
————–
This summer we held two fun craft parties to celebrate our daughters’ birthdays. One of the activities was to cover fabric figures in fun shapes with Foam Clay. This was by far the most popular craft among both the 7 and 10 year olds! Many of them made different fronts and backs, like with the purple/green one in the picture above. My oldest daughter made the green one and you can turn it upside it down and get white eyes instead of red ones. 🙂

Craft Party ideas - by Craft & Creativity

Här ser ni hur figurerna ser ut innan och efter att man har täckt dem med lera. Foam Clay är en skumliknande, lättviktig och självhärdande lera som lufttorkar på ca 24 timmar. Leran är giftfri, CE-märkt, den klibbar inte och man kan jobba med den utan underlägg på bordet. Den är perfekt till att täcka föremål av tyg, trä och papper men man kan även göra egna figurer med Foam Clay och med den slätare varianten som heter Silk Clay (som vi visat förut).
————–
Here you can see how the figures look before and after they where covered with clay. Foam Clay is a foam-like, lightweight and self-hardening clay that air dries in about 24 hours. The clay is non-toxic and non-sticky. It’s perfect to cover fabric, wood and paper objects with, but you can also make your own clay creations with Foam clay and with the smoother version called Silk Clay (as we’ve shown before). 

Craft Party ideas - by Craft & Creativity

Den övre åtta monstren har 10-åringarna gjort (“-Nej, de är inte sura”, förklarade min dotter för mig, “De har mustasch!”) och de undre åtta har 7-åringarna skapat. Helt underbara varenda en, tycker jag!
————
The top eight monsters above where made by the 10-year-olds (“-No, they’re not unhappy”, my daughter explained to me “-They have a mustache!”) and the lower eight where created by the 7-year-olds. I think that they are absolutely lovely, every single one!

Craft Party ideas - by Craft & Creativity

Craft Party ideas - by Craft & Creativity

Foam clay fäster enkelt på tyget utan att man behöver lim och det går att blanda färgerna sinsemellan. Det blir fint att använda plastpärlor till ögon (ingår i förpackningen) men de sitter bättre om man gör ögonlock som håller pärlorna på plats. Fäster man en o-ring och karbinhake i öglan på tygfiguren så kan barnen fästa sin skapelse på t ex skolväskan.
——–
Foam clay sticks easily to fabric without the need of glue and you can mix the colors if you like. You can use plastic beads for eyes (included in the kit) but they stick better if you make eyelids to hold the beads in place. Add a jump ring and a clasp to the loop and the kids can hang their monsters on their school bags for example. 

Craft Party ideas - by Craft & Creativity

Självklart kunde jag inte hålla mig ifrån att göra en egen figur men min blev kanske inte så monsterliknande…
——-
Needless to say, I couldn’t keep myself from making one of my own, but mine didn’t turn out so monster like…

Söta muffinskragar –
Cute cupcake liners

Cute cupcake liners - by Craft & Creativity

När jag gjorde mina popcornstrutar av papper härom veckan så fick jag även idén att göra muffinskragar/muffinsformar med samma stans – en Circle Border Punch från Martha Stewart Crafts®. Muffinskragarna är bara tänkta till dekoration och inte till att grädda muffinsen i. Det är en fint sätt att piffa till köpesmuffins eller om man bakar själv och använder vanliga vita formar. Då kan man ta bort dem efter gräddning och istället placera muffinsen i kragarna för en vacker servering, t ex på ett kalas, bröllop eller dop.
———–
When making paper popcorn cones the other week I got the idea to also make cupcake liners with the same punch – a Circle Border Punch from Martha Stewart Crafts®. The cupcake liners are only meant for decoration and not for baking. This is a nice way to garnish ready-made cupcakes or if you bake yourself and use ordinary white cupcake liners. Then you can remove the plain ones after baking and replace them with these cute homemade cupcake liners for a pretty serving at a party, wedding or baby shower for example. 

Cute cupcake liners - by Craft & Creativity

  1. Du behöver: En Circle Border Punch, fina papper (tjocklek ca 180-190 g/m²), tejp (dubbelhäftande eller vanlig) och en sax.
  2. Gör så här: Stansen passar för papper som är mellan 15,5×15,5 till 30,5×30,5 cm (6″x6″ till 12″x12″) och den kan göra sju olika storlekar på cirklar. Till muffinskragarna gjorde jag den minsta storleken (15 cm i diameter) och då krävs ett papper som är minst 15,5×15,5 cm. Är pappret större behöver du inte trimma det innan du stansar utan stansen gör hela jobbet själv. Ratta enkelt in vilken storlek du ha, placera pappret under det magnetiska roterande handtaget och börja stansa. För varje båge vrider du handtaget ett snäpp och stansar igen. Beskrivning medföljer även i förpackningen.
  3. När du är klar klipper du bort en cirkel i mitten av pappret, måttet beror lite på storleken på dina muffins. Diametern på cirkeln jag klippte bort är 7 cm i diameter. Måtta t ex med ett glas eller en passare. Experimentera gärna med vanligt skrivarpapper för att få till exakt den form som passar dina muffins.
  4. Klipp bort 4 st “bågar” som på bilden.
  5. Låt 1 st “båge” överlappa när du tejpar ihop kragen.
  6. Upprepa steg 2-5 för att göra fler muffinskragar. Nu kan du servera dina muffins.

—–

  1. You will need: A Circle Border Punch, pretty paper or cardstock (weight approx 180-190 g/m²), tape (double-sided or regular) and a pair of scissors. 
  2. Do like this: The punch is adapted for paper between 15,5×15,5 cm till 30,5×30,5 cm (6″x6″ to 12″x12″) and it can make seven different sizes of circles. For my cupcake liners I made the smallest size (15 cm in diameter) and that required a paper that is at least 15,5×15,5 cm. If the paper is bigger, you don’t need to trim before punching since the punch does all the work. Set the punch to the size you want, place the paper under the magnetic rotating handle and start punching. For each arc, turn the handle one snap and punch again. Instructions are also included in the start kit. 
  3. When finished, cut a circle in the middle of the paper, the measurements depends on the size of your cupcake. The diameter of the circle I cut is 7 cm (2.8″). Use a glass or a caliper to make a round circle. Experiment with plain printer paper to get the exact shape to fit your cupcake. 
  4. Cut and remove four of the arches, as shown in the picture. 
  5. Let one arch overlap when taping together your cupcake liner. 
  6. Repeat steps 2-5 to make additional cupcake liners. Now you can serve your cupcakes. 

Cute cupcake liners - by Craft & Creativity

Faten kommer från Cath Kidston och är inköpta i London men märket säljs även i vissa inredningsbutiker i Sverige. På torsdag flyger jag, min dotter och min mamma till London och firar dottern som fyller 10 år. Förutom ett obligatoriskt besök i en Cath Kidston-butik så kommer vi besöka Harry Potter Warner Bros Studio och en ta en tur upp i London Eye (för de av oss som inte är höjdrädda, d v s jag kommer stå på marken). 😉 Det blir även en del pysselspaning och jag kommer säkert lägga upp bilder från resan på Instagram.
———–
My plates are from Cath Kidston and I bought them in London but the brand is also at different retailers. On Thursday I’m flying off to London with my daughter and my mother, to celebrate my daughters 10th birthday. Besides an obligatory visit to a Cath Kidston store, we will take a tour at Harry Potter Warner Bros Studio and take a ride on London Eye (for those of us not afraid of heights, i e I will be standing safely on the ground). 😉 I’m also looking forward to scouting for new craft supplies and probably post some pictures from the trip on Instagram

Cute cupcake liners - by Craft & Creativity

Måla på metall – Painting on metal

Painting on metal - by Craft & Creativity

På skrivbordet i mitt pysselrum har jag en brevhållare av metall som jag köpt på Ikea (egentligen är det en servetthållare). Jag köpte den eftersom jag tyckte att den matchade fint med rosmönstret på min håltavla. Eftersom jag gillar färg så valde jag att måla brevhållaren med samma färger som jag använde när jag målade rosen.
————-
On the desk in my craft room I have a metal letter holder (or actually a napkin holder) that I bought at Ikea a while back because I thought it would look nice together with my rose patterned pegboard. I wanted to add some color to the letter holder and decided to use the same paint that I used to paint the rose. 

Painting on metal - by Craft & Creativity

Jag tvättade först brevhållaren med tvål och vatten. Enligt instruktionerna ska man torka av ytan med lite vitvinsvinäger på en trasa men det gjorde inte jag. I detta fall fäste färgen utmärkt ändå. Jag använde nyanserna Pink Carnation, Camellia Pink, Scallion och Green Curry. När färgen torkat så skrapade jag fram mönster i de gröna bladen och i rosen med en nål.
———–
I began by washing the letter holder with soap and water. According to the instructions you can wipe the surface with a cloth soaked in white vinegar before painting, but I didn’t. In this case the paint still sticks very well. I used the shades called Pink Carnation, Camellia Pink, Scallion and Green Curry. Once the paint dried, I used a needle to scrape patterns in the green leaves and the rose. 

Painting on metal - by Craft & Creativity

How I built and painted my pegboard - by Craft & CreativityFör att läsa mer om hur jag byggde och målade min håltavla så klicka på bilden här till vänster eller använd denna länk.
————
To learn more about how I built and painted my pegboard, please click on the picture to the left or use this link.