Smyckesträd – Jewelry tree

Jewelry tree - by Craft & Creativity

Jewelry tree - by Craft & Creativity

  1. Du behöver: Dekorationsträd i trä, ett ark decoupagepapper eller en mönstrad servett, decoupagelack, pensel, hobbykniv/skalpell och hobbyfärg ifall du vill måla trädet först.
  2. Gör så här: Jag ville ha en vit baksida och vita kanter på mitt träd och därför valde jag att börja med att måla trädet med en vit hobbyfärg. Färgen torkar på en halvtimme.
  3. Nästa steg var att pensla decoupagelack på framsidan av trädet och placera decoupagepappret ovanpå. Jag borstade försiktigt med penseln för att släta ut pappret. Täck även den lilla foten som ska sitta som stöd längst ner på trädet och eventuellt baksidan av trädet, om du så önskar.
  4. Efter ca 1 tim när lacket torkat tog jag min hobbykniv/skalpell och skar papperet längst med kanterna på trädet.
  5. För extra hållbarhet förseglade jag ytan med ett lager decoupagelack.
  6. När lacken torkat kilade jag fast det lilla stödet som gör att trädet kan stå upp.

——

  1. You will need: A wooden decoration tree, decoupage paper or a patterned napkin, decoupage lacquer, a paint brush, a hobby knife and hobby paint if you want to paint the tree first. 
  2. How-to: I wanted the back and the sides of the tree to be white and started by painting the tree with white hobby paint. The paint dries in half an hour. 
  3. The next step was to brush decoupage lacquer on the front of the tree and place the decoupage paper on top. I stroked the paper gently with a brush to smooth out any wrinkles. Remember to also cover the foot of the tree, which will be used as support. If you like you can also cover the back of the tree. 
  4. After about 1 h, when the lacquer had dried, I took my hobby knife and cut the paper along the edges of the tree. 
  5. I sealed the surface with a coat of decoupage lacquer, for extra durability. 
  6. When dry I attached the foot to the tree that enables the tree to stand on is own.

Jewelry tree - by Craft & Creativity

Trädet är 22 cm högt och står stabilt men är tunt och väger väldigt lite och tål därför inte alltför mycket tyngd. Men det fungerar perfekt till när man vill hänga av sig dagens smycken och som ren prydnad förstås. Eller som en fiffig följare på Instagram tipsade om – man skulle kunna borra små hål i det och fylla det med örhängen.
—————–
My tree is 22 cm (8.7″) high and is stable but it’s thin, low-weight and can therefor not stand too much weight. But it works perfect in the evening when you want somewhere to hang today’s jewelry or as pure decoration of course. Or as a creative follower on Instagram wrote – you could drill small holes in it and fill it with earrings. 

Jewelry tree - by Craft & Creativity

Bokstav med pompoms –
Pom pom letter

Pom pom letter - by Craft & Creativity

Bokstäver i papier-maché är roliga att dekorera på olika sätt och här har jag testat täcka ett H med pompombollar. En pompom-pyntad bokstav skulle t ex kunna vara fin i ett barnrum. Min hamnade på väggen i mitt pysselrum. H som i Helena. 😉
———-
Papier-maché letters are fun to decorate and here I’ve covered a H with fluffy pom-poms. A pom-pom decorated letter would for example look nice in a nursery. Mine ended up on the wall in my craft room. H as in Helena. 😉 

Pom pom letter - by Craft & Creativity

Eftersom jag pysslade ihop detta en sen och mörk kväll blev det inga steg-för-steg bilder denna gång men tillvägagångssättet är enkelt. Limma pompom-bollar på en bokstav av papier-maché och fördela färger och storlekar som du själv tycker blir fint. Med en limpistol torkar limmet extremt fort – men limmet är varmt så akta fingrarna!
———
Since I made this late in the evening when it was dark, I didn’t take any step-by-step pictures, but they way to go by this is simple. Glue pom-poms on a papier-maché letter and mix sizes and colors randomly or as you prefer. If you use a glue gun the glue dries very quickly – but the glue is hot so watch your fingers! 

Pom pom letter - by Craft & Creativity

Jag valde pastellfärgade pompoms och det gick åt ca 1/2 förpackning för att täcka framsidan av mitt H. Man kan förstås täcka kanterna med pompoms också och få en ännu “bulligare” bokstav men jag valde att måla istället. Så här i efterhand borde jag målat först och limmat på pompoms efteråt, men det blev helt ok resultat ändå.
————-
I chose pastel colored pom-poms and I used up about 50 pom-poms to cover the front of my H. You can certainly cover the sides as well to make it even more fluffier, but I chose paint instead. In retrospect, I should have painted first and then attached the pom-poms, but the result turned out ok anyway.  

Pom pom letter - by Craft & Creativity

För mer inspiration på bokstäver täckta med pompoms, besök gärna Aunt Peaches, Cutest Baby Showers och Along Abbey Road. Missa heller inte Mr Printables garnbollar med bokstäver, de är så fina!
———-
For more inspiration on pom-pom covered letters, please pay a visit to Aunt Peaches, Cutest Baby Showers and Along Abbey Road. And while your at it, take a look at Mr Printables alphabet pompoms – they’re fantastic! 

Handmålat kakfat –
Hand painted cake stand

Hand painted cake stand - by Craft & Creativity

När vi hade vår senaste pysselträff hemma hos Pysselbolaget gjorde vi också egna kakfat. Jag målade mitt kakfat med porslinspennor. Kika in hos Karin & Freja för att se deras fina fat och hur de gick tillväga när de skapade dem. Efter att ha borrat hålen började jag måla på fri hand och hittade på mönstret allteftersom. Den här gången valde jag glas- och porslinspennor i två olika blåa nyanser eftersom jag ville efterlikna gammeldags porslin. Porslinsfärgen lät jag torka i 4 tim och härda i ugnen i 90 min i 160°C för att tåla disk. Sedan skruvade jag ihop kakfatet, vilket går på ett kick. Jag fyllde fatet med presenter till en god vän som fyllde 40 år och slog in hela kakfatet i cellofan. Tyvärr glömde jag ta kort på inslagningen.
———–
At our latest craft meet over at Pysselbolaget we also made our own cake stands. I painted my plates with porcelain markers. Click your way over to Karin & Freja to see their lovely cake stands and how they went about making them. After drilling holes in the middle of the plates, I painting them free-hand and came up with the pattern as I went along. This time I chose two shades of blue because I wanted to to resemble old-fashion porcelain. I let my plates dry for 4 hours and cured them in the oven for 90 minutes at 160°C. I then put everything together, which only takes a few minutes. I filled the cake stand with gifts for a dear friend of mine who turned 40 and wrapped the whole cake stand in cellophane. Unfortunately I forgot to take pictures of the wrapping. 

Hand painted cake stand - by Craft & Creativity

Det roligaste med att göra egna kakfat tycker jag är att kombinera, mixa & matcha olika fat och du kan använda nytt porslin, fat som du har hemma eller som du fyndat på loppis. Att borra i porslin är enklare än man tror men du behöver en särskild porslins- eller kakelborr som du sätter i din vanliga borrmaskin. Freja 10 år borrade t ex sina tallrikar själv.
———–
The best thing about making your own cake stands, I think, is to combine, mix & match different plates and you can use new porcelain, plates you have at home or ones you found at the flea market. Drilling in China is easier then you might think. You need a porcelain drill that you use in your regular drilling machine. Freja 10 years drilled her plates by her own. 

Mina tidigare blogginlägg som handlar om kakfatstillverkning och porslinsmålning:/
My previous blog posts about cake stands and porcelain painting: 

Vinyl Record Cake Stand - by Craft & Creativity  Bygg ditt eget kakfat - Craft & Creativity  paintingporcelain1 Handpainted cup and saucer - by Craft & Creativity  Design your own mugs - by Craft & Creativity  decoratingvases3

Armband av gummiband –
Rubber band bracelets

Rubber band bracelets - by Craft & Creativity

I USA och i stora delar av Europa har dessa armband av gummiband blivit enormt populära. Ni kanske redan har sett dem här i Sverige. Det finns många olika märken på marknaden och de kallas bland annat för “Rainbow loom, “Fun loom” och “Wonder loom”. Jag och barnen har lärt oss några olika tekniker och vi tänkte börja med att visa er en enkel variant där man bara använder två pennor. Armbanden kan även skapas genom att använda t ex fingrarna, en sticklisa/påtdocka eller en stickring. Vi kan garantera att detta är ett jätteroligt pyssel och att det är svårt att sluta!
————-
Rubber bracelets like these have become very popular in the U.S. and in many parts of Europe. There are many brands on the market and they are a lot of names for them, for example Rainbow Loom, Fun Loom and Wonder Loom. Me and the kids have learned some different techniques and we thought we’d start by showing you a simple version, using only a pair of pencils. The bracelets can also be made on your fingers, a knitting spool, a board or a knitting loom. We can guarantee that this is a really fun craft that you can’t get enough of!

Rubber band bracelets - by Craft & Creativity

  1. Denna enkla men fina variant av gummibandsarmband kan som sagt tillverkas genom att använda två pennor. Det första gummibandet trär du i kors över de båda pennorna.
  2. Trä ytterligare två gummiband över pennorna (inte i kors från och med nu). Använd en virknål eller en krok (fingrarna går också men det är lite pilligare) och lyft det understa gummibandet över de andra två.
  3. Nu ska ditt projekt se ut så här.
  4. Trä ännu ett gummiband över pennorna och lyft det understa över de andra två.
  5. Nu ska ditt projekt se ut så här.
  6. Fortsätt på samma sätt och upprepa punkt nr 4 om och om igen tills armbandet är lagom långt att passa användarens handled. För att montera ihop armbandet krokar du fast början och slutet av armbandet på en o-ring eller en plastclips. Skillnaden på dessa två ser du längre ner.

—–

  1. This simple but pretty version of rubber bracelets can be made on two pencils. Place the first rubber band over your pencils, crossed in the shape of an 8. 
  2. Place two more rubber band over your pencils (not crossed from now on). Use a crochet needle or a hook and slip the bottom rubber band over the other two. 
  3. Now your project should look like this. 
  4. Place another rubber band over your pencils and slip the bottom one over the other two. 
  5. Now your project should look like this. 
  6. Continue in the same way and repeat step #4 over and over again, until your bracelet is long enough to fit around the wrist. To join the bracelet you need a jump ring or a plastic clip. The difference between these two will be visible a bit further down in this post.

För dig som gärna vill ha ytterligare vägledning har jag gjort en kort instruktionsfilm (min första!) som är 1 min och 30 sek lång.
———-
For those of you who would like further guidance, I have made a short video tutorial (my first!), which is 1 minute and 30 seconds long. 

Rubber band bracelets - by Craft & Creativity

Min yngsta dotter är 6 år och hon lärde sig detta på ett kick. Jag skulle tro att även en 5-åring enkelt fixar att göra egna armband. Barnen och deras vänner har gjort mängder med armband av gummiband senaste veckan och de har experimenterat med olika mönster och tekniker. De har till och med tagit upp beställningar från vänners syskon och föräldrar. 🙂
————-
My youngest daughter is 6 years old and she learned this in no time at all. I would think that even a 5-year-old could make these bracelets without any problems. The kids and their friends have made loads of rubber band bracelets and they’ve been experimenting with different patterns and techniques. They have even taken orders from  their friends’ siblings and parents. 🙂 

Rubber band bracelets - by Craft & Creativity

För att göra ett armband i denna fiskbensteknik går det åt ca 45-60 gummiband, beroende på längd på armband.
———-
To make this fishtail patterned bracelet you need about 45-60 rubber bands, depending on the length of the bracelet.

Rubber band bracelets - by Craft & Creativity

Här ser ni några andra tekniker som man kan använda för att göra armband av gummiband. A. Med påtdocka/sticklisa av plast som ingår i vårt pysselset tillsammans med instruktioner. B. På fingrarna och då kan man t ex använda samma fiskbensteknik som med pennorna. C. På pådocka/sticklisa av trä och här har vi använt en annan teknik där armbandet ser stickat ut. D. På en stickring och då kan man använda två eller fler piggar och bilda olika mönster. Barnen föredrar denna variant eftersom den är enkel att hålla i. Mer om dessa tekniker kommer dyka upp i framtida blogginlägg här på Craft & Creativity.
———-
Here you can see some other examples of techniques that you can use to make rubber brand bracelets. A. With a plastic knitting spool. B. On your fingers instead of on two pencils. C. On a wooden knitting spool and here we’ve used another technique which makes the bracelet look knitted. D. On a knitting loom where you can use two or more sticks to make different patterns. The kids prefer the knitting loom since it’s easy to hold while working. More about these different techniques will come up in future blog posts here at Craft & Creativity. 

Rubber band bracelets - by Craft & Creativity

Eftersom armbanden blir elastiska behövs inget lås men däremot något som fäster ihop armbandet. Vi har testat två olika sätt, här med o-ringar i metall. Trä slutet och början av armbandet på o-ringen och kläm ihop o-ringen med en tång. Våra o-ringar är 5 mm i diameter men det funkar även med mindre.
————
Since the bracelets are elastic there’s no need for a clasp, but you do need something to join the two ends. We tried two different ways, here using metal jump rings. Thread the beginning and the end of the bracelet on a jump ring and close it with a pair of pliers. We used 5 mm jump rings, but smaller ones work as well. 

Rubber band bracelets - by Craft & Creativity

Det andra alternativet är att använda dessa clips i plast som är speciella för gummibandsarmband. Man trär dem på armbandet på samma sätt som o-ringarna och eftersom man inte behöver inte klämma ihop dem är de enklare att använda för barn.
————
The other way is to use plastic clips that are special made for rubber band bracelets. You thread them the same way as you do with jump rings but since you don’t have to close them they are easier for children to use. 

Rubber band bracelets - by Craft & Creativity

Gyllene ask – Golden box

Golden box - by Craft & Creativity

Att dekorera askar är roligt och den här gången har jag täckt en rund ask av papier-maché med decoupagepapper och målat locket med guldfärg.
————
Decorating boxes is fun and this time I’ve covered a round papier-maché box with decoupage paper and painted the lid with metallic gold paint.

Golden box - by Craft & Creativity

För att få en mer exklusiv känsla täckte jag även insidan av asken med decoupagepapper och målade botten med samma guldfärg som locket.
———
To get an even more elegant look and feel I covered the inside with paper as well and painted the bottom with the same gold paint as used on the lid. 

Golden box - by Craft & Creativity

  1. Du behöver: Troféask, decoupagepapper, decoupagelack, metallicfärg, sax och en pensel.
  2. Gör så här: Börja med att måla locket. Jag målade ett lager med guldfärg. Färgen torkar på ca 1 timme.
  3. Klipp en remsa av ditt decoupagepapper (tjockare papper går också bra) som är lite högre än höjden på asken. Pensla decoupagelack på utsidan av asken svep papperet runt asken. Stryk det slätt med fingrarna eller borsta försiktigt med en pensel.
  4. Klipp jack i papperet som sticker upp och vik det över kanten till insidan av asken och fäst flikarna med decopagelack.
  5. Pensla decoupagelack på insidan av asken.
  6. Klipp ännu en remsa av decoupagepapper som är lika hög som insidan av asken och täck insidan med det. Pensla decoupagelack över hela asken. När det torkat kan du måla botten med färg om du vill.

———-

  1. You will need: A papier-maché box, decoupage paper, decoupage lacquer, metallic paint, a pair of scissors and a brush.
  2. Here’s how: Start by painting the outside of the box. I painted one coat of metallic gold paint. The paint dries in about 1 hour.
  3. Cut a strip of your decoupage paper (you can also use heavier paper) a bit wider than the height of the box. Brush decoupage lacquer on the outside of the box and wrap the paper around. Carefully smooth any wrinkles with your fingers or a brush.
  4. Cut notches in the excess paper and fold it over the edge to the inside of the box and glue the tabs down with decoupage lacquer.
  5. Brush decoupage lacquer on the inside of the box.
  6. Cut another strip of paper that is as high as the inside of the box and the cover inside with it. Apply a coat of decoupage lacquer on top of everything. When dried, you can paint the bottom of the box if you like.

Golden box - by Craft & Creativity

Min syhörna – My sewing space

My Sewing Space - by Craft & Creativity

Det är dags att visa lite mer från mitt nyinredda pysselrum och turen har kommit till min lilla syhörna. Där har jag äntligen fått till en plats där min symaskin kan stå framme hela tiden. Skrivbordet är ett loppisfyndat skrivbord som jag fått av min pappa och som han var snäll nog och slipade och snyggade till för att jag skulle kunna måla det. Jag satte hjul på skrivbordet för att dels få upp arbetshöjden och dels göra skrivbordet flyttbart. Mer om skrivbordet kommer lite längre ner i detta inlägg.
————
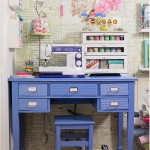
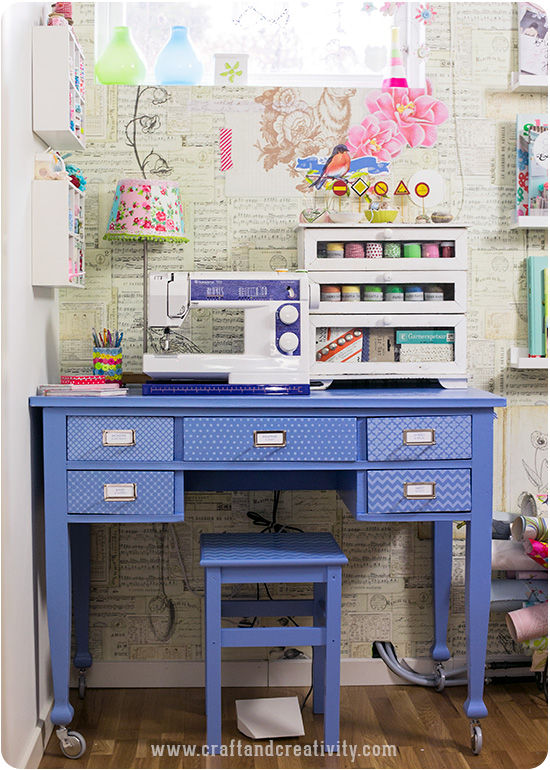
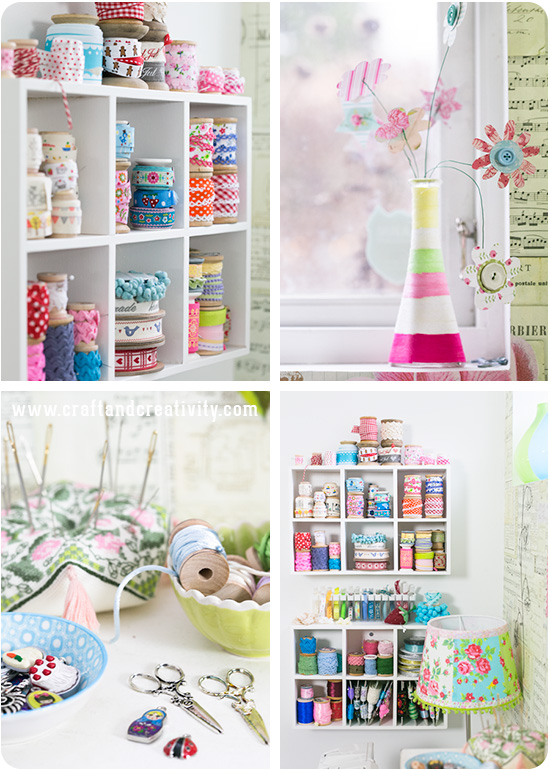
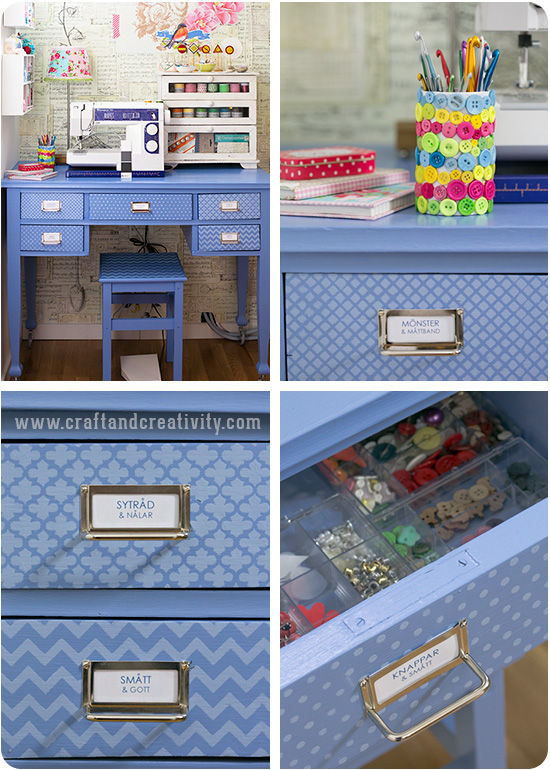
It’s time for me to show you a bit more from my newly decorated craft room and this time I thought I’d show you my sewing space. I finally have a place where my sewing machine can be displayed at all time and is easy to access. The desk is a flea market bargain, given to me by my dad who scraped, sanded and prepared it for my so that I could paint it. I put wheels on the legs to get a better working height and also make the desk portable. More information about the desk comes a bit further down in this post. 

My Sewing Space - by Craft & Creativity

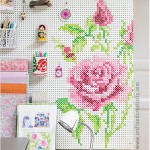
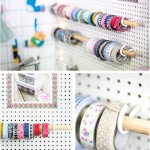
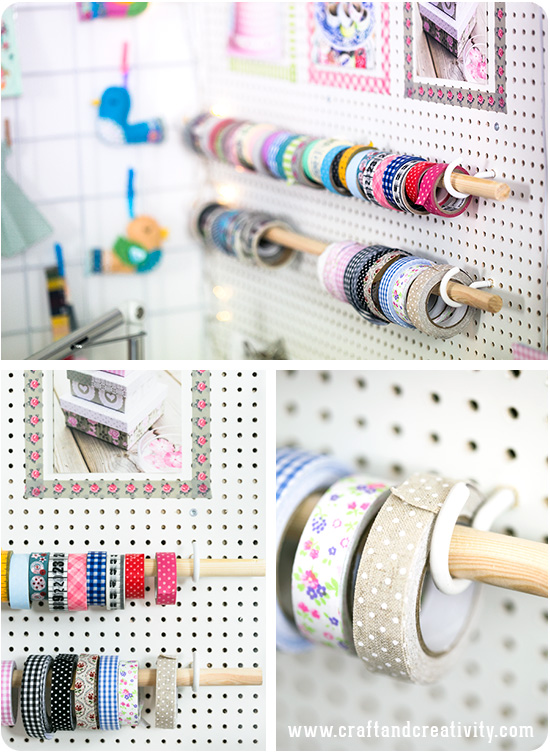
Jag har valt att förvara min samling av band i små hyllor som jag hängt upp på väggen. Ni skymtar även min tygklädda lampa som jag bloggade om för ett tag sedan och i fönstret syns en garnlindad glasflaska med pappersblommor som jag också gjort. När jag garnlindade flaskan använde jag decoupagelack för att fästa garnet – men dubbelhäftande tejp på ark eller på rulle funkar minst lika bra. För ett par veckor sedan använde den tekniken när jag garnlindade en kruka och visade steg-för-steg bilder på Instagram.
————
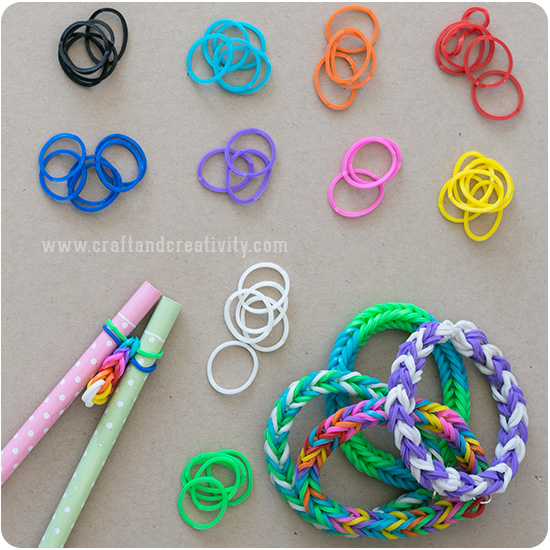
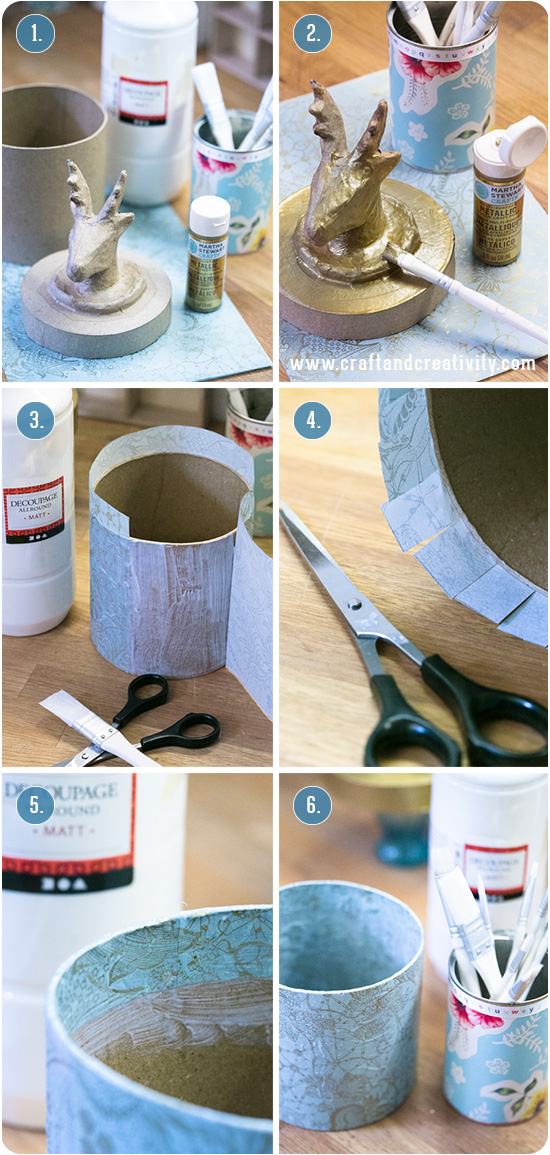
I have chosen to store my collection of trims and ribbons in small shelves on the wall. You can also see a glimpse of my fabric-covered lamp that I blogged about a while back and in the window appears a yarn-wrapped glass bottle with paper flowers that I also made. When I yarn-wrapped the bottle, I used decoupage glue to attach the yarn – but the adhesive tape on sheets or on roll works just as well. I used that technique when I yarn-wrapped a pot and demonstrated step-by-step photos on Instagram.

My Sewing Space - by Craft & Creativity

En del av mina band förvarar jag upprullade på trådrullar av trä och de smala banden är sorterade i Tic-Tac askar, en idé som jag snappade upp på en sida som heter Instructables.
———-
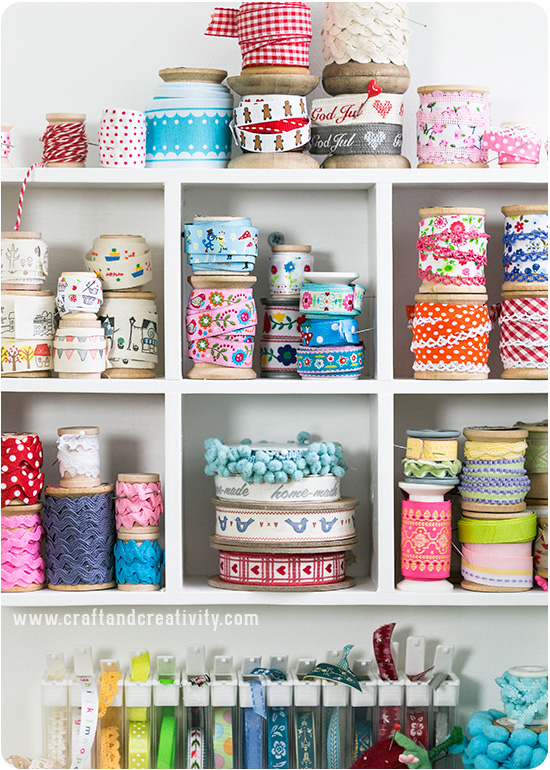
I store some of my ribbons and trims on wooden spools and the narrow ones are sorted in Tic-Tac containers, an idea I picked up at a site called Instructables.

Stencil Painted Sewing Table - by Craft & Creativity

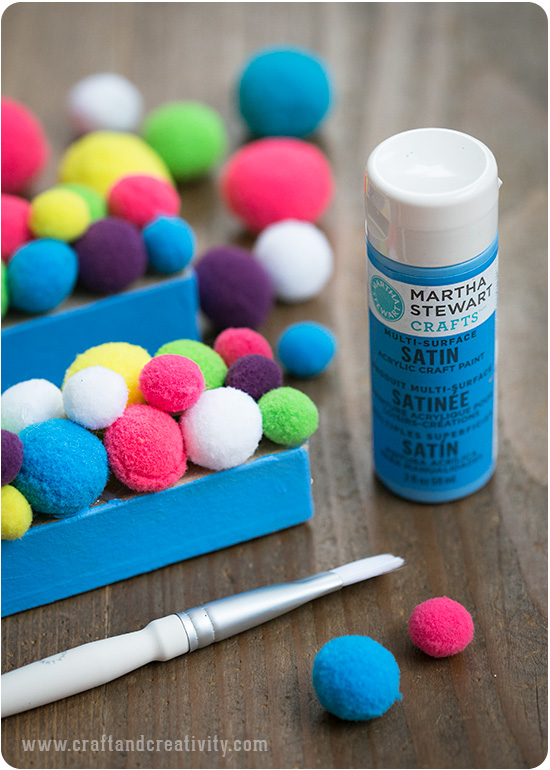
Åter till skrivbordet. På vår lokala färghandel tog jag hjälp av en duktig tjej som heter Emmelie med att plocka upp samma blå nyans som finns med på min fina tapet/väggbild (Feeling Papergood från Pip Studio). Jag började med att grunda skrivbordet och lådorna med en vit vattenburen grundfärg och penslade två lager med den blå färgen. Mellan varje lager lät jag färgen torka enligt angiven torktid. För att skapa mönster på lådfronterna använde jag tjocka pappersstenciler från Martha Stewart Crafts®. Jag ville ha mönstret i samma blåa färg men en nyans ljusare så jag blandade ut den blå snickerifärgen med vit färg av samma typ. Stencilerna placerade jag ovanpå lådfronterna och duttade dit färgen med en målarsvamp/skumtopp. Stencilerna går att använda fler gånger och de skulle vara roliga att testa på t ex tygväskor, som på produktbilden.
—————-
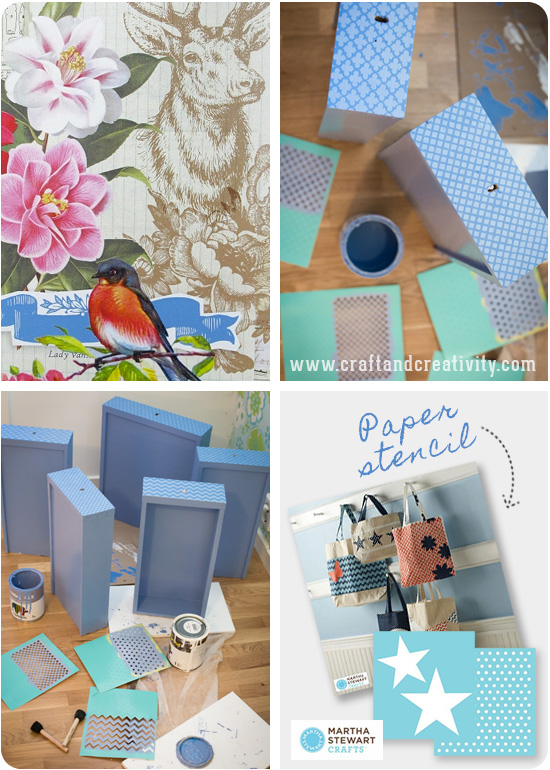
Back to my desk of drawers. At our local paint store, I got help to pick out the same shade of blue that appears on my pretty wallpaper (Feeling Papergood from Pip Studio). I began by priming the desk and drawers with a white water-based primer and added two layers of the blue paint. Between each layer I let the paint dry, according to the specified drying time on the paint cans. To create patterns on the drawer fronts, I used thick paper stencils from Martha Stewart Crafts®. I wanted the pattern in the same blue color but a shade lighter so I mixed blue paint with white paint of the same brand. After placing the stencils on top of the drawer fronts I applied paint with a foam pouncer. The stencils can be used many times and the would be fun to use on for example fabric totes, as shown on the product image. 

Stencil Painted Sewing Table - by Craft & Creativity

De fina bygelhandtagen med etiketthållare kommer från Byggfabriken där vi även köpt handtag till alla våra innerdörrar hemma. Jag skrev ut etiketter på datorn och satte i hållarna. Den lilla byrån som står ovanpå skrivbordet har jag köpt i inredningsbutiken Ambience en gång i tiden.
———-
The pretty handles with label holders comes from Byggfabriken, where we also bought handles for all the doors in our house. I printed the labels on my computer. The little chest of drawers on the top of the desk was bought a long time ago at a interior store in Stockholm, called Ambience. 

Button covered crochet hook holder - by Craft & Creativity

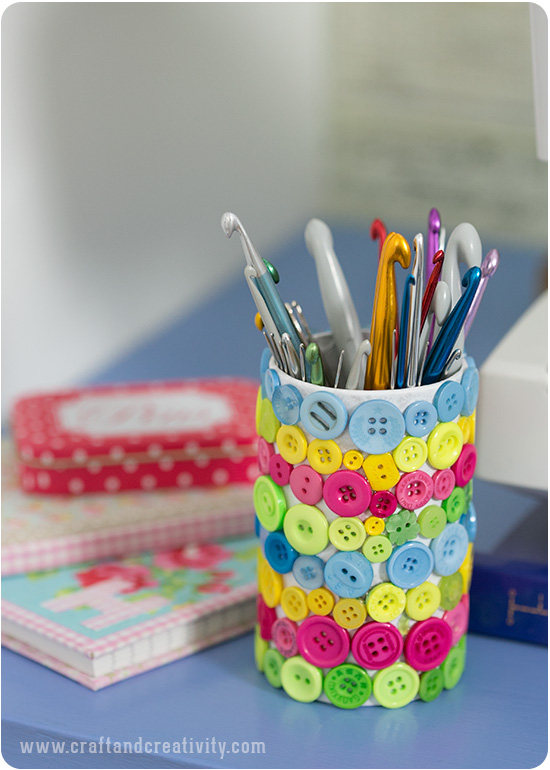
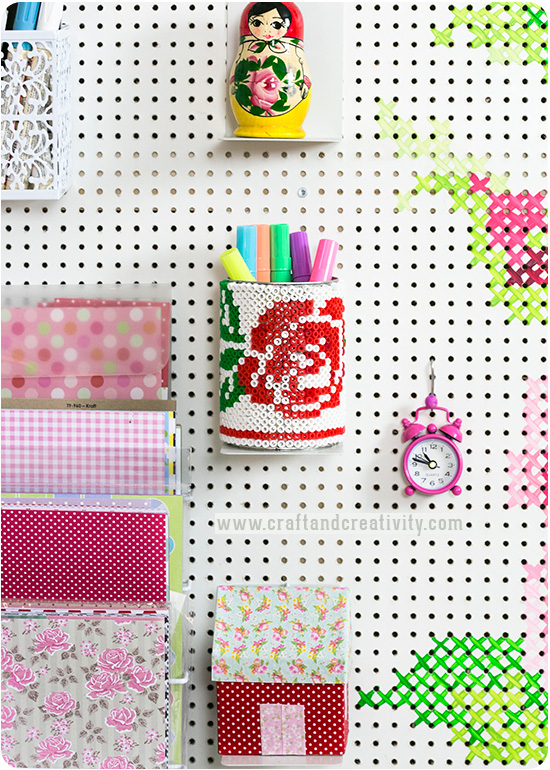
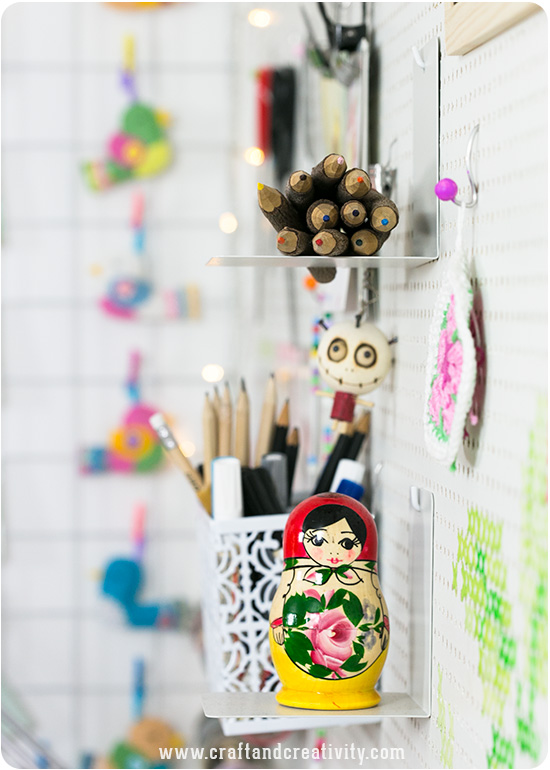
På skrivbordet passar min knapprydda virknålsburk in fint. Jag har visat den förut men den tål att upprepas eftersom den var så enkel att göra. Allt som behövs är en burk (pennställ av papper eller konservburk), lim och en hel massa färgglada knappar.
——-
My button covered crochet hook holder fits in perfectly on my desktop. I’ve shown it before, but it bears repeating since it was so simple to make. All you need is a pen holder or tin can, glue and a whole bunch of colorful buttons.

Biscornu by Annie's Granny Design - on Craft & Creativity

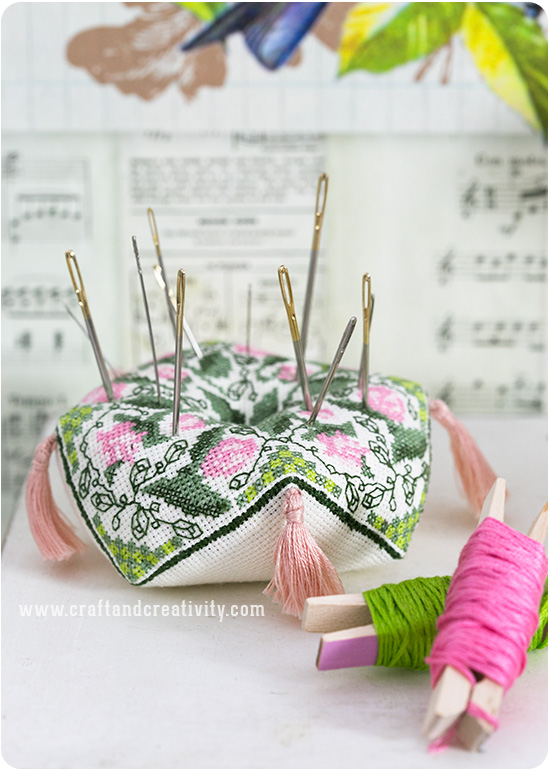
I julklapp fick jag denna vackra nåldyna som min duktiga mamma sytt och broderat till mig. Modellen kallas Biscornu och är en åttasidig stoppad nåldyna. Ni kan läsa mer om dem på mammas blogg, Annie’s Granny Design. Jag förvarar mina broderigarn på klädnypor dekorerade med washitejp.
————-
Last Christmas I got this beautiful pincushion that my talented mother sewed and embroidered for me. The design is called Biscornu and is an 8-sided ornamental padded pincushion. You can read more about them on mom’s blog, Annie’s Granny Design. I store embroidery yarn on clothes pins decorated with washi tape. 

My Sewing Space - by Craft & Creativity

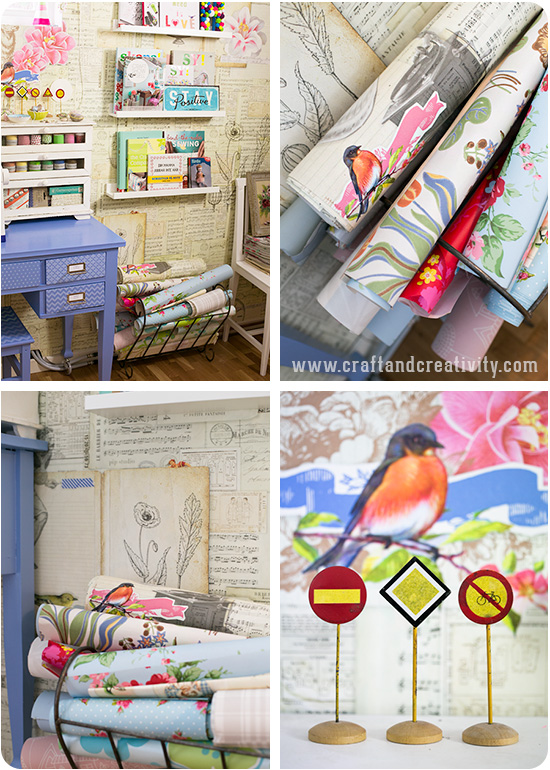
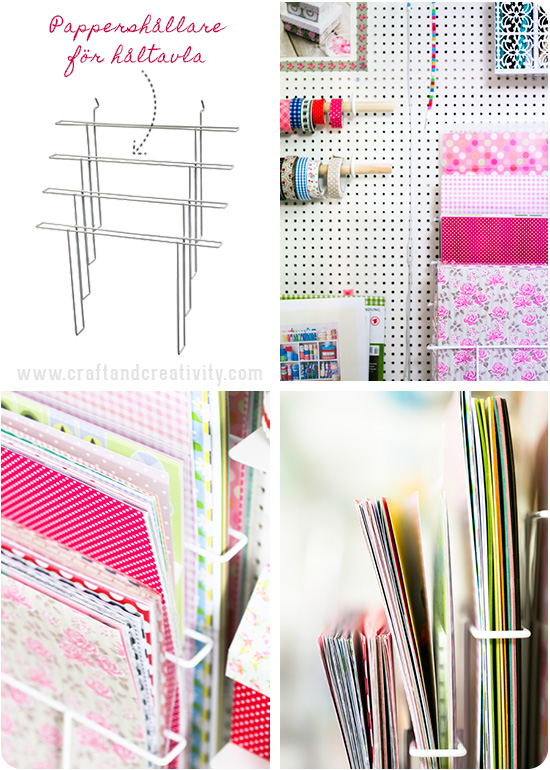
Vid sidan av syhörnan har jag en tidskriftssamlare för tapetprover och tapetrester och på väggen har jag skruvat upp tavellister (från Ikea) där jag samlat pysselböcker och inspiration. De små vägskyltarna fyndade jag på Stationen Röstånga i Skåne för många år sedan. Jag har många gånger tänkt att man skulle kunna göra liknande själv, av t ex träknappar, blomsterpinnar, kartong och lite färg.
——-
Alongside my sewing space I have a magazine holder for wallpaper samples and scraps and on the wall are picture ledges (from Ikea) where I store my collection of craft books. I found the miniature road signs at a restaurant in the south of Sweden called Röstånga station, many years ago. I have often thought of making similar myself, and for example use plain wooden buttons, flower sticks, cardboard and some paint.

Painted pebbles - by Craft & Creativity

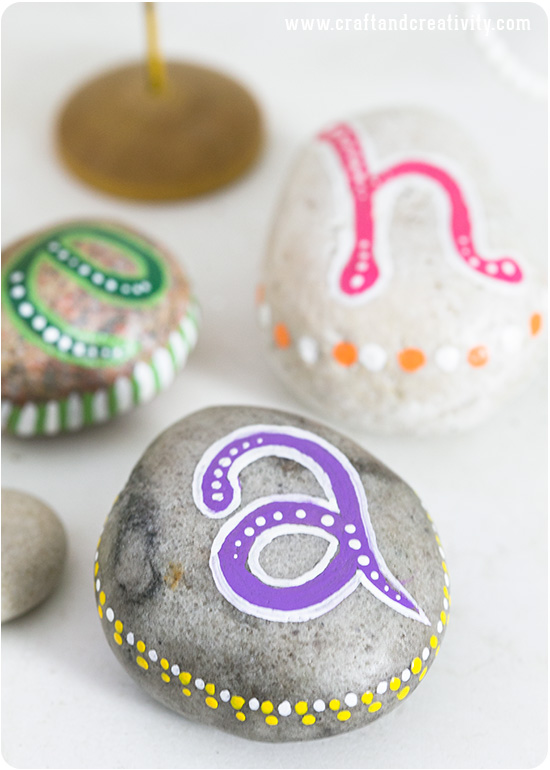
Dessa målade stenar har inget med sy & tyger att göra men är fina som dekoration. De var ett av de första pysslen jag visade på Craft & Creativity, i september 2011. Tänk att bloggen nu funnits i 2 1/2 år… 🙂
———-
These painted pebbles have nothing to do with sewing, but are pretty as decoration. They were one of the first crafts I blogged about at Craft & Creativity, in September 2011. Time flies and the blog has now been around for 2 1/2 years … 🙂

Fler inlägg från mitt pysselrum / More posts from my craft room:
How I built and painted my pegboard - by Craft & Creativity  Steel mesh inspiration board - by Craft & Creativity  DIY Pegboard hooks - by Craft & Creativity

Återbruk av värmeljuskoppar –
Recycling of tealight cups

Recycling of tealight cups - by Craft & Creativity

På ett år eldar vi i Sverige upp ca 300 miljoner värmeljus. Värmeljuskopparna är tillverkade av aluminium som går att återvinna och på så sätt sparar vi energi och värnar om miljön. Ett annat sätt är att återbruka dem och t ex göra söta hängen till påskriset eller julgranen. Börja med att ta bort metallbrickan i mitten (lägg den i metallåtervinningen) och skrapa ur resterna av stearin. Klipp till kanterna i önskat mönster, böj ut flikarna och dekorera dina ljuskoppar på valfritt sätt. Gör hål i kanten med en nål och trä ett snöre igenom.
—————-
In one year we use up about 300 million tealights, and that’s only here in Sweden. Tealight cups are made of aluminum which can be recycled and thus we save energy and are kind to our environment. Another way to re-use them is to make cute pendants for your Easter Twig or Christmas tree. Start by removing the metal disk in the middle and scrape out the remains of the candle wax. Cut the edges of your cup in different patterns, bend the tabs outwards and start decorating your cups. Make holes in the top with a needle and thread a string for hanging. 

Recycling of tealight cups - by Craft & Creativity

Detta pyssel kom till i lördags hemma hos Karin & Freja på Pysselbolaget då Karin föreslog att vi skulle göra påskhängen av värmeljuskoppar. Det är lätt att klippa i ljuskopparna och väldigt roligt att hitta på olika dekorationer. Använd gärna material som du har hemma – t ex knappar, washitejp, papper, klistermärken, små söta kycklingar, paljetter och fina band.
————
This is one of the crafts we created when visiting Karin & Freja at Pysselbolaget last Saturday. Karin suggested that we should make Easter decorations out of tealight cups. The cups are easy to cut and they are a blast to decorate. You can use supplies you have at home – such as buttons, washi tape, paper scraps, stickers, cute chickens, sequins and pretty ribbons.

Recycling of tealight cups - by Craft & Creativity

Jag dekorerade mina ljushållare med självhäftande bomullstyg, washitejp på A4-ark och söta klistermärken.
————
I decorated my tealight cups with adhesive fabric, washi paper sheets and cute stickers. 

Recycling of tealight cups - by Craft & Creativity

Även baksidan av värmeljuskopparna kan med fördel dekoreras.
——–
You can also decorate the back of the tealight cups. 

Recycling of tealight cups - by Craft & Creativity

Här ser ni några av Karins, Frejas, mina & min dotter Annies alster samlade. Klicka er in till Pysselbolaget för att se mer!
————
Here you see some of Karin’s, Freja’s, my & my daughter Annie’s creations gathered. Click your way to Pysselbolaget to see more! 

Visste du förresten att det är viktigt att peta bort den lilla metallbiten som håller fast veken innan man lämnar värmeljuskopparna till återvinning? Det är för att vekeshållaren är av järn, medan koppen är av aluminium. Om de smälts ner tillsammans så förloras möjligheten att återvinna aluminiumet. Sofia på Hildas hem skrev ett läsvärt blogginlägg om detta innan jul.
———
Did you know that it’s important to remove the small metal piece that holds the candlewick before you leave the tealight cups at the recycling center? It’s because the wick holder is made of iron, while the cup is made ​​of aluminum. If they are melted down together the ability to recycle the aluminum will be lost. Sofia at Hildas hem wrote an interesting blog post (in Swedish) about this before Christmas. 

Förvaring på håltavlan –
Pegboard storage

DIY Pegboard hooks - by Craft & Creativity

Det här med krokar för håltavlor har inte varit helt lätt och jag har letat med ljus och lykta efter en bra lösning. De S-krokar jag införskaffat från olika håll hade fel form för att kunna vinklas in i hålen. Till slut bestämde jag mig för att göra egna. Det visade sig vara en riktigt bra lösning – de var enkla och göra, fyller sitt syfte och blir både billigare och mer anpassningsbara än köpta krokar. På bilden ovan ser ni även en av mina tygklädda husaskar och min pärlmönstrade pennburk. Den lilla rosa klockan har jag fått av min lillebror i present.
————-
I’ve had a hard time finding fitting hooks for my pegboard. Pegboards aren’t at all as common here in Sweden as they are in for example the US. The hooks I found in stores and on the net didn’t fit. They had the wrong dimensions or the wrong angle to fit in the holes. In the end I decided to make my own. It proved to be a good solution, they were simple to make, at a low cost and they filled their purpose perfectly. In the picture above you can also spot my fabric covered house boxes and my beaded tin can. The small pink clock was a gift from my little brother.

DIY Pegboard hooks - by Craft & Creativity

För att göra krokarna använde jag mig av aluminiumtråd (2 mm), en avbitartång, lim, hobbyfärg, pensel och små träpärlor som är 10 mm i diameter och har en hålstorlek på 2 mm (hålstorleken är viktig!).
————
For making my hooks I used aluminum wire (2 mm), wire cutters, glue, acrylic paint, a brush and small wooden beads that are 10 mm in diameter and has a hole size of 2 mm.

DIY Pegboard hooks - by Craft & Creativity

Aluminiumtråden går lätt att forma med fingrarna men håller ändå för tillräcklig tyngd, i alla fall för mina syften. Jag knipsade av den i lagom bitar, böjde till den och limmade en träkula på ena änden. Träkulan målade jag med hobbyfärg. Sedan var det bara att hänga fast krokarna i håltavlan och använda dem. Plättlätt! 🙂
———–
Aluminum wire is easy to shape with your fingers but still strong enough to bear some weight, at least for my purposes. I cut the wire into desired length, shaped it in a s-shape and glued a wooden bead at one end. I painted the wooden bead with hobby paint That’s all it took and I now have a whole bunch of hooks for my pegboard. Easy peasy! 🙂

DIY Pegboard hooks - by Craft & Creativity

De L-formade metallhyllorna ovan kommer från Muji och dessa skruvade jag fast, genom håltavlan och in i en av de två vertikala stödlister som finns i ramverket bakom håltavlan.
————
I bought the L-shaped metal shelves (above) from Muji and screwed them in place, through the pegboard and into one of the two vertical support strips of wood in the framework behind the pegboard. 

DIY Pegboard hooks - by Craft & Creativity

Jag ville att min håltavla skulle innehålla förvaring för min washitejp och tygtejp. Därför köpte jag fyra st lampkrokar/skruvkrokar (20 mm hålstorlek) och en rundstav (15 mm i diameter) som jag sågade i två längder. Efter att jag skruvat i lampkrokarna var det enkelt att bara lägga dit rundstaven och trä på tejprullarna. På håltavlan tejpade upp några av mina egna vykort och ramade in dem med washitejp.
————-
I wanted my pegboard to include storage for my washi tape and fabric tape. Therefore, I bought four pieces of screw hooks (hole size 20 mm) and a wooden round rod (15 mm in diameter), which I sawed into two lengths. After mounting the screw hooks I could easily hang the round rod on the pegboard and add the tape rolls. As decoration I pinned a couple of my own postcards and framed them with washi tape.

DIY Pegboard hooks - by Craft & Creativity

Bra förvaring för 30,5×30,5 cm designpapper är svårt att hitta tycker jag och därför fastnade jag för denna pappershållare som är 34 cm bred och har fyra fack. Den är anpassad för håltavlor och passade helt perfekt. Vill jag så kan jag flytta på den, bara genom att kroka fast den någon annanstans på tavlan.
————-
Smart storage for 12×12 inch paper is hard to find and I was delighted when I found this paper holder, that is 34 cm (13,4 inch) wide and has four compartments. It is adapted for pegboards and fit perfectly. If I want I can move it, simply by hanging it some other place on the pegboard. 

DIY Pegboard hooks - by Craft & Creativity

Dessa söta pennor kommer från Thailand och jag föll pladask för dem när jag hittade dem på en marknad.
——–
These cute wooden pens comes from Thailand and I fell in love with them when I found them at a floating market. 

Fler inlägg från mitt pysselrum / More posts from my craft room:
How I built and painted my pegboard - by Craft & Creativity  Steel mesh inspiration board - by Craft & Creativity  My Sewing Space - by Craft & Creativity

Karamellformade presentaskar –
Candy shaped boxes

Candy shaped boxes - by Craft & Creativity

För att göra dessa karamellaskar i papper har jag använt en stansmall. Askarna kan användas som presentaskar eller varför inte fylla med godis och använda som ett alternativt påskägg? De skulle också vara söta att lägga på gästernas tallrikar vid ett dop eller bröllop, med en liten gåva eller sötsak inuti.
————
I used a punch board to create these candy boxes out of paper. The boxes can be used as gift boxes or why not fill them with candy for Easter, instead of Easter eggs? They would also look great as decoration at a wedding or baby shower, with a small gift or treat inside. 

Candy shaped boxes - by Craft & Creativity

Stansmallen kommer från We R Memory Keepers.
————-
The brand of the punch board is We R Memory Keepers.

Candy shaped boxes - by Craft & Creativity

Candy shaped boxes - by Craft & Creativity

Jag fyllde mina askar med godis som jag först rullade in i silkespapper, som söta smällkarameller.
———
I filled my boxes with candy rolled in tissue paper, kind of like crackers. 

Candy shaped boxes - by Craft & Creativity

Dekorerade äggetiketter –
Decorated egg tags

Decorated egg tags - by Craft & Creativity

När jag fick hem dessa äggformade kort med snöre så kom jag på en massa olika idéer på hur man skulle kunna dekorera dem. Jag beslutade mig för två olika varianter, dels med tygtejp och dels med decoupagepapper. Min tanke är att använda dem dels som prydnad och dels som presentetiketter till påsk. På baksidan kan man skriva en påskhälsning. Tapeten som jag precis satt upp i mitt pysselrum kommer från Pip Studio och heter Feeling Papergood.
———-
When I first saw these egg-shaped tags, I thought of a million ideas how to decorate them. I finally decided to try two different variants, one with fabric tape and one with decoupage paper. My idea is to use them both as decoration and as gift tags for Easter. I was thinking of writing Easter greetings on the back. The wallpaper on the wall in my craft studio comes from Pip Studio and is called Feeling Pappergood. 

Decorated egg tags - by Craft & Creativity

Hälften av äggen tejpade jag som sagt med tygtejp i olika mönster. Jag klippte rent runt äggen efter att jag tejpat. Det var roligt att kombinera olika mönster och när de är klara ser de nästan sydda ut.
————–
As mentioned above, I covered some of the tags with fabric tape in various patterns. I trimmed the tape around the edges of the eggs with a pair of scissors. It was fun to combine different patterns and afterwards they looked almost hand sewn. 

Decorated egg tags - by Craft & Creativity

Andra hälften av korten målade jag med vit hobbyfärg och täckte sedan ena sidan med decoupagepapper som jag fäste med decoupagelack. När jag var klar trädde jag i linsnöret igen.
——-
I painted the remaining tags with white hobby paint and then covered one side with decoupage paper. When the glue had dried I put the flax yarn back in the existing holes. 

Decorated egg tags - by Craft & Creativity

Nu gäller bara att bestämma vilka jag ska behålla och vilka jag ska ge bort. 🙂
————
Now all is left is to decide which ones to keep and which ones to give away. 🙂

Decorated egg tags - by Craft & Creativity