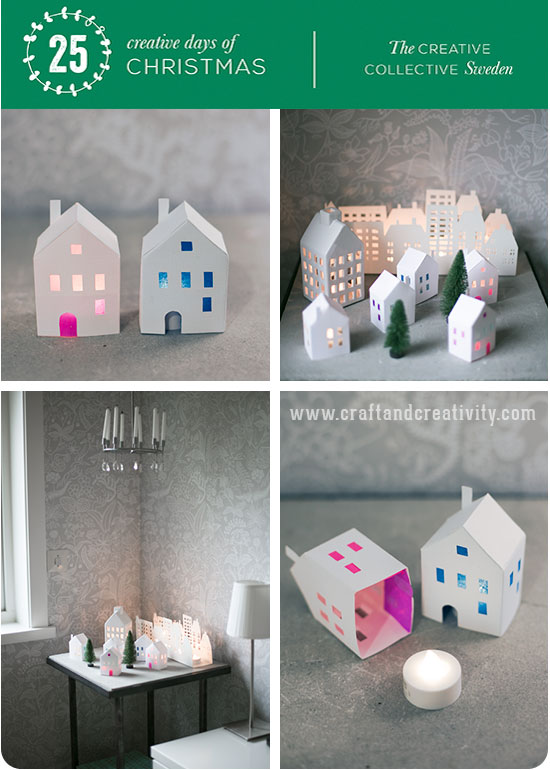
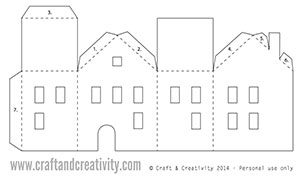
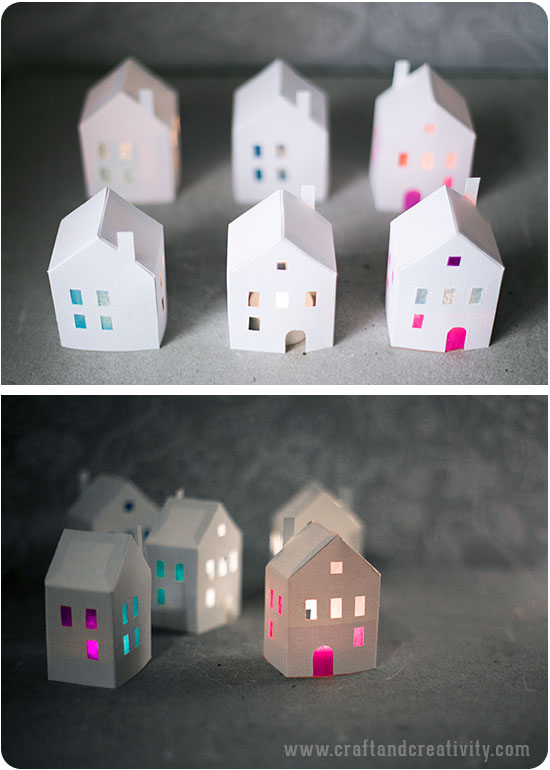
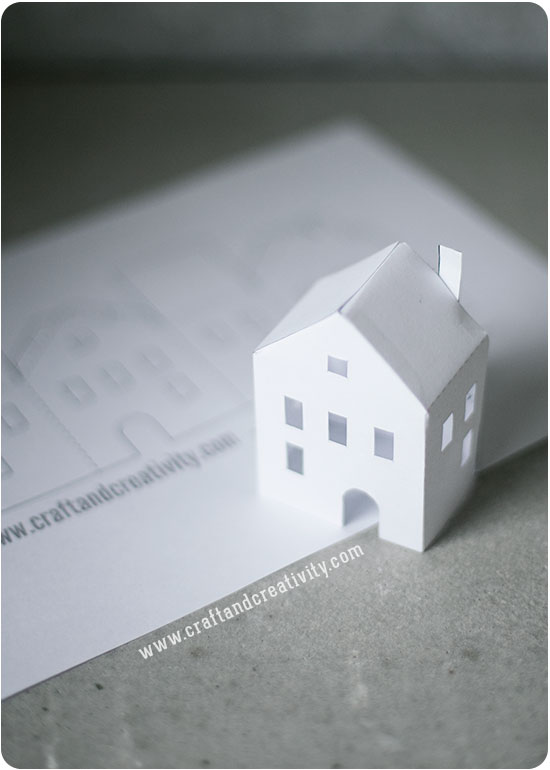
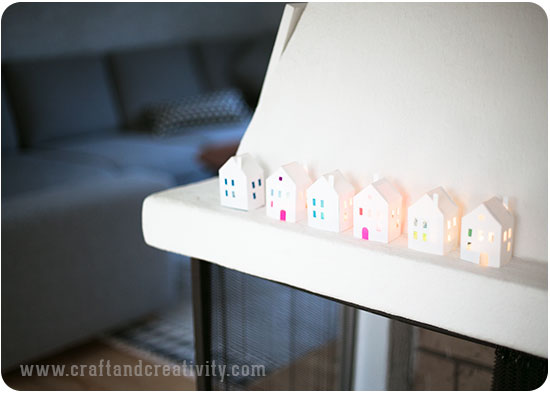
Igår visade Helena på Mormorsglamour oss hur man gör en fin ljusstake av rundstav och idag är det min tur att ta över stafettpinnen i julkalendern “25 kreativa dagar i december“. Jag har gjort en mall som du kan skriva ut och vika ihop till små pappershus som lyser upp i vintermörkret. Med silkespapper på insidan skiner fönstren i fina färger.
—————
Yesterday Helena at Mormorsglamour showed us how to make an elegant candel holder out of dowel rods and today it’s my turn to take the baton in the Christmas calendar “25 Creative Days of Christmas“. I made a template for you to download, print and fold into small paper houses which will light up your winter evenings. Using tissue paper inside the houses the windows will make the windows shine in bright colors.
Du behöver:
Mall (klicka för att ladda ner), skrivare, skrivarpapper i A4-format, vit kartong eller tjockt papper, sax, ca 6 mm bred dubbelhäftande tejp, limstift, linjal, skalpell/hobbykniv, falsben, skärplatta, batteridrivna värmeljus och silkespapper i olika färger.
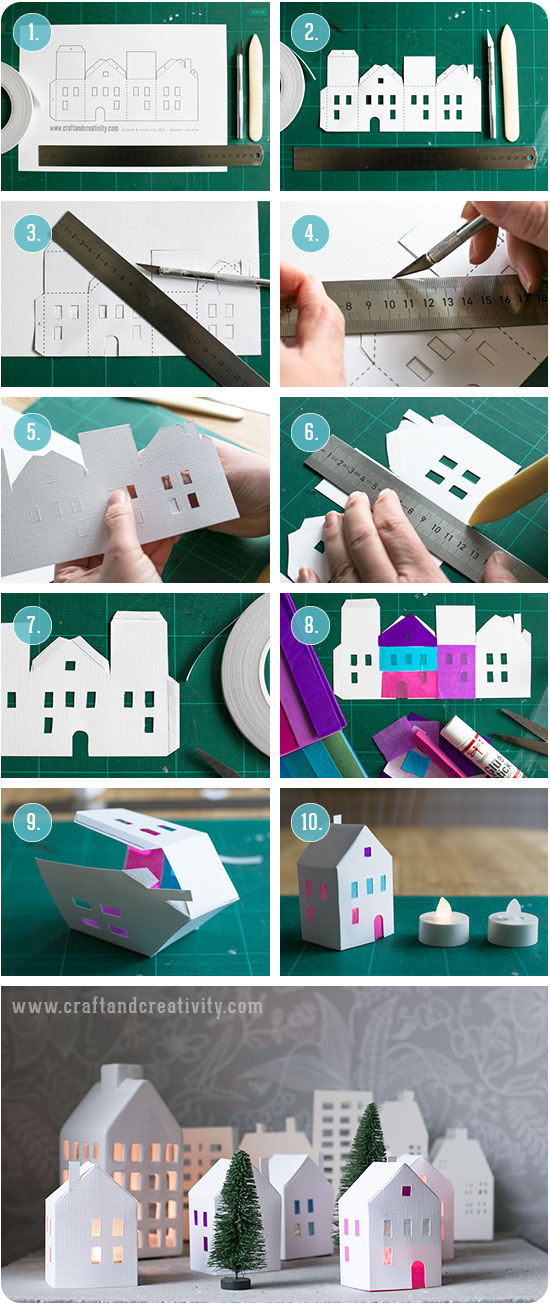
Gör så här: 1. Skriv ut mallen på vanligt skrivarpapper i A4-format (liggande). 2. Klipp/skär ut mallen. 3. Lägg mallen ovanpå ett ark vit kartong. Jag använde Bazzill canvas cardstock som har en fin canvasliknande struktur. 4. Skär genom kartongen längst mallens ytterkanter och skär ut fönster/dörr. Använd en skalpell/hobbykniv och en stållinjal för att få raka, fina linjer. 5. Peta bort överflödig kartong. 6. Skåra/falsa längst med de streckade linjerna med hjälp av falsben eller den slöa sidan av en bordskniv. 7. Klipp bitar av dubbelhäftande tejp och fäst på flikarna. 8. Limma bitar av olikfärgat silkespapper på insidan av huset. Täck några eller alla fönster. 9. Vik längst med de skårade linjerna, ta bort skyddspappret på tejpen och montera ihop huset. Enklast i den ordning som flikarna är numrerade. 10. Tänd huset genom att placera det ovanpå ett batteridrivet värmeljus och ditt första hus är klart!
—————–
You will need: Template (click to download), printer, printer paper, white cardstock, scissors, double-sided tape, glue stick, ruler, hobby knife, bone folder, cutting mat and tissue paper in various colors. Battery operated tea lights can be found at for example Ikea or the hardware store.
Do like this: 1. Print the template on plain printer paper (landscape). 2. Cut out the template. 3. Place the template on top of a sheet of white cardstock. I used Bazzill canvas cardstock, which has a nice canvas-like structure. 4. Cut through the cardstock along the edges of the template and cut out the windows and the door. Use a hobby knife and a steel ruler to get fine, straight lines. 5. Peel away any excess cardstock. 6. Notch along the dashed lines with a bone folder or the blunt side of a table knife. 7. Cut pieces of double-sided tape and attach to the tabs. 8. Glue pieces of colored tissue paper to the inside of the house. Cover some or all of the windows. 9. Fold at the scored lines, remove the backing paper from the tape and assemble the house. It’s easiest to do this in the order in which the tabs are numbered. 10. Light up the house by placing it on top of a battery operated tea light and your first house is ready!
Observera som sagt att du endast kan använda batteridrivna värmeljus i dessa ljushus. Husen skapar julstämning i all sin enkelhet men den som önskar kan även måla utsidan som t ex pepparkakshus innan montering.
————-
It’s important that you use only battery operated tea lights inside these paper houses. The houses will create a Christmas spirit in all its simplicity but if you wish you can paint the outside to look like for a example a gingerbread house, before mounting.
Vill du göra en enklare variant av husen så kan du använda mallen och bygga ditt hus med den och även skippa silkespappret. Vänd den tryckta sidan inåt när du viker ihop huset för bäst resultat. Med skrivarpapper blir huset inte lika stabilt men fint ändå! Det enda du behöver då är: Skrivare, skrivarpapper, sax/hobbykniv, linjal och dubbelhäftande tejp (eller limstift). Om du inte har någon skärplatta hemma så går det bra med en bit tjock kartong så länge du är försiktig och inte skär igenom underlaget.
————–
If you want to make a simpler version of the houses you can use the template itself and furthermore skip the tissue paper. For best result you should in that case turn the printed side facing inwards when you fold your house. With printer paper the house will not be as stable, but it will look nice anyway! All you need then is: Printer, printer paper, scissors/hobby knife, ruler and double-sided tape (or glue stick). If you don’t have a cutting mat you can use a piece of thick cardboard, as long as you are careful not to cut through and damage your table.
Imorgon är du varmt välkommen att titta in till Sofia på Hildas hem för lucka nr 4. Följ The Creative Collective och vår julkalender på Facebook och Pinterest för att inte riskera missa en enda lucka! På Instagram taggar vi våra bilder med #25kreativadagar.
————
Tomorrow, you are most welcome to visit Sofia at Hildas hem for door No. 4. Follow The Creative Collective and our Christmas Calendar at Facebook and Pinterest to not risk missing a single day! On Instagram we tag our pictures with #25creativedays.
![]()
1. Pysselbolaget, 2. Mormorsglamour, 3. Craft & Creativity, 4. Hildas hem,
5. Hemma med Helena, 6. Made by Mary, 7. Djura Bok & Pappersverkstad,
8. Pastill, 9. Mormorsglamour, 10. Lina by the Bay, 11. Mini Piccolini,
12. Djura Bok & Pappersverkstad, 13. Willowday, 14. Willowday, 15. Hemma med Helena,
16. Pastill, 17. Hildas hem, 18. Craft & Creativity, 19. Made by Mary,
20. Lina by the Bay, 21. Hildas hem, 22. Mini Piccolini, 23. Mormorsglamour, 24. Pysselbolaget, 25. Willowday.

Så fantastiskt fint! Jag vill göra ett helt gäng nu på en gång!
Tack Karin!
love your village, the stained glass windows are a great splash of colour!
Thank you! I’m glad you like my little twist. /Helena
adorable, Helena!
Thank you Gina!
Fantastic papercrafting project. thank you!
Thank you Joanna, I’m glad you liked it!
love it! Thanks for sharing. I also love your blog and that part of it is in Englisch so I can follow it with bloglovin!!
Thank you for your kind words Ceciel! /Helena
Love it! Thank you for sharing
I have made with my son. He likes it
Thank you Dhini! I’m happy you son liked the houses!
Pingback: Paper | Pearltrees
So very cute. Lovely!
Thank you Cate! /Helena
Iv been trying to download template for makeing little tea light paper houses and I dont seam to be able to,
Apart from that I love your prog
Thank you
I’m sorry to hear that! I will e-mail you the template right away. Kind regards /Helena
I love the addition of colored tissue paper; really cute.
Thank you Ann Martin, I’m glad you liked my idea! /Helena
Pingback: DIY: Dekorativa granrisstjärnor | DIY Mormorsglamour
Herregud vilka fina lyktor! Du är så himla duktig!
Du kan inte lägga ut en mall på de andra varianterna också?
Ha en bra dag!
Tusen tack Carina! Om du menar de andra husen i bakgrunden så är de köpta ljuslyktor av porslin och metall. Men det går säkert att göra något liknande i papper!
  Trevlig helg! /Helena
Men Oj! det syntes verkligen inte att de var i porslin & metall förrän du skrev det Man är väl lite halvblind och trött på morgonen. Riktigt snyggt i alla fall. Gör ett gäng av din mall till min sons rum just nu och det blir så häftigt
Tack detsamma, trevlig helg och din blogg är så inspirerande för oss pysselsugna!
Haha, jag tänkte inte alls på det när jag tog bilderna men jag inser nu att de var förvirrande lika pappershusen. Vad roligt att du gillade mallen och hoppas husen blir fina i sonens rum. Tack för dina fina ord! /Helena
Pingback: 25 creative days of Christmas - Pysselbolaget - Fun Easy Crafts for Kids and Parents
This is beautiful! Thank you for sharing it with us!
Thank you Tammy! /Helena
Pingback: 25 Creative Days of Christmas – The First Week!
Pingback: Romantiskt julpynt – Whimsical ornaments | Craft & Creativity – Pyssel & DIY
Pingback: 7 dagar av inspiration, första veckan Julkalendern | DIY Mormorsglamour
Tack för ditt fina tips och mallar till små hus i papper! Nu ska jag ut och köpa material och ta med till mitt barnbarn som älskar att klippa och klistra och önskat just modell till små hus i papper!
Pingback: Dag 7: 1 paket 4 olika presentinslagningar | DIY Mormorsglamour
Pingback: 15 DIY Holiday Projects That You Need To Make -
Pingback: DIY Blomsterarrangemang – Flower arrangements | linabythebay.se
Pingback: Tips på julklappsinslagning – Christmas wrapping ideas | Craft & Creativity – Pyssel & DIY
Pingback: 25 kreativa dagar i december - Pysselbolaget - Enkla roliga pyssel för barn och vuxna
Pingback: Tealight Paper Houses | pinfollow.me feeds
Pingback: En tid för kreativitet - Pysselbolaget - Enkla roliga pyssel för barn och vuxna
Pingback: 'Tis the Season - Pysselbolaget - Fun Easy Crafts for Kids and Parents
Thank you for sharing these precious little houses! Your gracious spirit is appreciated! Merry Christmas!
Pingback: Centsational Girl » Blog Archive BOTB 12.12.14 - Holiday Edition - Centsational Girl
Pingback: DIY | Pearltrees
Pingback: Dag 18: Julklappsetiketter att skriva ut – Day 18: Printable Christmas Tags | Craft & Creativity – Pyssel & DIY
Pingback: Pynta granen ”gratis” – Decorate your christmas tree for free | linabythebay.se
Pingback: Last-Minute Christmas Ideas – this heart of mine
Pingback: Dag 24: Rullande tomtar - Pysselbolaget - Enkla roliga pyssel för barn och vuxna
Pingback: Day 24: Rolling Santas - Pysselbolaget - Fun Easy Crafts for Kids and Parents
Cool!! This is a must-try for me!
thank you for sharing love these little houses, will start now, so excited
Pingback: Papierowe miasto | MAŁE WIELKIE ODKRYCIA - DIY DLA DZIECI
Pingback: Dag 21: Kanderade mandlar med lakrits - Hildas hem
Pingback: Dag 17: Gör om dina julgranskulor - Hildas hem
Pingback: Julpyssel - Hildas hem
Pingback: Dag 4: Gör egna julkort - Hildas hem
so beauty ,papers does not fire?
Please use electric lights, not real ones. All the best, /Helena
Pingback: Den kreativa julkalendern 2015 - Pysselbolaget - Enkla roliga pyssel för barn och vuxna
So, so cute! Love them!
I love them and want to make them, but won’t they light on fire? How do you prevent that? Thanks!
Use electric lights instead of ordinary tea lights. All the best, /Helena
Pingback: Christmas decoration – cute paper houses – mornings with coffee
Fantástico, ¡para realizar en familia!
Pingback: Kerstmis: Huisjes & Knutselen | Mieke Rozing
Cute! Looks like someone likes this concept too. https://liagriffith.com/diy-paper-house-christmas-ornament/