

Min kreativa kollega Annika och hennes son har pysslat ihop dessa ljuvliga garngranar och dessutom gjort en rolig variant på julklappsinslagning. Hur sött som helst, tycker jag!
————
My creative colleague Annika and her son made these adorable pom pom Christmas trees, and then used them for wrapping Christmas gifts. I think they look super cute!
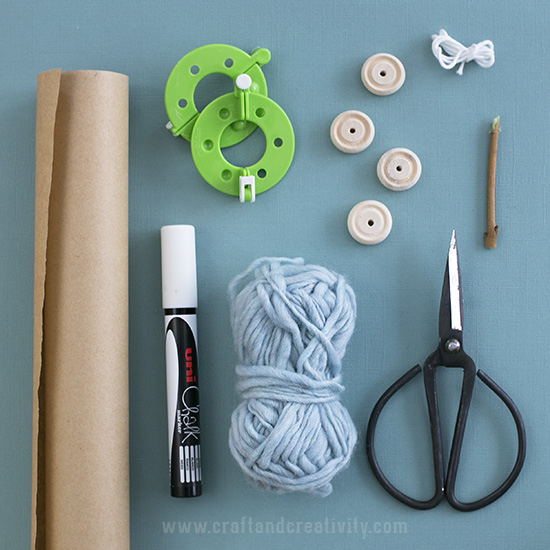
Du behöver: Presentpapper, en Chalk marker (eller annan täckande vit tusch, t ex Uni Posca), en pom pom maker, tjockt ullgarn, trähjul, en bit bomullssnöre eller liknande, en kvist från naturen och en sax. Med en pom pom maker går det snabbt och enkelt att göra många garnbollar.
———-
You will need: Gift wrapping paper, a Chalk Marker (or another opaque white marker like Uni Posca), a pom pom maker, chunky wool yarn, wooden wheels, a piece of cotton string, a twig from the garden and a pair of scissors. With a pom pom maker you can make a load of pompoms in almost no time at all.
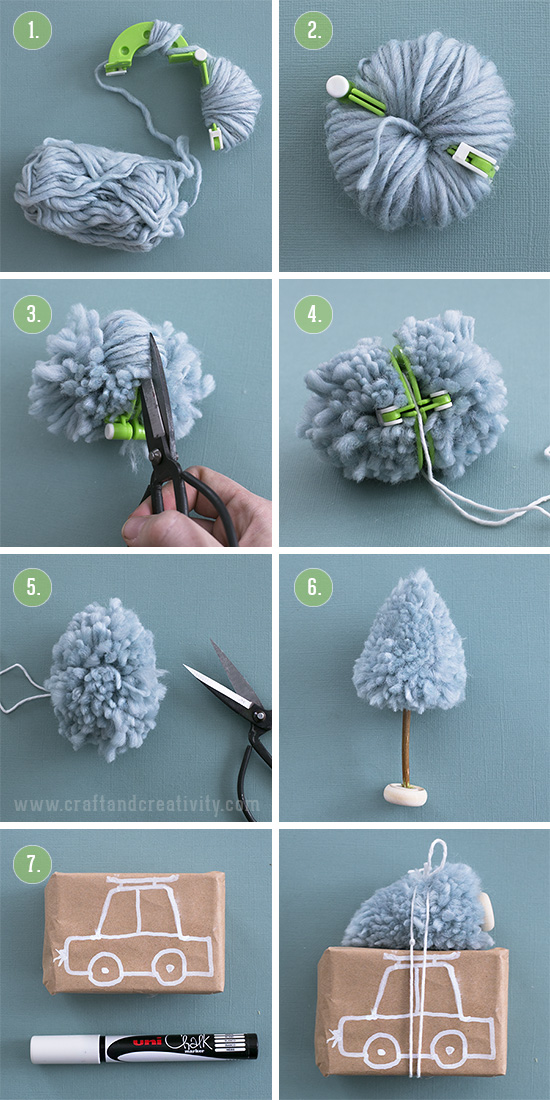
- Gör så här: Öppna pom pom makern och lägg ihop de två skivorna. Linda garn runt båda halvcirklarna tills att hålet i mitten är helt täckt.
- Stäng pom pom makern och lås.
- Klipp upp garnet mellan de två skivorna hela vägen runt.
- Använd en bomullstråd eller liknande och knyt hårt runt mitten av garnbollen. Öppna låset och tag bort skivorna.
- Trimma garnbollen till en kon med en skarp sax. Trådändarna ska löpa ut på sidan av garnbollen, som på bilden ovan. Klipp av ändarna när du klippt klart.
- Vässa gärna träpinnen något i båda ändar innan du för in den ena änden i trähjulet och den andra änden i garnbollen (genom mittenhålet).
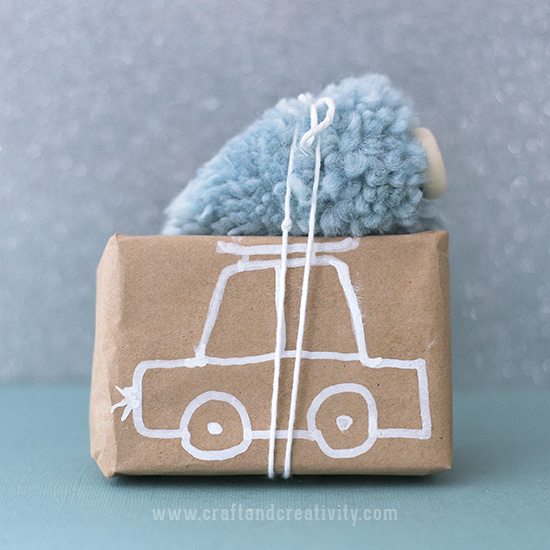
- Slå in din julklapp och rita en bil. Placera granen ovanpå paketet och slå ett snöre runt.
- Do like this: Open the pom pom maker and put the two discs together. Wrap the yarn around the two half circles until the hole in the middle is completely covered.
- Close the pom pom maker and lock it.
- Cut the yarn between the to discs all way around.
- With a cotton string tie firmly around the middle of the pompom. Open the lock and remove the discs.
- Trim the yarn ball into cone shaped form using a sharp pair of scissors. The ends of the cotton string should run on the side of the yarn ball, as illustrated above. Cut the ends when your done trimming.
- Sharpen the ends of the twig and insert one end in the wooden wheel and one end through the center hole of the yarn ball.
- Wrap your Christmas gifts and draw the outlines of a car. Place the tree on top and turn a string around.
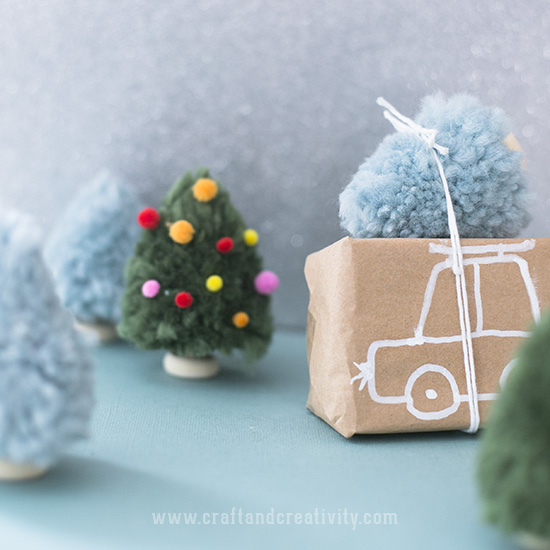
Vill du få extra juliga granar så kan du dekorera dem med små pompom-bollar. De fäster vid granen utan lim men för extra hållbarhet kan du limma om du vill.
———
If you want the trees to look even more Christmassy you can decorate them with small craft pompoms. They stick to the tree without glue but for extra durability you can use glue if you like.

I bakgrunden syns mina pappershus från ett blogginlägg ett par jular tillbaka. Mallarna finns fortfarande att ladda ner gratis för privat bruk för den som önskar.
———–
In the background you can see my paper houses from a blog post a couple years back. The templates are still available to download for free for those who wish (only for private use).
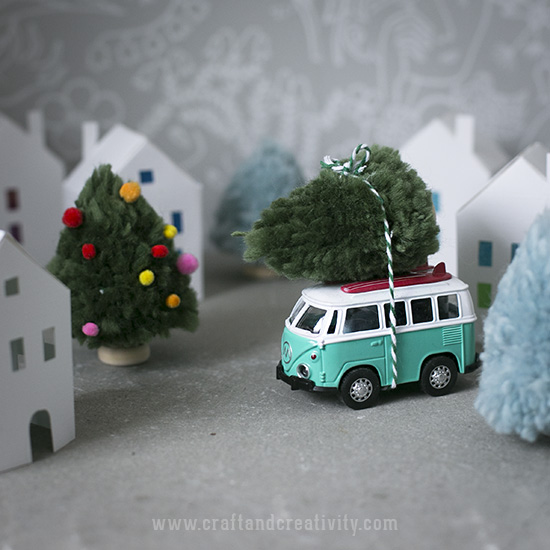
Folkabussen köpte jag på TGR (som tydligen snart byter namn till Flying Tiger Copenhagen) för ett par veckor sedan. Den var för söt för att motstå. Mina döttrar förstod verkligen inte varför eftersom de “inte leker med bilar längre”… 😉
———-
I bought this VW bus at Flying Tiger Copenhagen a couple of weeks ago. It was to cute to resist. My two daughters couldn’t understand why, since they “don’t play with cars any longer”… 😉
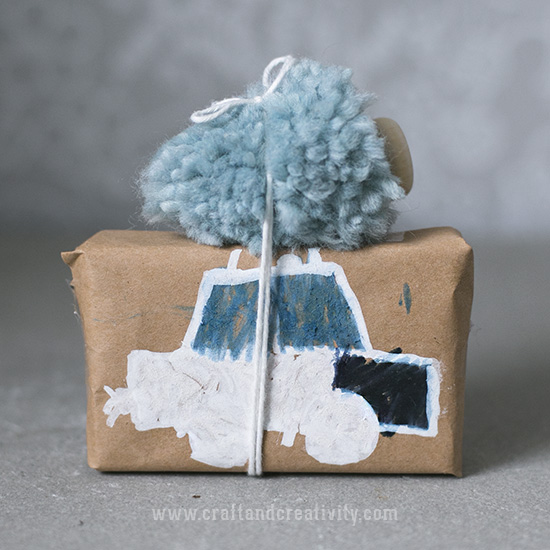
Annikas son har målat denna bedårande bil som är en polisbil (ni ser väl sirenen på taket?). Det svarta är motorn så klart.
———–
Annika’s son painted this adorable little car. It’s a police car (you can see the siren on the roof, right?). The black part is of course the engine.
These are SO cool! What a great idea! 😀
Thank you Dottie! 🙂 /Helena
Vilken rolig idé och vilken underbar teckning, klart man ser att det är en polisbil 🙂
Ja, eller hur? 🙂 <3 /Helena
Très joli! Merci!
J’ai un bus VW presque identique!
Very pretty! Thank you!
I have a VW bus almost identical!
Thank you! How great that you have one almost the same! 🙂 /Helena
Pingback: Inspiration | 5 DIY Projects To Get You Inspired This Week - Make&Mess
Dear Helena! I am planning an advent calendar for my blog/ shop, a knitting blog (http://meinefabelhaftewelt.de), and love your idea of the pompon tree. Every day I present a different blog with a great christmas diy, recipe, decoration tip.. and would love to make a link to your blogpost as well. For the better blogpost feeling, I would like to take one of the above pictures, of course by naming the photo credit and linking to your site. Is it possible to use your picture for my calendar? I would be very pleased, if it is okay for you. Love Sandra
Dear Sandra, I’m very happy you like the pompom trees! Yes, you can share one picture on your blog as long as you leave the watermark and link to my blog for the tutorial. Have a great day! /Helena
Vilka söta!
Man kanske skulle kunna göra en fullstor gran på samma sätt…? Mycket garn blir det! 🙂
Kramen G
Haha, ja eller hur! Skulle ju bli hur häftigt som helst… men som sagt MYCKET garn skulle det gå åt! 😉 Kram /H.
I love this! Thank you so much for sharing!
Thank you Elizabeth, I’m so happy you like it! /Helena
Habe.eine kleine Kastenente mit einem Tannenbaum geschmückt .Freue mich auf die Augen meines Mannes er ist als junger Mann immer solch ei Auto gefahren.
Gudrun