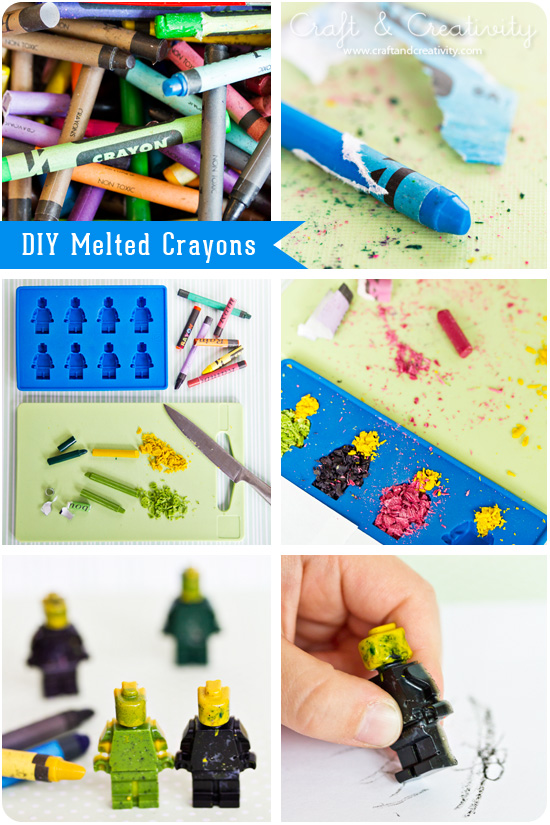
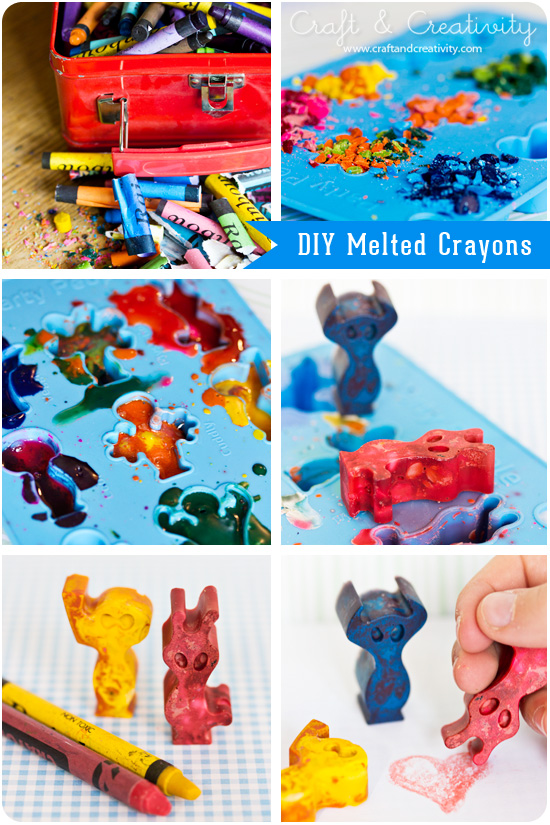
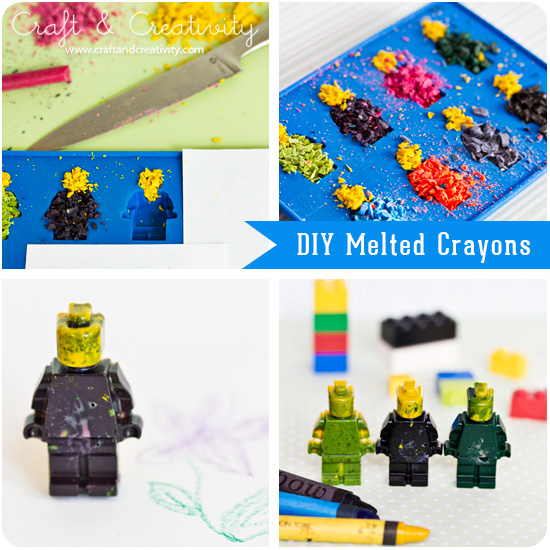
Gör så här: Avlägsna allt papper från dina kritor/kritstumpar. Finfördela kritorna med en kniv. Fyll valfri silikonform (eller annan passande ungssäker form) med kritbitarna. Smält i ugnen på ca 200°C i 5-10 min. Passa noga. Får kritorna vara inne för länge i ugnen riskerar de att skikta sig. Bränn dig inte när du tar ut formen ur ugnen! Ett annat tips (som jag läste på Homemade by Jill) är att först smälta kritorna i en tom konservburk i vattenbad och sedan hälla “smeten” i formarna för att stelna.
—–
Do like this: Remove all paper from your crayons / crayon nubs. Cut the crayons into small pieces with a knife. Fill your optional silicone mold (or other suitable oven-safe mold) with the crayon crumbs. Place the mold in the oven at 400°F (200°C) for about 5-10 minutes, until the crayons have melted. Place close attention. Be sure not to burn yourself when removing the mold from the oven! Another tip (which I read at Homemade by Jill) is to first melt the crayons in an empty tin can in water bath and then pour the “batter” into the molds.
Silikonformen med monster hittade jag på Cervera. Ikea har också roliga varianter för under 10 kr. Isbitsformen med legofigurer har jag köpt på Lego.com (den har jag tidigare använt till att göra choklad-lego-gubbar till barnkalas…).
—
The monster shaped silicone mold comes from a Swedish retailer called Cervera. Ikea also has molds in fun shapes for a favorable price. I bought the Lego minifigure ice cube tray from Lego.com (I previously used them to make chocolate lego minifigures for the kids’ birthday parties…).
Tips: Olika kritor fungerar olika bra att smälta, upptäckte jag. Efter att googlat lite så förstod jag att det bör vara kritor av vax. Tänk också på att de ska vara giftfria. Silikonformarna kommer troligen inte gå att använda till is/mat efter att du smält kritor i dem. Mina formar blev dessutom missfärgade. Men barnen blev överlyckliga över sina nya och unika kritor! 🙂
—
Tip: I discovered that different crayons work differently well to melt. After googling I realized that I should have used only wax crayons. Also keep in mind that they must be non-toxic. I don’t think it’s a good idea to use the molds for ice or food after you’ve melted crayons in them. My mold also got discolored. But the kids are very happy about their new and unique crayons! 🙂


Vad häftigt!
Såna där legokritor skulle min son älska! (och min man också tror jag 🙂 )
Vilken fantastisk idé!!! Så kul ska prova bums! Kram emelie och elin
Kul ide’! Vi ska till Legoland om några helger och då ska jag slå till påse formarna… Min son kommer att älska!!
Sorry för felskrivningen:)
Vilka härliga kritor…
Det här ett typiskt sånt pyssel som jag skulle vilja hinna göra, men som är så svårt att ta sej tid till. Men kanske nu… tack för inspirationen!
Vad söta legogubbarna blir!!!
Kul idé! Har jag aldrig sett för 🙂
Vilken glädje att få hitta en så fin blogg.
Hanna
Mycket bra idé! 🙂
I love the minifig ones. Off to check Lego.com for the ice cube tray. Thanks.
åh så fina dom blev! Har varit sugen på att göra ett liknande pyssel, men det blir aldrig av. älskar verklgien legogubbe-kritorna!
Dom blev verkligen fina! Formarna går ju att använda till en massa annat, frysa isbitar i, hälla smält choklad i, göra tvål i kanske? Alla dina idéer sätter verkligen igång fantasin!
This is so cool! I never knew you could do this with crayons. Great idea.
Du är ju bara FANTASTISK! Vad får du allt i från 🙂
Jag vill önska dig en kanon fin dag!!
Vad coolt!!
Så söta de blev! Och roliga. Vilken jättebra present dessutom!
Pingback: Thursday Thoughts of Inspiration « craftgirl78
Men oooh så roligt! Det måste jag prova! 😀
Pingback: DIY Kids | Pearltrees
Pingback: Legokritor, nästa generation – Lego crayons, next generation | Craft & Creativity
Tack snälla för det roliga tipset!!
Hei! Så stilig! Du kan sikkert bruke et rivjern for ost til å finknuse krittene før du smelter dem. Mulig det tar litt kortere tid. =)
brilliant and so clever! I’ve never thought that crayons will have the second life!!
Pingback: Emma ha crecido
Pingback: Crayon Lego Men « Friendly Shares
Pingback: Crayon Lego Men « Unique Way
Is that Lego Ice Cube Tray okay to use in a oven?
Hi Jinny! Yes, it is. It’s made out of silicon, the same as silicon baking moulds. 🙂 Kind regards /Helena
Pingback: - Unicorn Kids Crafts