
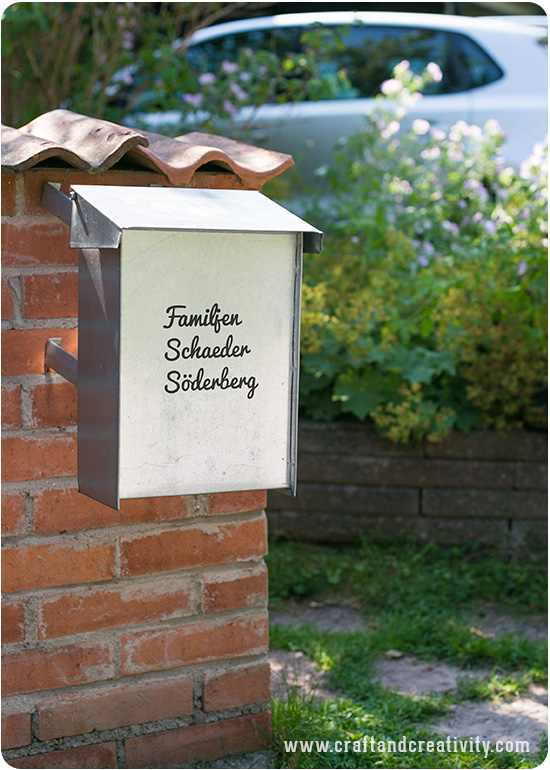
Vår brevlåda behövde ett lyft då den gamla lappen med våra namn för länge sedan hade bleknat. Ett bra tillfälle att testa min inlånade Silhouette Cameo tillsammans med dekorplast, tänkte jag. Förutom att pimpa brevlådan har vi sedan dess gjort en namndekal till dotterns cykel och väggdekaler till båda tjejernas rum. Vi har även gjort väggdekaler med namn på några av barnens vänner och gett bort dekalerna i present, vilket har uppskattats. Att göra väggdekaler/väggord med en Silhouette skärmaskin fungerar på precis samma sätt som med texten till brevlådan. Läs vidare så ska jag förklara hur man gör.
————
Our mailbox needed a make-over as the old paper sign with our name had long since faded. A great opportunity to try my borrowed Silhouette Cameo together with decor vinyl. In addition to pimping the mailbox, we have since tagged my daughter’s bike and made vinyl wall decals for both the girls’ rooms. We have also made wall decals with the names of friends of our daughters and gave them away as gifts, which was very much appreciated. Making vinyl wall decals works exactly the same way as with the text on our mailbox. Continue reading and I’ll explain how.
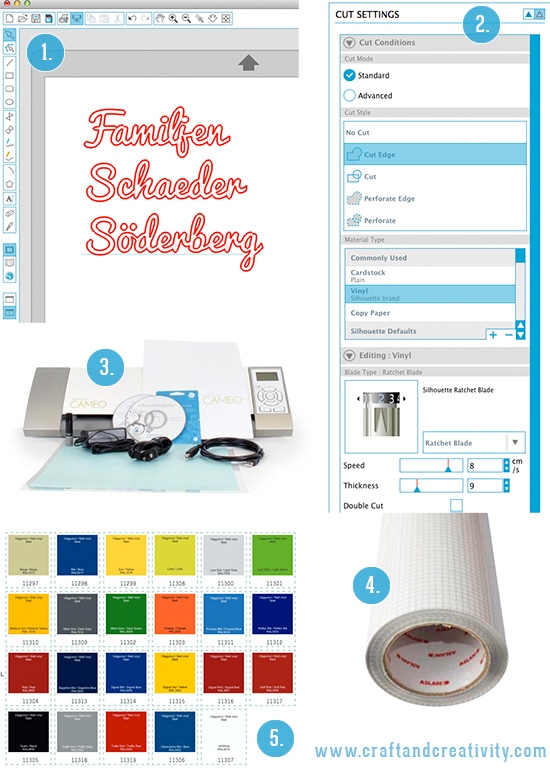
1. Typsnitt/Font: Pacifico, 2. Inställningar/settings, 3. Silhouette Cameo,
4. Applicationstejp/application tape, 5. Självhäftande vinyl/decor vinyl.
- Du behöver: En skärmarskin (t ex Silhouette Cameo eller Silhouette Portrait), appliceringstejp, en plastskrapa (eller liknande), rensningsverktyg (förenklar jobbet) och självhäftande vinyl/dekorplast i önskad färg.
- Gör så här: Öppna Silhouette Studio. Skriv texten med önskat typsnitt och storlek. Jag valde ett typsnitt som heter Pacifico.
- Klicka på Cut Settings och välj Cut Edge. Skärmaskinen skär på så sätt längst ytterkonturen, vilket är extra viktigt om man väljer ett typsnitt där bokstäverna överlappar varandra. Välj Material Type: Vinyl. Dubbelklicka på Vinyl för att få upp mer inställningar. Notera hur kniven (Silhouette Ratchet Blade) ska vara inställd och vrid till rätt siffra på kniven i skärmaskinen.
- Mata in vinylen/dekorplasten i din Silhouette Cameo eller Silhouette Portrait. Gör gärna en s k “Test cut” först, eftersom knivbladets inställningar kan behöva ändras beroende på om kniven är slö/vass och på vilket märke av dekorplast du använder. Kniven ska skära igenom dekorplasten men inte igenom skyddspappret på baksidan, den s k “bäraren”.
- När maskinen skurit klart så matar du ut dekorplasten och drar bort den överflödiga dekorplasten som är runt motivet, men lämna själva texten kvar på skyddspappret. För att ta bort små bitar av vinyl, t ex inuti bokstäver så går det enklare med ett rensningsverktyg. Klipp ut en bit appliceringstejp (den gör det mycket lättare att applicera motivet där du vill ha det) och placera tejpen över texten. Stryk ut eventuella bubblor med en plastskrapa. Klipp rent runt motivet/texten men lämna gärna lite marginal. Nu är det dags att placera texten där du vill ha den.
———
- You will need: A cutting machine (for example Silhouette Cameo or Silhouette Portrait), application tape, a Silhouette Scraper Tool (or similar), a Silhoutte hook (simplifies your work) and self-adhesive decor vinyl in the color of you choice.
- Do like this: Open Silhouette Studio. Enter your text in the font and size you want. I chose a font called Pacifico.
- Click on Cut Settings and select Cut Edge. The Cameo will thus cut the outer contour, which is especially important if you choose a font where the letters overlap. Select Material Type: Vinyl. Double-click on the text Vinyl to view the settings. Note how the blade (Silhouette Ratchet Blade) should be set and turn the blade to match the same number in the cutting machine.
- Feed the vinyl into your Silhouette Cameo or Silhouette Portrait. I recommend do a “Test Cut” first, because the knife’s settings may need some adjusting depending on sharp/new your knife is and on the brad of the vinyl you are using. The knife is supposed to cut through the vinyl but not the backing paper.
- When the machine has finished cutting, remove the vinyl and remove all excess vinyl around the text, but leave the text itself on the backing paper. When removing small pieces of vinyl, it’s easier if you use a Silhouette hook. Cut a piece of application tape (it makes it easier to transfer the text to the surface of your choice) and place the tape over the text. Smooth out any air bubbles with a plastic scraper. Trim around the text but leve some margin. Now it’s time to place the text where you want it.

Själva appliceringen är också enkel. Dra bort appliceringstejpen från skyddspappret och vinyltexten kommer att följa med. Placera texten där du vill ha den. Skrapa slätt med en plastkrapa för att få bort eventuella luftbubblor. Ta bort appliceringstejpen och du är klar! Jag har avvänt en flyttbar dekorplast som fungerar både inom- och utomhus.
—————
The application is also simple. Peel the application tape from the backing paper and the vinyl text will follow. Position the text where you want it. Scrape it smooth with a plastic scrape to remove any air bubbles. Remove the application tape and you’re done! I used a removable decor vinyl that works both indoors and outdoors.
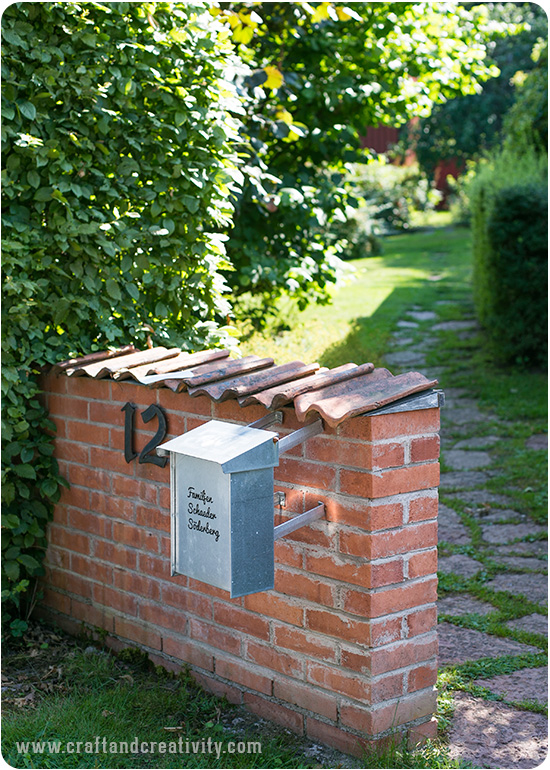
Nu går det inte att missa vilka som bor här! 🙂
————–
Now it’s impossible to miss who lives here! 🙂