Återbruk av värmeljuskoppar –
Recycling of tealight cups

Recycling of tealight cups - by Craft & Creativity

På ett år eldar vi i Sverige upp ca 300 miljoner värmeljus. Värmeljuskopparna är tillverkade av aluminium som går att återvinna och på så sätt sparar vi energi och värnar om miljön. Ett annat sätt är att återbruka dem och t ex göra söta hängen till påskriset eller julgranen. Börja med att ta bort metallbrickan i mitten (lägg den i metallåtervinningen) och skrapa ur resterna av stearin. Klipp till kanterna i önskat mönster, böj ut flikarna och dekorera dina ljuskoppar på valfritt sätt. Gör hål i kanten med en nål och trä ett snöre igenom.
—————-
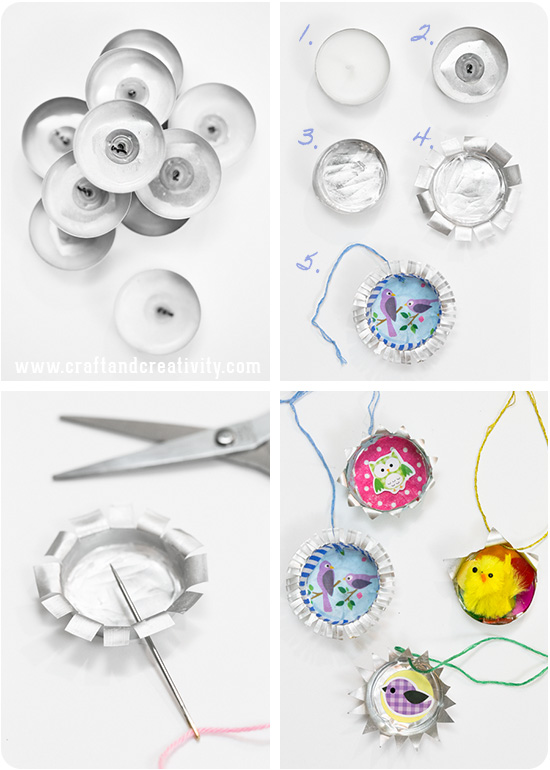
In one year we use up about 300 million tealights, and that’s only here in Sweden. Tealight cups are made of aluminum which can be recycled and thus we save energy and are kind to our environment. Another way to re-use them is to make cute pendants for your Easter Twig or Christmas tree. Start by removing the metal disk in the middle and scrape out the remains of the candle wax. Cut the edges of your cup in different patterns, bend the tabs outwards and start decorating your cups. Make holes in the top with a needle and thread a string for hanging. 

Recycling of tealight cups - by Craft & Creativity

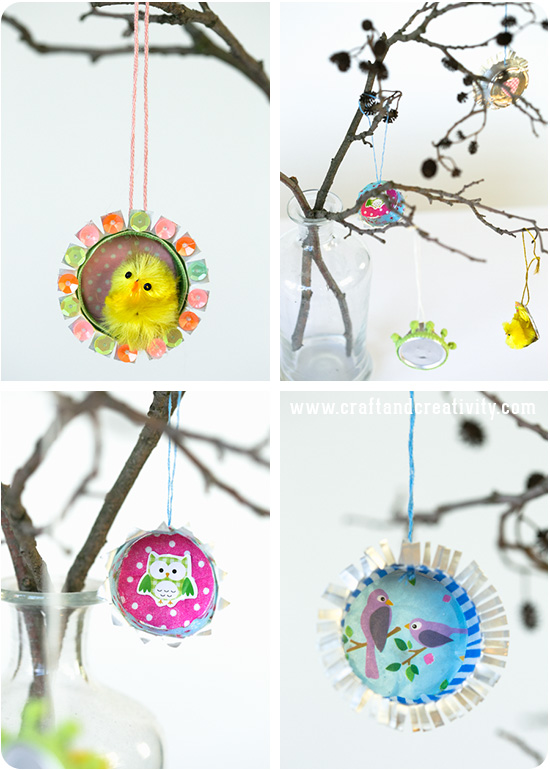
Detta pyssel kom till i lördags hemma hos Karin & Freja på Pysselbolaget då Karin föreslog att vi skulle göra påskhängen av värmeljuskoppar. Det är lätt att klippa i ljuskopparna och väldigt roligt att hitta på olika dekorationer. Använd gärna material som du har hemma – t ex knappar, washitejp, papper, klistermärken, små söta kycklingar, paljetter och fina band.
————
This is one of the crafts we created when visiting Karin & Freja at Pysselbolaget last Saturday. Karin suggested that we should make Easter decorations out of tealight cups. The cups are easy to cut and they are a blast to decorate. You can use supplies you have at home – such as buttons, washi tape, paper scraps, stickers, cute chickens, sequins and pretty ribbons.

Recycling of tealight cups - by Craft & Creativity

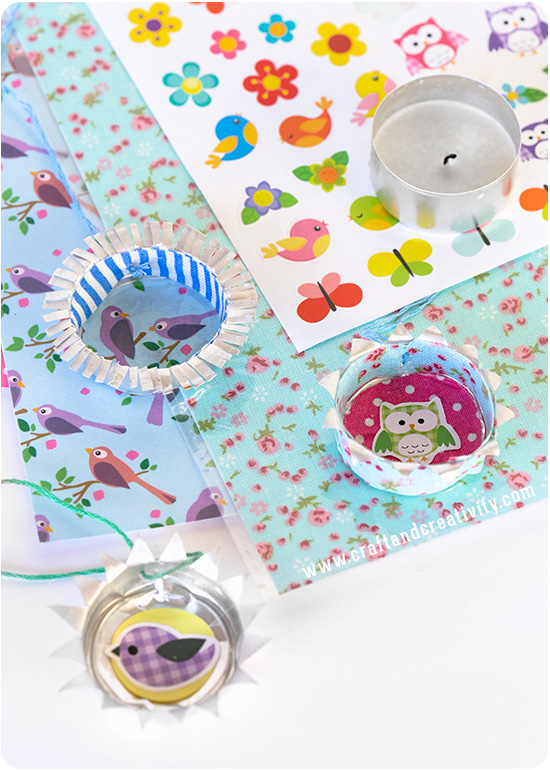
Jag dekorerade mina ljushållare med självhäftande bomullstyg, washitejp på A4-ark och söta klistermärken.
————
I decorated my tealight cups with adhesive fabric, washi paper sheets and cute stickers. 

Recycling of tealight cups - by Craft & Creativity

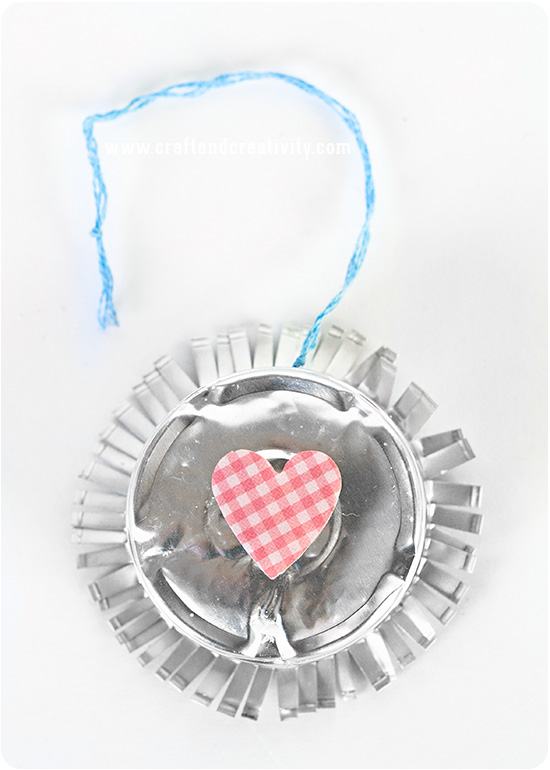
Även baksidan av värmeljuskopparna kan med fördel dekoreras.
——–
You can also decorate the back of the tealight cups. 

Recycling of tealight cups - by Craft & Creativity

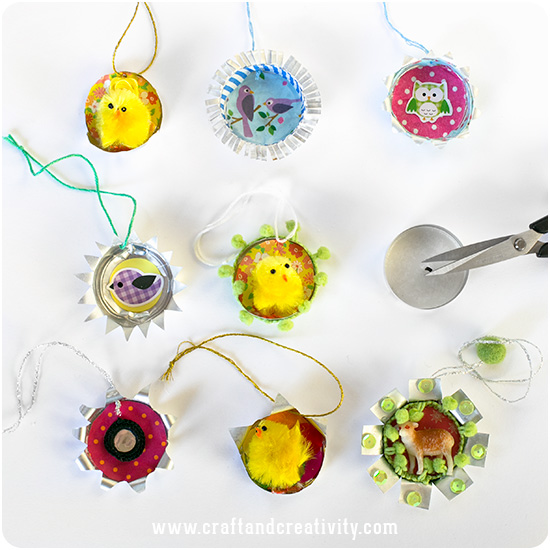
Här ser ni några av Karins, Frejas, mina & min dotter Annies alster samlade. Klicka er in till Pysselbolaget för att se mer!
————
Here you see some of Karin’s, Freja’s, my & my daughter Annie’s creations gathered. Click your way to Pysselbolaget to see more! 

Visste du förresten att det är viktigt att peta bort den lilla metallbiten som håller fast veken innan man lämnar värmeljuskopparna till återvinning? Det är för att vekeshållaren är av järn, medan koppen är av aluminium. Om de smälts ner tillsammans så förloras möjligheten att återvinna aluminiumet. Sofia på Hildas hem skrev ett läsvärt blogginlägg om detta innan jul.
———
Did you know that it’s important to remove the small metal piece that holds the candlewick before you leave the tealight cups at the recycling center? It’s because the wick holder is made of iron, while the cup is made ​​of aluminum. If they are melted down together the ability to recycle the aluminum will be lost. Sofia at Hildas hem wrote an interesting blog post (in Swedish) about this before Christmas. 

Lopplampa – Fortune teller lamp

DIY Fortune teller lamp - by Craft & Creativity

Som jag nämnde tidigare blev det en del loppvikande vid vårt senaste besök hemma hos Karin & Freja på Pysselbolaget. Det var Freja som började och inspirationen spred sig. Jag hade glömt hur roligt det är! Lopptillverkningen resulterade i lampskärmar och jag tycker absolut ni ska klicka er över till Pysselbolaget och se hur fin deras blev!
———–
As I mentioned earlier, one of the things we did on our latest visit to Karin & Freja was to fold fortune tellers. Freja had already started and she inspired me. I had forgotten how fun it is. The folding resulted in lampshades and I recommend that you head over to Pysselbolaget and take a look at theirs! 

DIY Fortune teller lamp - by Craft & Creativity

DIY Fortune teller lamp - by Craft & Creativity

De flesta av oss har säkert vikt pappersloppor som barn. För er som glömt hur man gör har jag gjort en liten skiss ovan. Till min lampskärm gick det åt 44 små loppor och jag använde origamipapper som var 7,5×7,5 cm stort, d v s jag delade 15×15 papper i fyra lika delar. Barnen och mamsen hjälpte mig med de sista lopporna. 🙂
———
Most of us have probably folded paper fortune tellers as kids. For those of you who have forgotten how to, I’ve made ​​a simple drawing above. I needed 44 small fortune tellers to cover my lampshade and I used origami paper that was 3×3 inch (7,5 x7,5 cm) wide, which means I cut 6×6 inch (15×15 cm) paper into four equal parts. To help me make the last ones I had great help from my children and my mum. 🙂

DIY Fortune teller lamp - by Craft & Creativity

Efter att alla lopporna var vikta limmade vi fast dem på lampskärmen med en limpistol. Det är lätt att bränna fingrarna när du jobbar med varmt lim och ett tips är att ha ett glas kallt vatten bredvid dig när du jobbar. Det är lite klurigt att få en jämn fördelning på lopporna som nästan lever sitt eget liv. Å andra sidan så gör det inget om det inte blir perfekt.
———
After folding all the fortune tellers, we glued them to the lampshade with a glue gun. You can easily burn your fingers when working with hot glue, and I recommend you have a glass of cold water beside you while you work. It’s a bit tricky to spread the fortune tellers evenly, but on the other hand it really doesn’t have to be perfect.

DIY Fortune teller lamp - by Craft & Creativity

Jag valde att limma mina loppor på en enkel cylinderformad lampskärm men jag har sett flera exempel på rislampor limmade med vita loppor, vilket blir väldigt fint.
———-
I chose to glue my fortune tellers on a simple cylindrical lampshade, but I have seen several examples of paper lanterns covered with white fortune tellers, which looks very nice.

DIY Fortune teller lamp - by Craft & Creativity

Äldsta dottern vann kampen om vem som skulle få ha lampan i sitt rum. Hennes kompisar är väldigt imponerade och vill alla ha likadana. 🙂
——-
My oldest daughter won the battle over who would get to have the lamp in her room. Her friends are very impressed and all want one just like it. 🙂

Roliga bokmärken – Fun bookmarks

Bookmark template - by Craft & Creativity

Min dotter Annie kom hem från skolan härom dagen och talade om för mig att
“-Mamma, nu ska jag lära dig göra roliga bokmärken!”. Och det gjorde hon. Visst blev de fina? Först lärde hon mig och sedan höll hon kurs för sin lillasyster. I lördags visade hon även bästa pysselvännen Freja hur man gör. Vi var hemma hos Karin & Freja från Pysselbolaget en hel dag, pysslade tillsammans och hade roligt.
—————-
My daughter Annie came home from school the other day and stated “-Mom, I’m going to teach you how to make fun bookmarks”. And she did. Don’t they look pretty? First she taught me, and then she held a course for her little sister. Last Saturday, she also showed her best crafting friend Freja from Pysselbolaget how to make the bookmarks. We spent a whole day at Karin & Freja’s house, creating and having fun.

Bookmark template - by Craft & Creativity
Bild 1 & 2: Systrarna pysslar                           Bild 3: Freja & Annie (Karin fotograf)
Photo 1 & 2: Crafting sisters                           Photo 3: Freja & Annie (Karin’s photo)

Bookmark template - by Craft & Creativity

Med min dotters hjälp har jag gjort en mall som ni kan ladda ner om ni vill. Det går utmärkt att göra bokmärkena utan mall också – men vill man ha lite vägledning så klicka här för att ladda ner pdf-filen.
————–
With my daughter’s help, I made a template that you can download if you like. It’s not necessary to use the template – but if you want a bit of guidance, simply click here to download the pdf file

Bookmark template - by Craft & Creativity

Du behöver: Mönstrade papper (vi använde Color bar kartong 250 g och Color bar papper 100 g), plastögon, lim, sax och lite passande pynt att dekorera med.

Gör så här:
1. Klipp ut alla delar. Kropp, huvud bak, huvud fram (välj mellan rund nos eller spetsig näbb), öron x2, tunga, tänder och näsborrar om man vill.
2. Börja med att limma fast öron + tunga på huvud (bak).
3. Vik huvud (fram), efter den streckade linjen. Vik tänderna och limma fast dem under nosen/näbben. Limma dit ögon.
4. Limma huvud (fram) på huvud (bak).
5. Limma huvudet på kroppen.
6. Pynta bokmärket med pärlor, paljetter eller en rosett. Sedan är du klar!
————
You will need: Patterned paper (we used a mix of cardstock and 100 g paper), plastic eyes, glue, scissors and fun stuff to decorate with.

Do like this:
1. Start by cutting out all the parts. Body, head back, head front (choose between round nose or pointy beak), 2 ears, tongue, teeth and nostrils if you like.
2. Glue the ears and the tongue to the head (back).
3. Fold the head (front) at the dotted line. Fold the teeth and glue them under the nose. Glue the eyes in place.
4. Glue the head (front) on top of the head (back).
5. Glue the head to the body.
6. Decorate your bookmark with beads, sequins, or a bow. And your done! 

Bookmark template - by Craft & Creativity  Bookmark template - by Craft & Creativity

Nu har alla i familjen var sitt bokmärke, plus att vi har ett gäng extra att ge bort till lämpliga bokmalar i vänskapskretsen.
——-
Now everyone in the family has their own personal bookmark, plus we have a bunch extras to give away to friends and relatives.

Bookmark template - by Craft & Creativity

Minikransar av ullpärlor –
Tiny wool bead wreath

Dessa minikransar är ännu ett resultat av pysselträffen med Karin & Freja från Pysselbolaget. Bollkransarna är väldigt enkla att göra. Trä 6-7 ullpärlor på en bit garn och knyt ihop. Välj ett matchande band, forma en rosett, sy fast och avsluta gärna med en fin pärla eller knapp. Titta gärna in hos Pysselbolaget för fler varianter av kransar och beskrivande bilder.
——–
These tiny wreaths are another result of our craft meet with Karin & Freja from Pysselbolaget. The wool bead wreaths are very easy to make. Simply thread 6-7 wool beads on string of yarn and tie a knot. Choose a matching ribbon, make a bow, sew it in place and finish off with a pretty bead or button. Pay a visit to Pysselbolaget for a look at their pretty wreaths and picture tutorial.

Ullpärlor kan du köpa färdiga men man kan förstås även filta egna ullbollar.
——-
You can either buy wool beads or make them yourself


Adventsstjärnor i ny skrud –
Advent star makeover

Förra fredagen fick vi fint besök av Karin och hennes dotter Freja från Pysselbolaget. Vi pysslade och bollade idéer tillsammans en hel eftermiddag och kreativiteten sprutade, både bland vuxna & barn. Så roligt! Dessa omgjorda adventsstjärnor är ett av många resultat av denna dag. Idén var att pynta färdiga adventsstjärnor på olika sätt. Antingen köper man nya eller så gör man om gamla som man har hemma.
—–
Last Friday we got a nice visit from Karin and her daughter Freja from Pysselbolaget. We crafted together and exchanged ideas an entire afternoon. There was a flow of creativity in the air, both among us adults and the children. We had so much fun! These pimped Advent stars are one of many result of this day. The idea was to decorate pre-made Advent stars in different ways. You could either buy new ones or use old ones from your stash. 

Jag valde att täckte en stjärna med boksidor från en gammal uppslagsbok och limmade och lackade med decoupagelack. Enklast är att börja med att klippa ut en trekantig mall som passar formen av stjärnans udd. Använd sedan mallen för att få rätt form på papperet. Se bilderna ovan. Pensla limmet på stjärnan, lägg papperet på plats och släta ut eventuella ojämnheter med fingrarna. Täck en udd i taget och vänd sedan på stjärnan och ta andra sidan. Blir kanterna ojämna kan du putsa dem med en sax. När stjärnan är helt täckt, lacka ytan med samma decaupagelack som du använde för att limma med. Jag använde blank lack men så här i efterhand hade jag hellre använt den matta varianten. Men det är ju en smaksak.
—–
I chose to cover one star with book pages from an old encyclopedia and used decoupage lacquer (i.e. Mod Podge) for glue and finish. I found that the easiest way is to start by cutting out a triangular template that fit the shape of the points of the star. Then use the template to get the correct shape when cutting the book pages. See the pictures for guidance. Brush decoupage laquer on the star, put the paper in place and smooth out any irregularities with your fingers. Cover one point at a time and then turn the star around and do the other side. If the edges get uneven, you can trim them with a pair of scissors. When the star is completely covered, paint the surface with the same decoupage laquer you used to glue with. I chose the glossy kind, but in retrospect, I would rather have used the matte one. But that’s just a matter of taste. 


A comment for you non-Swedish readers: In Sweden it’s very common to hang these Advent stars in the windows on the first Advent before Christmas. 

Blinka lilla stjärna. Vår andra stjärna tejpade vi med papperstejp, s k washitejp. Ganska effektfullt det också och mindre kladdigt att jobba med än lim/lack. /
Twinkle twinkle little star. We decorated our second star with paper tape, so called washi tape. Pretty effect-full, and less messy to work with compared to glue/laquer. 

Tejpa hela eller delar av stjärnan. Trimma bort överflödig tejp med en sax och du är klar! Tips: Ta även en titt hos Pysselbolaget och se vad Karin & Freja gjorde med sina stjärnor!
——
Tape the whole or parts of the star. Trim off excess tape with scissors and you’re done! Tip: Take a look at Pysselbolaget and see what Karin & Freya made with their stars!

Ett fång tulpaner – A bunch of tulips

Tack för alla era fina kommentarer, uppmuntringar och hejarop! Speciellt på förra inlägget, med mammas dockor. Både jag och mamma har verkligen glatt oss åt era fina ord. Jag önskar jag kunde skänka er alla ett fång tulpaner, som dessa som jag plockade in från trädgården i förmiddags.
——-
Thanks for all your kind comments, encouragement and cheering! Especially on the latest blog post, featuring my mom’s dolls. Both my mom and I have really enjoyed reading your kind words. I wish I could send you all a bunch of tulips, like these I picked in the garden earlier today. 


En annan sak som gör mig glad är senaste numret av 101 idéer där min blogg är med på ett hörn, i eminent sällskap av Karin & Freja på Pysselbolaget (en av mina absoluta favoritbloggar) och duktiga Tove på Baka baka liten kaka.
——
Another thing that makes me happy is the latest issue of 101 idéer (101 ideas) where my blog is featured, in the eminent company of Karin & Freja at Pysselbolaget (one of my absolute favorite blogs) and the talented Tove at Baka baka liten kaka