Fina tygband och spetsar är roligt att använda när man pysslar, syr eller slår in paket. Mina band har dock hittills legat huller om buller, hoptrasslade med varandra och i flera olika lådor. Svårt att få någon överblick.
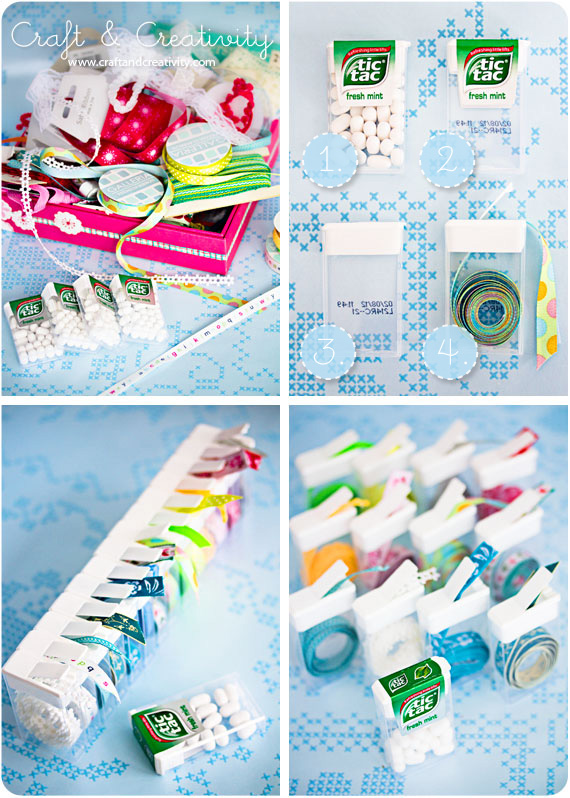
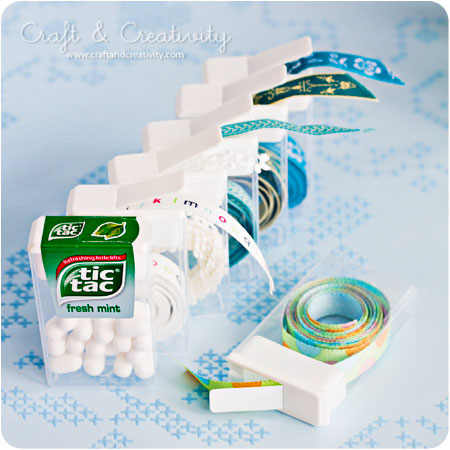
Som så ofta innan hittade jag lösningen via en bild på Pinterest. Bilden ledde mig till en sida som heter Instructables (smart sida för övrigt!) och där fanns en beskrivning på hur man använder TicTac-behållare som praktisk förvaring för tygband. Genialt! Som tur är har jag en make som gillar minttabletter och på Lidl kom jag över ett gäng TicTac’s riktigt billigt.
———–
Beautiful trims, ribbons and lace is fun to use when you’re crafting, sewing or wrapping gifts. My trim stash has been a total mess up to now, all tangled together and no order at all. It’s been hard to get a proper overview.
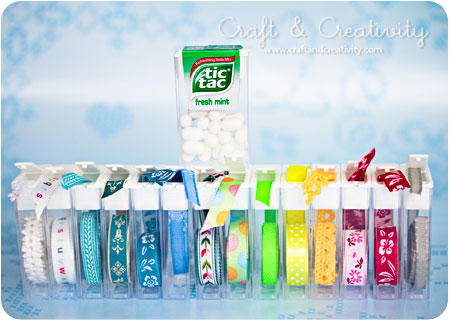
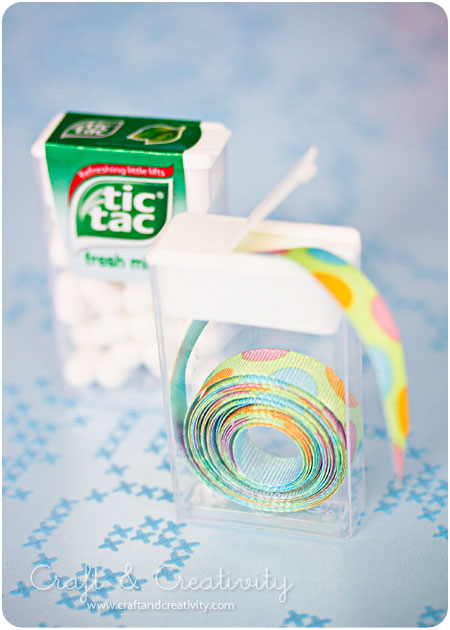
As so often before I found the solution via an image on Pinterest. The picture led me to the site Instructables (a great source of inspiration, by the way!) and there I found a description on how to use TicTac containers for a smart ribbon storage solution. Ingenious! Luckily I have a husband who likes mints and I was able to lay my hands on a bunch of TicTac’s really cheap at our local grocery store.
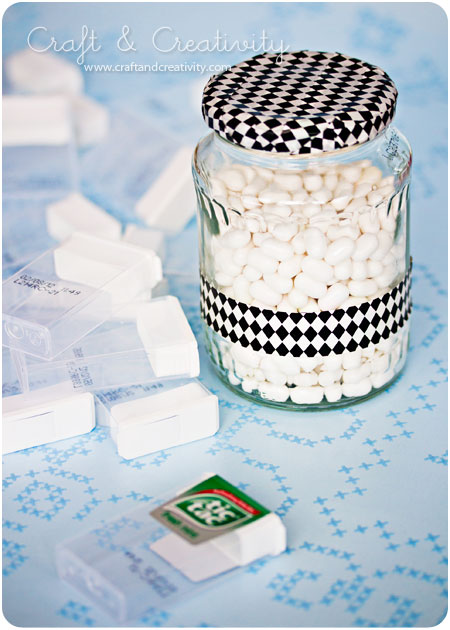
TicTac-tabletterna hällde jag över i en större burk som jag piffade till med lite washi tejp (inget får förbli opyntat, det förstår ni va?). 😉 /
I poured the TicTac tablets into a large jar and pimped the jar with some washi tape (nothing may remain unembellished, you get that right?). 😉
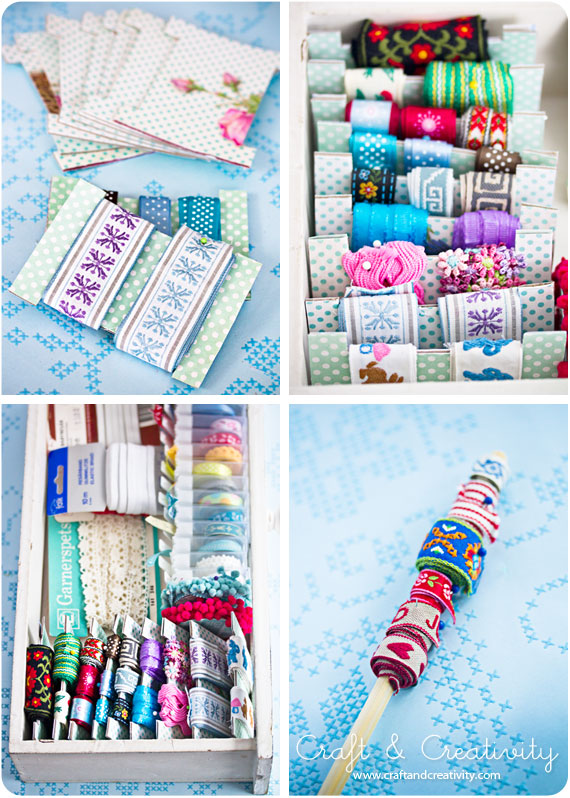
Nu är det ju så att TicTac-behållare är ganska smala och några band fick helt enkelt inte rum. Detta löste jag genom att klippa till kartongbitar som jag sedan virade mina breda band runt. Jag fäste ändarna med synålar. Småsnuttar av band lindade jag runt en kinapinne istället. /
It just so happens that TicTac containers are quite narrow and some of my trims simply didn’t fit. I solved this by cutting out pieces of cardboard and wrapped the wider trims around them. I pinned down the ends with sewing needles. I wrapped tiny trim scraps around a chopstick instead.
Resultatet blev både fint och överskådligt, tycker jag. Som bonus för att jag varit så duktig “fick” jag köpa lite nya band (och lite ny washi tejp) på Etsy… Nu väntar jag bara på leveransen. 🙂 /
I’m very happy with the result. And as a reward for doing such a good job, I treated myself to some new trims (and some new washi tape) from Etsy … Now I’m just waiting for the delivery. 🙂

Linda & Fatema: Thank you! 😀
It’s a fantastic idea and are well above the candy.
I want to get there in Spain.
Fioreta: Thank you! 🙂
Great ideas!!Thanks
kisses
Fabulous storage idea and so so pretty, as always!
Have a sweet day!
Pingback: Glad! – Happy! | Craft & Creativity
Sharing your tip on my blog today… This is brilliant!
This is genius! Must go buy some Tic Tacs right away!!
Hej!
Jag har testat det här och då koma jag på att man kan ta lite nagellacks borttagning för att få bort den svarta texten på sidan..
Tack för all inspiration!
Thank you for your sweet comments!
Ellinor: Tusen tack, vilken bra idé! Det måste jag testa!
Pingback: Great Ribbon Organizers | MAUstudio • Love
Pingback: Bänder organisieren » unikatissimas
Pingback: Organizing Ribbons » unikatissima's
These pictures are so inspiring! Thanks for showing me how easy and beautiful ribbon storage can be.
Wonderful idea, I’ll implement it myself. Thanks a lot.
Love the idea but how did you get the tic tac jars open to insert the ribbon is a loosing battle over here short from destroying the container.
oh nice idea for the ribbons. I had used tic tacs for my glitters, since I got glitters in packets. So I punctured holes, on the flip of the lid with a safety pin, big enough for the gllitters to come out of it (depends on your glitter size). Then I filled the empty tic tac containers with the glitters i got from the packets. I shall post it in my blog with pictures some day when I have the time. Hope you find this useful 🙂
Pingback: Crafts | Pearltrees
Wow, this is the best idea EVER!!!
Greetings,
Kirsten
Just love this idea, we have a lot of tic tacs in our house, but how to you get the ribbon into the container, I haven’t been able to get the top off the tic tac container, and I don’t want to damage it?
Great idea!Going to give it a try.
I love this idea, but where did you get so many tic tac containers? I don’t use that many. but thanks for the idea.jossie38
What a clever idea!!! Thank you for sharing it.
Pingback: Práctico organizador de Cintas
Pingback: New Artsy | Pearltrees
I loved your post on TicTac containers. I have taken the liberty of posting this on Facebook – http://www.facebook.com/thelittlegreenpage – an online community to spread eco-awareness. Trust this is fine with you. Pravin Amudan
Thank you for the idea. Now that I’m getting into crafting heavily again I need all of the suggestions I can get to stop things from getting messed up really bad.
What and excellent idea for ribbon storage. I defo will be doing that . Thanks for sharing 🙂 xx
As others have asked: how do you get the tops off the tic tax containers?
Hi Lorie, I just pulled it up. With the containers I had it wasn’t hard. Perhaps they are made different?
Kind regards
Helena
Thanks for responding back to my ? Love the Idea to thanks again!
Pingback: Creative DIY Storage Solutions for Organizing Your Home and Office Made from Recycled, Upcycled and Repurposed Items
Wonderful idea,hubby buys them every week so have lots of them.Was wondering how you got the containers to stay together?Did you super glue them? I would like them to stay together but look neat an easy to get to.
Thank you Jeanie! 🙂
The lid of my tic tac containers stay in place pretty tight, I didn’t need to do anything else. Perhaps the sizes can be different, I don’t know?
Otherwise I would use a pretty washi tape. 🙂
Kind regards /Helena
Pingback: Webtipp: craft and creativity | (Alles) NähBAR...
Pingback: Práctico organizador de Cintas - Daiverdei
but how do u get the ribbon in, i think its a good idea and i want 2 do it for my mum, but im really confused…
Hi Lucy!
I remove the white plastic lid, put the ribbon inside and put the lid back in place. 🙂 Good luck!
Pingback: 35 "Crafty" Craft Supply Storage Ideas - Becoming Martha
That is one of the coolest ways to also make space on your desk
What a fabulous idea! Now I need to go buy some tic tacs! This would be great for washi tape too!
Ah! excellent and creative idea. I will try it.
Thanks
Pingback: Incredibly Creative Ways to Reuse Your Tic Tac Containers
Would love to know how you removed the sticky labels.
Dear Marie, I carefully removed them with my fingers. Mine where easy to remove. 🙂 /Helena
Pingback: Bowdabra Feature Friday: Week 5 | Bowdabra Blog
Pingback: Crafty Tip: tic tac boxes for ribbon | handmade by neena
Pingback: 45 Organization Hacks To Transform Your Craft Room | Sharing Interesting Stuff, Updates News & Free Tips
Pingback: Get Crafty AND Organized | Changing Vases
thank u for sharing excellent thought. nice creativity. I will definitely try it.
Very creative..love it..
Pingback: 20 Uses for Tic Tac Containers - Renée ReardinRenée Reardin
Pingback: 45 Craft Hacks for your Kids Craft supplies - Kiddy Crafty
For those of you that still don’t understand. She separated the entire white top (lid) from the CLEAR bottom bottom part. If you just take your finger nail and go around where the two met it should separate with a little push and pull.
Pingback: Min syhörna – My sewing space | Craft & Creativity – Pyssel & DIY
Pingback: DIY Ideen – All I want is everything