
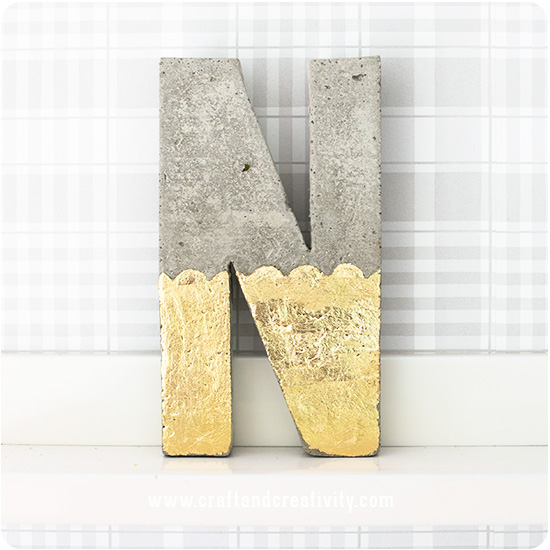
Att gjuta i betong är roligt och inte så krångligt som man kan tro (vilket även jag trott hittills). Det underlättar dock om det är sommar om man kan vara ute. Här har vi gjutit bokstaven N och använt en pappbokstav av papier-maché som form. Vi tyckte att det var roligt att sätta lite bladguld på nederdelen av bokstaven för att kombinera den råa kalla betongen med en varm gul och glänsande yta.
————-
Concrete DIY projects are fun and not as complicated as one might think (which at least I thought up till now). It helps, however, to work with concrete when the weather is nice, because then you can take your project outdoors. Here we’ve made a concrete letter by using a paper mache letter as mould. We thought it fun to cover part of the letter with gold foil and combine the cold raw concrete with a worm golden and shiny surface.
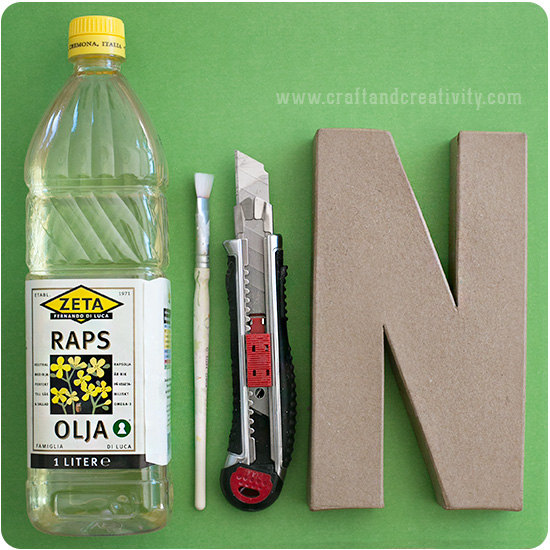
Till själva gjutningen behöver du: 1,5 kg hobbybetong, en pappbokstav, en skvätt rapsolja, en plastbytta (t ex en gammal glassburk) eller liten hink, en slev, ett decilitermått, en pensel och en vass hobbykniv. Använd plasthandskar när du jobbar med betong (vilket vi missade)! Det går också bra med någon annan vegetabilisk olja som matolja eller majsolja. Valfria tillbehör: ståltråd, tidningspapper, sandpapper, Mod Podge och bladguld.
———-
You will need: 1.5 kg of concrete, a paper mache letter, some vegetable oil, a plastic bowl or bucket, a spoon, a meauring cup, a brush and a sharp hobby knife. Use plastic gloves when working with concrete (we didn’t but it’s better to use gloves). Optional: wire, sand paper, old news papers, Mod Podge and gold foil.
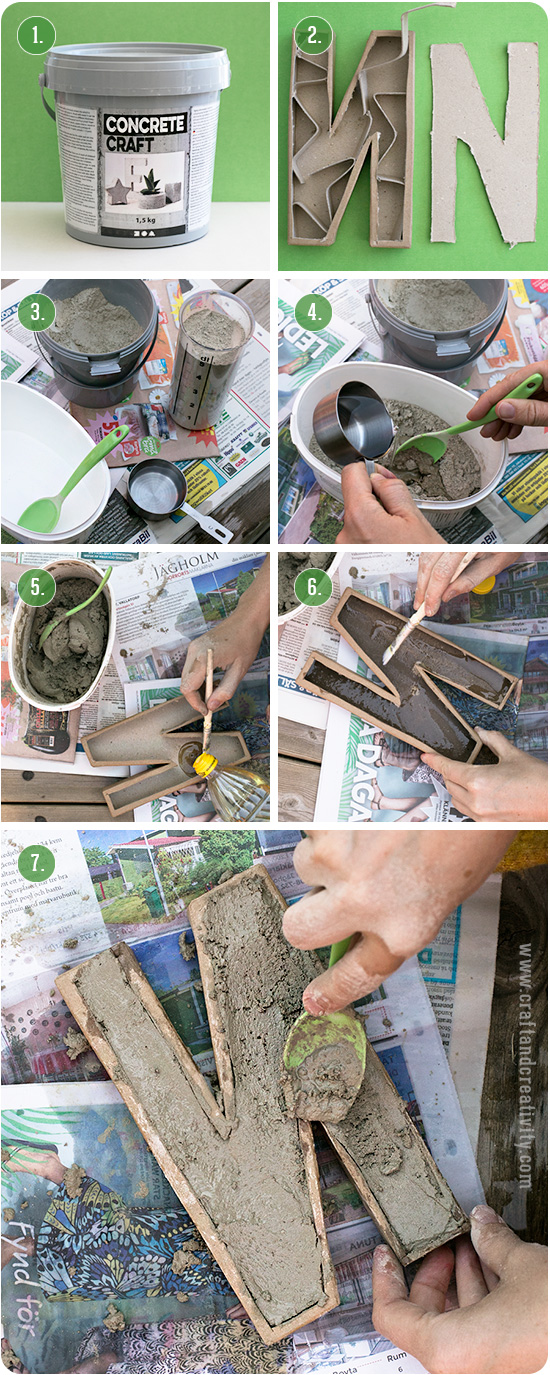
- Gör så här: Tag fram betongen och allt annat du behöver.
- Skär bort baksidan av bokstaven och avlägsna fyllningen.
- Förflytta dig med fördel utomhus och täck underlaget med tidningspapper. Vår betong blandas enligt förpackningen 1,5 del vatten till 10 delar betongpulver. Vi använde lite mer vatten och blandade 5 dl betong med 1 dl vatten. Betongen ska bli mjuk och lätt att forma men inte rinnig. Ju mindre vatten desto snabbare torkar betongen men om betongen är för lös så är den svårare att få loss från pappformen när den torkat.
- Häll betongpulvret i en plastburk och addera vatten, rör om tills du får en jämn smet. Följande moment bör göras ganska snabbt så att betongen inte hinner stelna.
- Häll lite olja i pappformen.
- Pensla ut oljan i botten och runt kanterna, var noga så att du täcker hela insidan av bokstaven.
- Fyll bokstavsformen med den färdigblandade betongen. Blanda till mer betong om du behöver. Jämna till ytan med en slev. Släpp formen i marken ett par gånger från låg höjd så att alla eventuella luftbubblor försvinner och betongen når alla hörn.
———–
- Do like this: Take out the concrete and everything else you need.
- Cut away the back of the letter and remove the filling.
- Move outdoors and use old newspapers to protect the surface your working on. The concrete we used is mixed with 1.5 part water and 10 parts concrete. We used a little more water than recommended and mixed 5 dl concrete with 1 dl water (1 dl = 0.42 cups). the less water the quicker the concrete cures, but if the concrete is too loose it’s more difficult to remove the paper mache when the concrete is dry.
- Pour the concrete in a plastic bucket and add the water, stir until you get a smooth batter. The following steps should be done rapidly before the concrete starts curing.
- Pour some oil into the paper mache letter.
- Spread the oil evenly with a brush and make sure to cover the entire inside of the letter.
- Fill the letter with the mixed concrete. Mix more if it’s not enough. Use the back of your spoon to even out the surface. Drop the form to the ground a couple of times (from a low height) to remove any air bubbles and to make sure that the concrete reaches every corner.
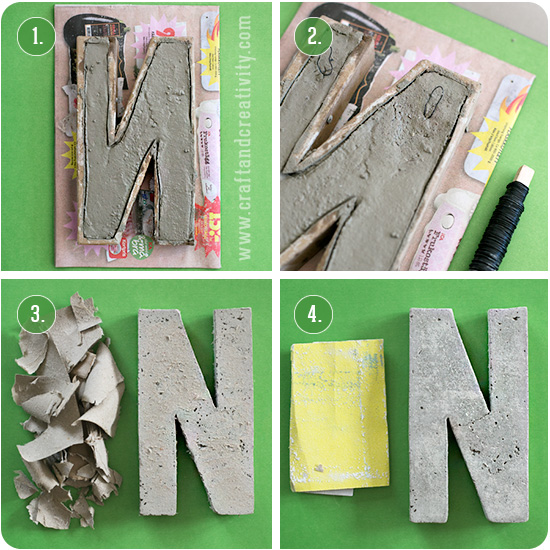
- Så här ser bokstaven ut när den är fylld med betong.
- Om du vill kunna hänga bokstaven så kan du göra två öglor av ståltråd vars ändar du stoppar ner i betongen innan den torkar. Se till så att ändarna är ganska långa så att de får bra fäste i betongen.
- Låt betongen torka. Vi väntade tills nästa dag innan vi tog ur den ur formen. Trots att du penslat insidan med olja så kan pappersrester fastna på ytan. Riv bort så mycket som du kan.
- För att få bort de sista pappersresterna så kan du antingen använda sandpapper och slipa bort resterna eller skölja betongen under vatten och skrapa bort det blöta pappret. Med sandpapper får du en slätare yta.
———
- This is how the letter when it is filled with concrete.
- If you want to be able to hang the letter on the wall you can make two loops of wire and stick the ends well into the concrete before it dries. Make sure that the ends are quite long to get a good enough grip.
- Allow the concrete to cure. We waited until the next day before we removed the mould. Even though you used oil in the mould some scraps of paper can be difficult to remove. Tear away as much of the paper mache as you can.
- To get rid of the last paper remnants you can either use sandpaper or rinse the concrete letter under water and scrape away the wet paper. With sandpaper, you get a smoother surface.
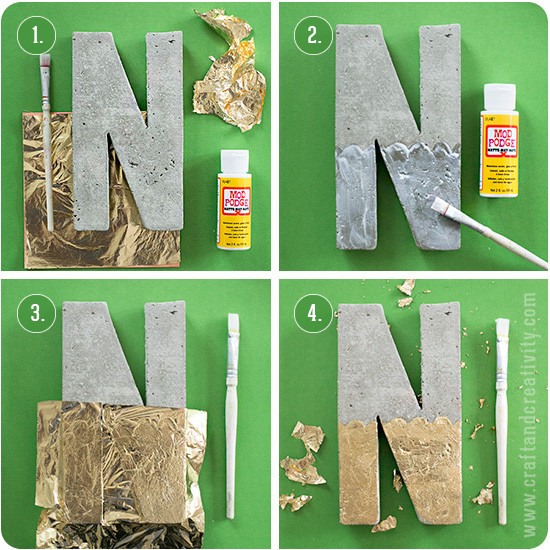
- För att få till guldeffekten så behöver du bladmetall (finns som guld, silver och koppar), en pensel och Mod Podge eller Klæber-fix.
- Pensla Mod Podge den yta av betongen som du vill täcka med bladguld.
- Placera bladguldet över den limmade ytan. Pensla försiktigt ut alla veck med en mjuk pensel. Oroa dig inte om bladguldet råkar spricka eller gå sönder! Det löser du senare.
- När limmet har torkat är det dags att borsta bort allt överflödigt bladguld. Här kan det vara bra med en borste som har lite hårdare strån. Lappa eventuella delar som skadats med bitar av nytt bladguld.
————
- To add the gold effect, you need gold foil, a brush and Mod Podge or Klæber fix.
- Brush a layer of Mod Podge to the parts of the concrete surface that you want to cover with the gold foil.
- Place the gold foil over the glued surface. Brush gently over the surface with a soft brush to smooth out any creases. Don’t worry if the gold foil breaks.
- Once the glue as dried, it’s time to brush off all the excess gold foil. Patch any parts that are damaged with new pieces of gold foil.
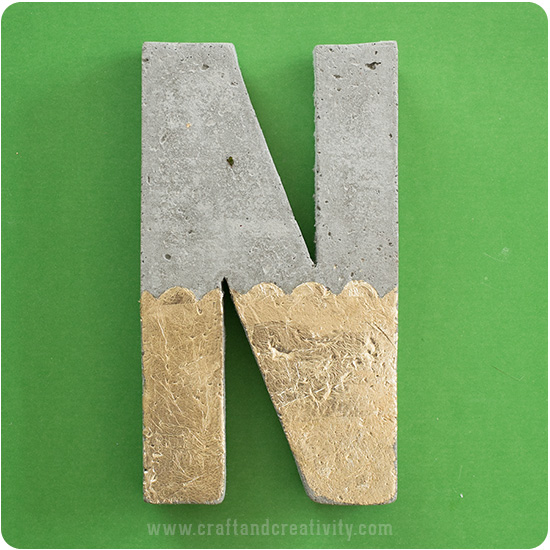
Förutom att använda betongbokstaven som dekoration blir den fin att ha som bokstöd i bokhyllan.
—————
In addition to using the concrete letter as decoration you can use it as a bookend.
Smart att gröpa ur bokstaven och använda som form! Betong är ett av mina favoritmaterial som jag återkommer till ofta, trodde också att det skulle vara svårt men det är ju väldigt lätt faktiskt! Kan nog räkna antalet mindre lyckade projekt på ena handen och då har det blivit väldigt mycket gjutning de senaste åren 🙂
Tack Mikaela! Vad roligt att höra! Vi kommer absolut göra fler betongprojekt i framtiden känner jag! 🙂
How fun! I love the gold leaf on the cement.
Thank you Carolynn! 🙂 /Helena
Pingback: Concrete Letters DIY - Makers Bakers Movers & Shakers
I love this idea! However, when working with cement please wear rubber gloves. My granddaughter developed Portland cement syndrome from walking on cement before it was completely dry. Components of concrete are toxic to some people. Please be careful.
Dear Rebecca, thanks for the information! I will add this to my tutorial right away! 🙂 All the best, /Helena
Pingback: Concrete Letters – unikatissima's
Pingback: Beton-Buchstaben – unikatissimas
Pingback: Gjuta betongdiamanter – Making concrete diamonds | Craft & Creativity – Pyssel & DIY