Lådor med ny look –
Storage box makeover

Storage box makeover - by Craft & Creativity

När Helena på Mormorsglamour i februari klädde om skokartonger och gjorde fina knapplås så gjorde jag en notering i min mentala vill-pyssla-lista – sådana lådor ville jag också göra! Det tog ett halvår innan jag kom igång. Så här blev resultatet.
———
In February, when Helena over at Mormorsglamour dressed shoeboxes and made pretty button clasps, I made a note in my mental crafts-to-make list. I too wanted to make boxes like that! This is the result. 

Storage box makeover - by Craft & Creativity

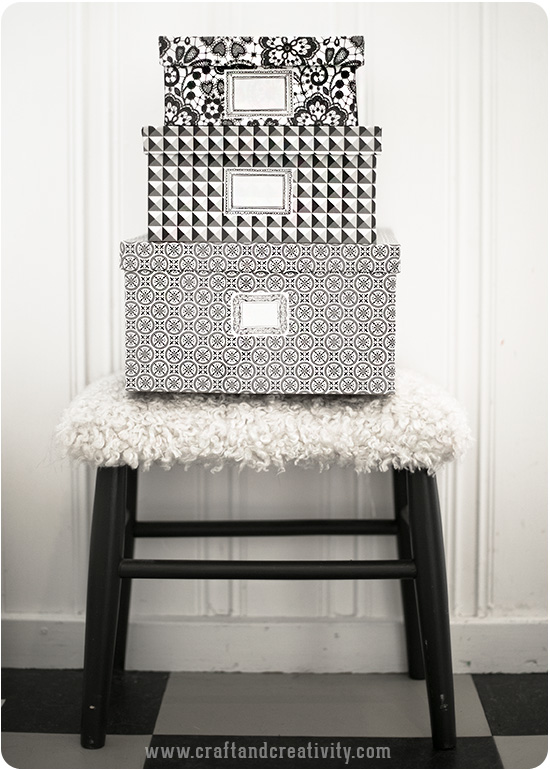
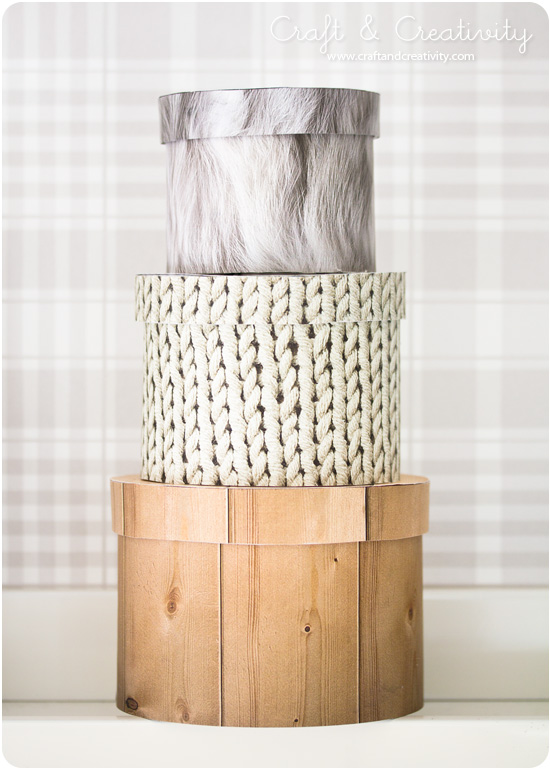
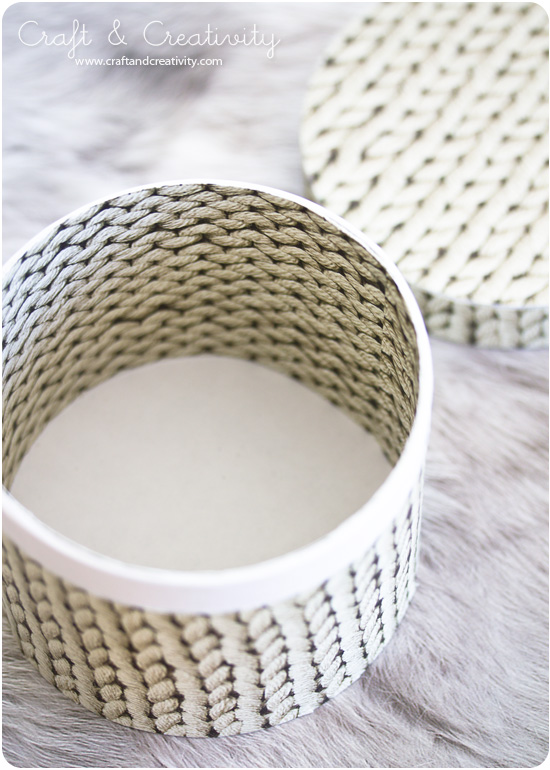
Jag valde att använda ganska stora lådor eftersom vi behövde rymlig förvaring hemma. Mina lådor fanns att köpa i 7-pack där den största lådan är 34×34 cm bred och 20 cm hög. De två största lådorna klädde jag med dubbelmönstrat omslagspapper och jag använde båda sidor för att få två olika mönster på mina lådor. De tre minsta lådorna är klädda med designpapper.
———-
I chose to use fairly large boxes because we needed spacious storage at home. These are so called hat boxes and the largest box is 34×34 cm wide and 20 cm high. I dressed the two largest boxes with double patterned wrapping paper and used both sides to get a two different looks on my boxes. The three smallest boxes are dressed with designer paper.

Storage box makeover - by Craft & Creativity

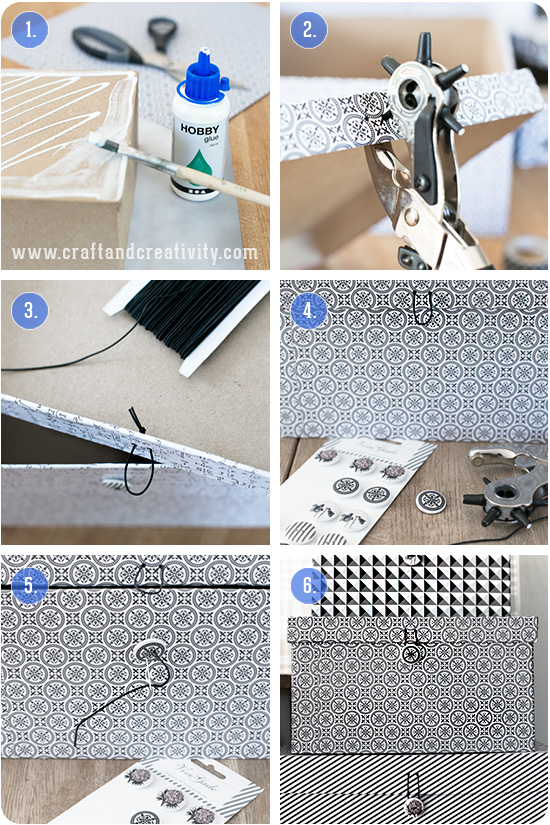
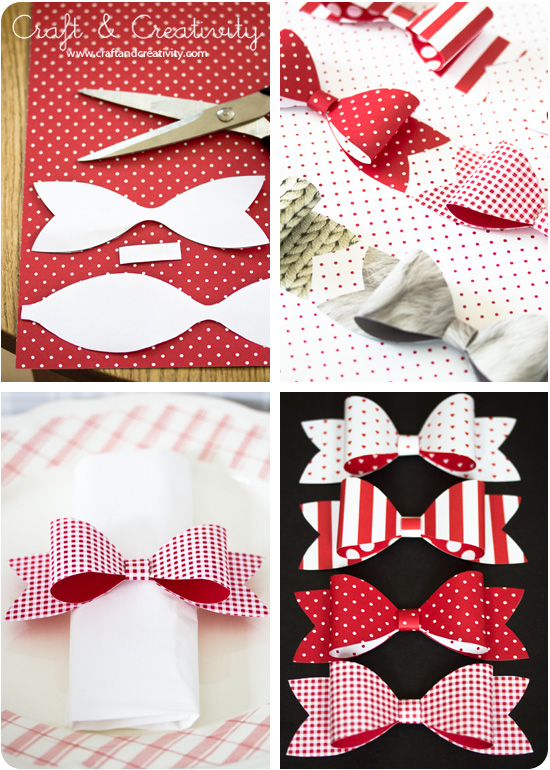
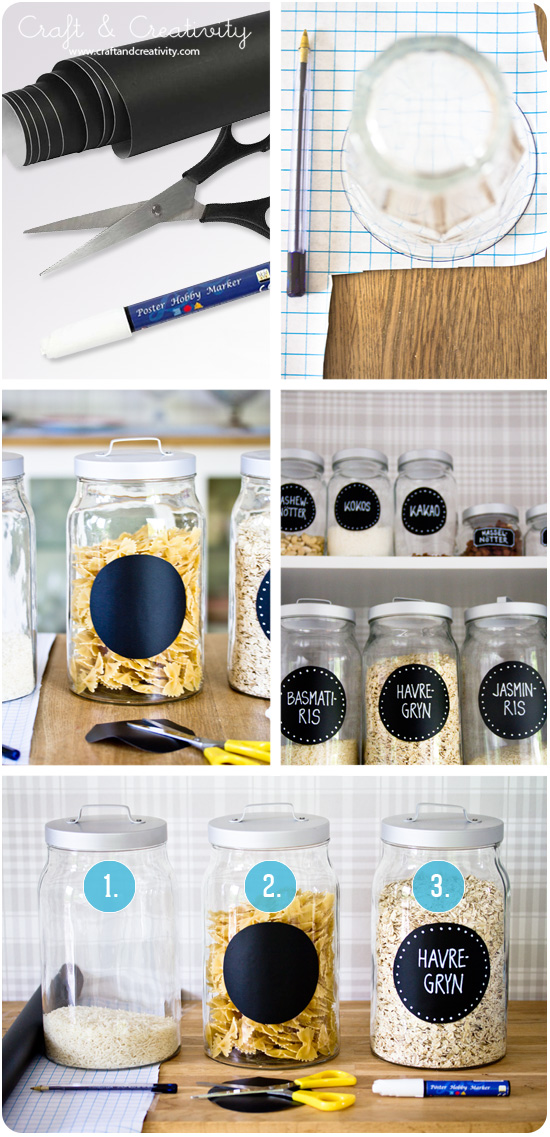
Du behöver: Lådor/askar eller skokartonger, mönstrat papper, lim, pensel, elastisk snodd, tjock nål, fina knappar och eventuellt en håltång eller handstans för runda hål. Du kan även göra som Mormorsglamour och använda öljetter.

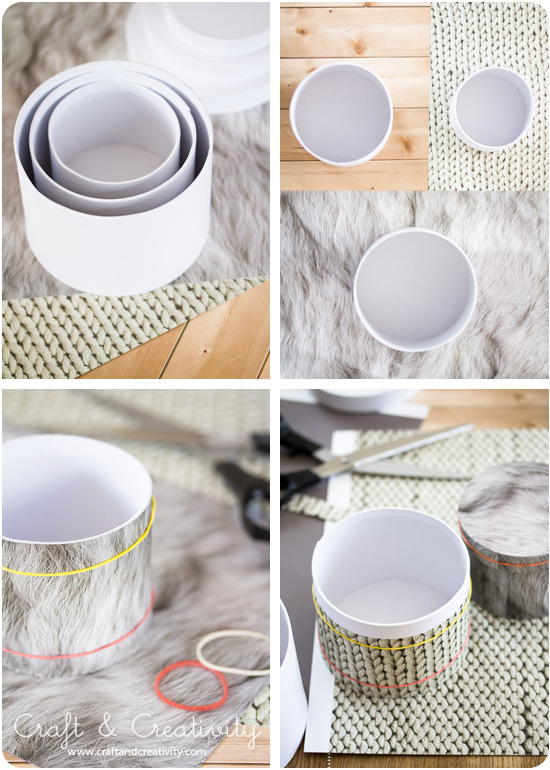
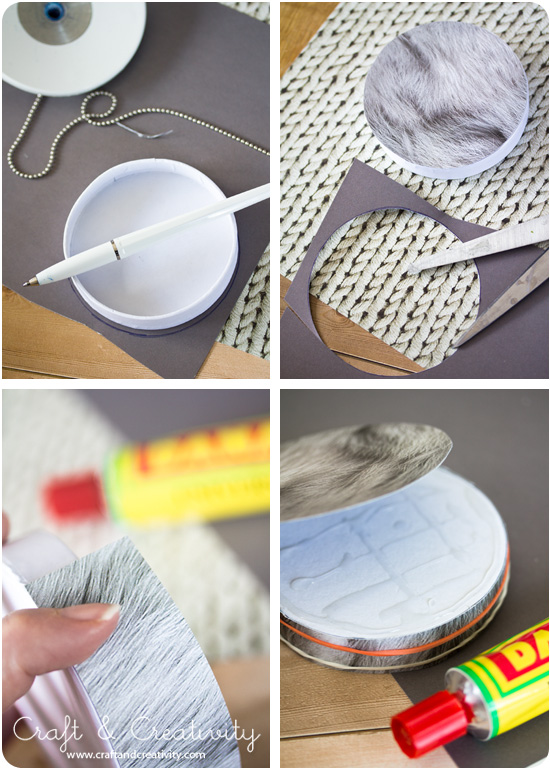
  1. Jag använde samma teknik som jag brukar när jag klär om lådor och mer om den kan ni läsa i blogginlägget turkosa askar med snygga hörn. Den här gången valde jag hobbylim som jag strök ut med en pensel.
  2. Gör två hål i locket för öglan. Använd en håltång, en handstans eller gör hålen med en tjock nål eller syl.
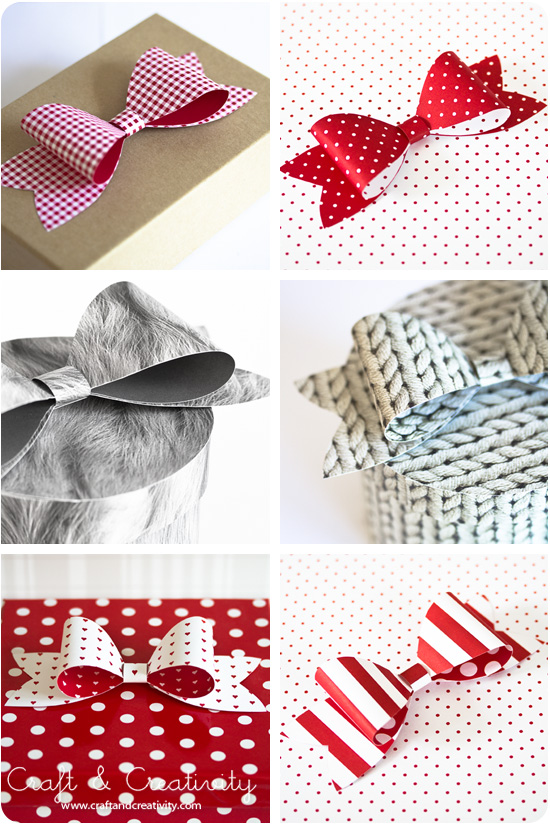
  3. Trä elastisk snodd genom hålen och knyt på insidan. Lämna ett par cm ögla beroende på hur långt ner du tänker placera din knapp.
  4. Måtta var du vill ha knappen och gör två hål i lådans framsida.
  5. Sy fast knappen på lådan med en bit elastisk snodd (eller sytråd). Knyt en dubbelknut på insidan av lådan för att fästa knappen.
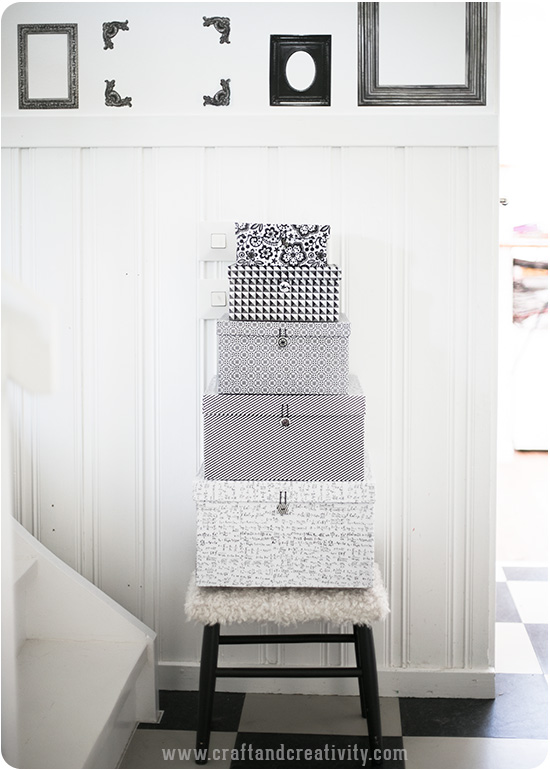
  6. Sätt på locket, trär öglan över knappen och “lås” lådan. Mixa och matcha mönster på papper och knappar men behåll gärna en s k röd tråd. Mitt tema blev grafiska mönster i svart och vitt.

—–

You will need: Storage boxes or shoe boxes, patterned paper, glue, brush, elastic cord, a thick needle, pretty buttons and possibly a revolving punch or hand punch for round holes. You can also use eyelets, like Mormorsglamour did. 

  1. I began by dressing my boxes in the same technique I always do, as shown in this previous blog post, Turquoise boxes with pretty corners. This time I chose craft glue which I smeared with a brush.
  2. Make two holes in the lid for the loop. Use a revolving punch, a hand punch or make the holes with a thick needle or awl.
  3. Thread elastic cord through the holes and tie a knot on the inside. Make the loop an inch or so, depending on how far down on the box you intend to place your button.
  4. Measure where you want the button to be and make two holes in the front of your box.
  5. Sew the button in place with a piece of elastic cord (or thread). Tie a knot on the inside of the box to attach the button.
  6. Put the lid on top of the box, thread the loop over the button and “lock” the box. Mix and match patterned papers and buttons as you wish. My boxes kept a theme – graphic patterns in black and white.

Storage box makeover - by Craft & Creativity

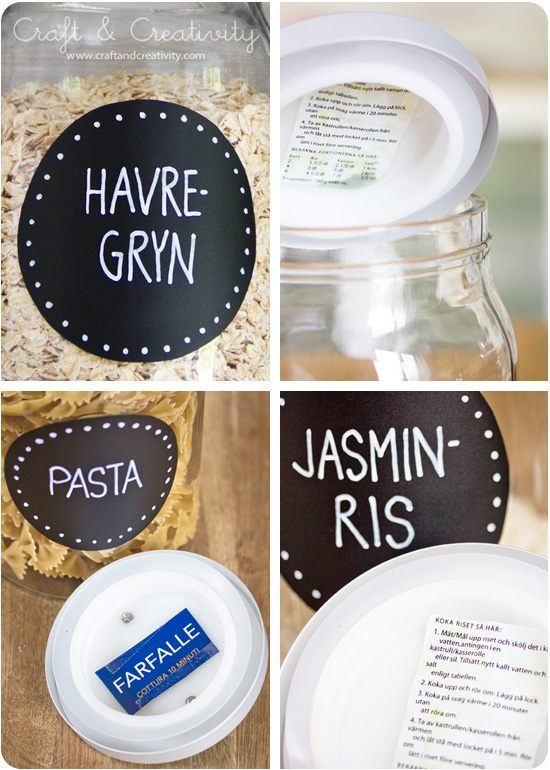
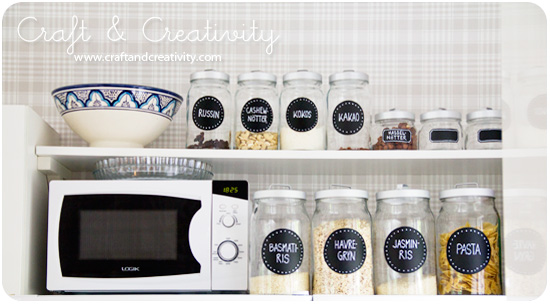
Istället för “knapplåset” kan du sätta etiketter eller stickers på lådorna. Ovan dyker även min pimpade byrå upp, den som jag skrev om härom dagen. Väggdekalerna som sitter på vår vägg i hallen och som ser ut som tomma ramar är inhandlade på Ikea för några år sedan.
———–
Instead of the button clasps, you can put labels on your boxes, like with these sticker labels in the same line of design as the paper. Above you can also spot my pimped drawers from a previous blog post. The wall decals on the wall that look like empty frames where purchased at Ikea a few years back. 

Storage box makeover - by Craft & Creativity

Enkel blomvas à la Ernst –
Simple flower vase

Simple flower vase - by Craft & Creativity

Nu är jag tillbaka efter ett litet uppehåll från bloggvärlden. Förutom att jag sprungit på Formex-mässan och varit på jobbresa i Danmark har jag unnat mig lite ledighet med bland annat en minisemester på Ormsö utanför Estland. En annan sak som jag och familjen roat oss med var att titta på “Sommar med Ernst“. Döttrarna gillar honom skarpt och även jag blev inspirerad. Bland annat fick jag inspiration till denna blomvas som jag fyllt med sensommarblomster från vår trädgård.
———-
I’m back after a short break from the blogosphere. Besides from a fun day at the Formex fair (the largest interior design fair for Nordic design), I’ve been on the job trip to Denmark and I also allowed myself some time off, including a mini-vacation to Ormsö outside the coast of Estonia. Another thing me and my family did together this summer was to watch a Swedish tv-show called “Summer with Ernst” (Ernst is a interior decorator and popular tv host). My daughters like his programs and I was also inspired. Among other things, I got the inspiration to make this flower vase and filled it with late summer flowers from our garden. 

Simple flower vase - by Craft & Creativity

Ernst använde en cylindervas till sin kreation. Jag hade ingen sådan hemma så jag tog en stor glasburk istället. Jag lät bli att limma fast trästammarna, istället nöjde mig med att bara surra fast dem runt min burk med hjälp av naturhampa. På så sätt har jag möjlighet att använda dem till något annat senare om jag vill. Mina halva trästammar är köpta färdigkapade men du kan förstås även gå ut och plocka träpinnar i naturen och såga till dem i lagom längd.
———-
Ernst used a cylinder vase for his creation. I did’t have one at home so I used a big glass jar instead. I chose not to glue the sticks in place so instead I simply tied them to the vase using hemp thread. This way I can use them for something else later on if I feel like it. My wooden sticks comes from my shop, but you could easily go out and pick some yourself and make them the length you prefer. 

Simple flower vase - by Craft & Creativity

Jag är så glad för min nya kamera (Canon EOS 6D + 50 mm 1.4 lins). Det har blivit många bilder fotade den här sommaren. 🙂
Önskar er en riktigt trevlig helg!
——-
I’m so happy for my new camera (Canon EOS 6D + 50 mm 1.4 lens). I’ve taken loads of pictures with it this summer. 🙂
I wish you a nice weekend!

Pappersrosetter – Paper bows

Pappersrosetter / Paper bows - by Craft & Creativity

How About Orange är namnet på en amerikansk blogg som jag följt i flera år. Jessica som driver bloggen tipsar om fiffiga och fina pyssel och länkar ofta till mallar och snygga typsnitt som går att ladda ner gratis. Det var på hennes blogg som jag hittade mallen till dessa söta pappersrosetter.
———
For years I’ve been a big fan of the blog How About Orange. Jessica who runs the blog shares great craft ideas with her readers, and often links to templates and pretty fonts that are available to download for free. It was at her blog that I found the template for these cute paper bows. 

Pappersrosetter / Paper bows - by Craft & Creativity

Ladda hem mallen från How About Orange, klipp ut och använd på valfritt papper. Montera ihop rosetterna med lim eller dubbelhäftande tejp. På Jessicas blogg finns även beskrivande text och bilder som visar hur du går till väga. Det är inte svårt alls!
——–
Download the template from How About Orange, cut out the template and use on your choice of paper. Use glue or double-sided adhesive tape to assemble your bows. You’ll find a great tutorial over at Jessica’s blog. It’s not difficult at all! 

Pappersrosetter / Paper bows - by Craft & Creativity

Pappersrosetterna kan användas till att pynta ett paket eller en ask. De är också fina att placera på tallrikarna till en festlig dukning. De runda askarna på bilderna är klädda med samma typ av papper, beskrivning till dessa hittar ni i ett tidigare blogginlägg.
———–
The paper bows can be used to decorate a gift or a box. They also work well for decorating plates at a table setting. The round boxes in the pictures have been covered with the same kind of paper, a tutorial for these can be found in a previous blog post.

Våningsfat av vinylskivor –
Vinyl record cake stand

Vinyl Record Cake Stand - by Craft & Creativity

Jag är så glad för mina kakfat av gammalt porslin som jag gjorde i vintras! Ända sedan dess har jag varit sugen på att även göra ett kakfat att gamla skivor. Den uppenbara fördelen med vinylskivor är att du slipper borra hål – hålen finns ju redan där. 😉 Inte för att det är svårt att borra i porslin men det blir ju trots allt ett moment mindre. Nu var det bara till att skruva ihop delarna och fatet var klart på under fem minuter. Jag valde en rund variant av kakfatsdelar i svart utförande men det finns en mängd olika kakfatsdelar att välja mellan.
——–
I’m very fond of those porcelain cake stands I made last winter! Ever since I made them I’ve been wanting to make cake stands out of old vinyl records. One advantage of using vinyl records is that you don’t need to drill holes – they’re already there. 😉 Not that it’s difficult to drill in china, but this was quicker. All I had to do was to screw the cake stand parts together and the cake stand was ready in less then five minutes. For those of you non-Scandinavian, Etsy is probably a good place to look for cake stand kits. 

Vinyl Record Cake Stand - by Craft & Creativity

LP-skivor, 10″-skivor och singlar i vinyl kan du hitta billigt på loppis (om du inte redan har ett gäng i garaget…). Ju tjockare vinylskivor desto bättre. Då tål kakfatet mer tyngd. När det gäller singlar så leta efter skivor som har litet centrumhål. I mitt fall var hålet 1/2 mm för stort och jag fick förstärka med en limklick. Det går också bra att sätta en liten metallplatta under. Tips: Sätt fyra möbeltassar eller limkuddar i botten för att få ett stadigt kakfat.
———
You can find old vinyl records at the flea market for a bargain (if you don’t already have a bunch stucked away in your garage …). The thicker the vinyl the better and the cake stand will withstand more weight. When it comes to 7″ singles, look for vinyls with a small center hole. In my case the hole was a tiny bit too big and I had to reinforce with a dab of glue.  Tip: Put four felt pads or glue dots underneath to make the cake stand more stable. 

Vinyl Record Cake Stand - by Craft & Creativity

Ett alternativ är att forma en eller flera vinylskivor som en skål genom att värma dem i ugnen. Nu ska jag smaska Engelsk konfekt! 🙂
——–
Another option is to shape one or two of the vinyl like a bowl by heating them in the oven. Now I’m off to enjoy some Licorice Allsorts! 🙂

Burkar med tavelfolie –
Blackboard foil on jars

Blackboardfoil on jars - by Craft & Creativity

Jag är inne i en period där jag tycker det är roligt att organisera upp saker hemma. Jag har städat mitt pysselrum och märkt upp alla lådor. Jag har sorterat barnens kläder, plockat bort allt som är för litet och ordnat snyggt i deras garderober och nu har jag även fixat fint ovanpå kylen & frysen. En plats som tidigare var ett katastrofområde. Känns skönt!
——–
I’m in a period where I think it’s fun to organize stuff in our house. I have tidied up my craft room and labeled all my boxes. I have sorted the kids’ clothes, picked out everything that’s too small and arranged the rest neatly in their closets. In addition to all of this, I’ve also organized on top of the fridge and the freezer, which was previously a disaster area. Feels great!

Blackboardfoil on jars - by Craft & Creativity

Min man kläckte idén att vi skulle sätta upp en hylla ovanför vår halvhöga kyl & frys, ett svårdisponerat utrymme som hittills utnyttjats till förvaring av allt möjligt jox. Aha, tänkte jag! Där kan vi ha burkar med våra basvaror, lättillgängligt och snyggt. Vi styrde kosan mot Ikea och inhandlade hylla, konsoler och ett gäng billiga burkar.

Under tiden maken satte upp hyllan gjorde jag etiketter till burkarna av tavelfolie/dekor-plast från Make & Create. Lätt som en plätt! Jag använde dricksglas som mall, ritade runt dem på baksidan av plasten och klippte ut. Sedan tog jag bort skyddspapperet, fäste etiketterna på burkarna och ritade med en permanent vit penna – Poster Hobby Marker. Klart! Det går förstås även att skriva med tavelkritor på tavelfolien, men vi ville ha en permanent lösning.
———–
My husband came up with the idea to put up a shelf above our fridge and freezer, a space that’s been hard to dispose and where we’ve been storing all kind of stuff, in a total mess.  I thought his idea was great! Why not use this space to store jars with our basic groceries, in a neat and presentable way. We headed over to Ikea and bought a shelf, brackets and a whole bunch of affordable jars. 

Meanwhile my husband put up the shelf, I made labels for the jars with blackboard foil from my shop, Make & Create. It was a piece of cake!  I used a drinking glasses as templates, drew around them with a pen on the back of the plastic and cut. I then removed the protective paper, mount the labels on the jars and wrote on them with a permanent white hobby marker. That was it! You could also use chalk on the blackboard foil, but we wanted a permanent solution. 

Blackboardfoil on jars - by Craft & Creativity

Maken hade fler goda idéer på lager och kom på att vi skulle tejpa fast förpackningarnas kokanvisningar på insidan av locken! En smart lösning eftersom jag aldrig kommer ihåg hur länge man ska koka saker och ting… 😉
———
My husband had more good ideas in stock and suggested that we should tape the boiling instructions from the packages inside the lids! A smart solution since I never can remember for how long you should cook different things … 😉

Blackboardfoil on jars - by Craft & Creativity

Ordning på torpet! / Everything neat and organized! 

Papperståg – Paper train

Papperståg / Paper train - Craft & Creativity

Att bygga modeller är roligt, det tycker både jag och mina legoentusiaster till barn. Därför blev jag populär när jag kom hem med det det här papperståget.
———-
Both me and my lego loving girls think model building is fun. Me brining home this paper train from work for testing became a great success.

Papperståg / Paper train - Craft & Creativity

Vi samlades runt köksbordet för att montera ihop vagnarna och loket. Åttaåringen fixade instruktionerna utan problem och femåringen & jag hjälptes åt. Delarna är utstansade och enkla att trycka ut och vika ihop. Tydliga steg-för-steg beskrivningar ingår i paketet och ark med pappersbokstäver så barnen kan dekorera vagnarna med sina namn om de vill. Små konduktörer följer också med. Det enda man behöver komplettera med är dubbelhäftande tejp och limstift/papperslim om man inte har det hemma redan.
————
We gathered around the kitchen table to mount the wagons and the locomotive. My eight year old girl had no trouble following the instructions by herself while me and the five year worked together as a team. All the parts are pre-cut and easy to fold and mount. Step-by-step instructions are included as well as a sheet of paper letters for the kids to use when decorating the train with their names. The only thing not included is double-sided adhesive tape and a glue stick or paper glue. 

Papperståg / Paper train - Craft & Creativity

Mina tjejer har mest lekt med tågen men jag tänker mig också att det skulle vara fint att fylla ett tåg med godis till ett kalas och låta det vara en del av dukningen till exempel.
————
My girls have been using the train to play with, but another idea is to use it for a birthday party table setting and fill it with candy for example.

Naturtrogna askar –
Natural looking boxes

Naturtrogna askar / Natural looking boxes - Craft & Creativity

En av de många fördelarna med att ha en pysselbutik är att jag får möjlighet att testa en massa nytt roligt pysselmaterial 🙂 men det gäller att förvara det på ett bra sätt också. Jag gillar ordning och att snabbt kunna hitta materialet jag behöver när inspirationen faller på. Bra förvaring är A och O och till det använder jag gärna både glasburkar, askar, hyllor och lådor. Jag märker upp dem för att veta vad som är i, mer om det i ett annat blogginlägg.
———–
One of the many great advantages of having a craft shop is that I get to test a lot of new fun craft supplies 🙂 , but it also requieres good storage. I’m a fan of structure and want to be able to quickly find the material I need when inspiration strikes. I use both jars, boxes, shelves and drawers to organize my supplies in a neat way. I tag my boxes to know what’s in them, more about that in another blog post.

Naturtrogna askar / Natural looking boxes - Craft & Creativity

Att klä om askar är något jag aldrig tröttnar på. Det går snabbt och jag kan själv välja precis hur de ska se ut. Jag tycker verkligen om den naturliga look som dessa fick. Det passar fint till den runda formen på askarna.
———–
I never get tired of dressing boxes. It’s quick and I can create whatever look I want. I really like the natural look of these ones. The patterns looks nice in combination with the round shapes of the boxes. 

Naturtrogna askar / Natural looking boxes - Craft & Creativity

AskFörst klippte jag till papperet i ungefär rätt bredd och längd för att passa runt asken. Jag limmade med universsallim (går säkert lika bra med limstift eller papperslim), satte gummiband runt och lät torka. Sedan trimmade jag kanterna snygga genom att klippa bort överflödigt papper med en sax. Om man vill att locket ska vara enkelt att ta av och på kan det vara smart att inte låta papperet gå ända upp till kanten, upptäckte jag efter två askar…
————
I started by cutting the paper in roughly the right width and length, to fit around the sides of the box. I used All Purpose Glue (glue stick or paper glue surely works as well) to glue the paper around the box, put a rubber band around and allowed to dry. I then trimmed the edges by cutting off excess paper with a pair of scissors. 

Naturtrogna askar / Natural looking boxes - Craft & Creativity

Sedan var det lockens tur. Jag använde locken som mall, ritade runt på baksidan av papperet och klippte ut. Sidorna på locket gjorde jag på samma sätt som när jag täckte asken. Även här satte jag gummiband runt medan det torkade. Slutligen limmade jag fast toppen på locket.
———
Then it was time for the lids. I used each lid as a template, drew around the lids on the back of the paper and cut. For the sides of the lid, I went about in the same way as when covering the box. Again, I put rubber bands around while drying. I finished off by gluing the top of the lid in place.

Naturtrogna askar / Natural looking boxes - Craft & Creativity

Här utnyttjade jag det faktum att papperet är dubbelsidigt och valde att täcka både utsidan och insidan. Notera att insidan består av aviga maskor och utsidan av räta maskor… Lite skoj! 🙂
————
Here I took advantage of the fact that the paper is printed on both sides and chose to cover both outside and inside. Note that the inside shows purl stitches and outside knit stitches … Kind of fun! 🙂

Loppisfynd – Flea market find

Jag vet inte om ni lade märke till porslinsljusstaken i förra inlägget. För mig har den blivit en ny favorit och nu är ju den perfekta tiden på året att tända ljus, så ofta som möjligt. Det är visserligen ingen adventsstake, men tål kanske att visas idag ändå. 😉
—-
I don’t know if you noticed the porcelain candle holder in my last post. It’s become a new favorite of mine, and this is the perfect season to light candles, as often as possible.

Jag köpte ljusstaken på loppis, för ynka tjugolappen och pyntade till den med dekorationsband från egna butiken. /
I bought the candle holder at a flea market for 20 SEK (2 Euro / 3 USD) and decorated it with ribbons from my own web shop.


Ps. Det syns att dessa bilder är tagna tidigare i veckan, då inte snön hunnit göra trädgården vit och vintrig. 😉 /
Ps. It’s obvious that these pictures were taken earlier in the week, before the snow made the garden all white and wintry. 😉 

Juliga burkar – Christmas glass jars


Jag såg några burkar med målat korsstygsmönster i en affär och fick idén att göra det själv och dessutom passa på och återvinna några av de gamla glasburkar som jag har liggande hemma i skåpen. /
I saw some cross stitch decorated jars at a local shop and decided to make my own and at the same way recycle some of those old glass jars I have in my cabinets. 

Jag skrev GOD JUL i datorn, skrev ut på skrivaren och klippte till pappersarket så det passade inuti burken. Sedan kalkerade jag med en röd tusch på utsidan av glaset. Typsnittet heter Costura och går att ladda ner gratis på Font Squirrel. Man kan använda glastuschpennor men jag använde Poster Hobby Marker som fäste väldigt bra. Bör dock inte diskas i maskin.
—-
I wrote GOD JUL (Swedish for Merry Christmas) on my computer, printed and trimmed the paper to fit inside the jar. I then traced the text with a red marker on the glass. The font is called Costura and can be downloaded for free at Font Squirrel. You can use regular glass & porcelain markers, but I used Poster Hobby Markers and they worked very well on glass. Not dishwasher-safe though. 


På några burkar ritade jag snöflingor med vit Hobby Marker. För att göra en lykta, virade jag ståltråd runt toppen av burken och gjorde en båge för upphängning. /
On some of the jars I drew snowflakes with a white Hobby Marker. To make a lantern, I twisted wire around the top and made a loop for hanging. 

Idag är det dags! – Today is the Day!

Idag är det dags. Dagen D. Dags att berätta vad som sysselsatt mig den senaste tiden. Vad som gjort att jag jobbat nästan dygnet runt och varit totalt osocial mot familj, släkt & vänner (förlåt!).

Ända sedan jag startade bloggen för ganska precis 1 år sedan har jag närt en dröm om att öppna en webbutik för gör-det-själv entusiaster. Tillsammans med en kollega har jag nu förverkligat detta.

Vi vill erbjuda kvalitetsprodukter utvalda av kreativa människor, för kreativa människor. Hos oss ska du kunna hitta inspiration och material, oavsett om du skapar för att göra ditt hem mer personligt med unik design, för att det är en rolig hobby att dela med barnen, eller för att det helt enkelt får dig att koppla av och må bra.

Butiken är fortfarande under utveckling och mycket kommer ske så här i starten. Inom kort kommer vi ta in fler intressanta produkter, lansera ytterligare funktioner, erbjuda fler betallösningar och inte minst fylla idébanken med ännu mer inspiration och beskrivningar. Det här är bara början men någon gång måste jag våga släppa taget, fast allt inte känns perfekt. Det känns enormt spännande, roligt och inte minst – väldigt väldigt nervöst.

Today is the day. D-Day. Time to tell you all what’s been keeping me occupied lately. What has made me work almost around the clock with very little spear time for family & friends (sorry!).

Ever since I started this blog, about one year ago, I have nurtured a dream of opening an online store for Do-It-Yourself enthusiasts. Together with a colleague, I have now actualized this dream. For now, the shop is limited to the Swedish market. But if all goes as planned, we will launch it abroad in the future. 

We aim to offer quality products selected by creative people, for creative people. You will be able to find inspiration and supplies, whether you create to make your home more personal with your own unique design, because it’s a fun hobby to share with your kids, or simply a way to relax and feel good.

The shop is still under development, and much will happen in the beginning. Soon we will offer more fun products, launch additional features, offer more payment solutions and last but not least – fill the idea bank with even more inspiration and tutorials. This is just the beginning, but at some point I have to dare to let go, even though everything isn’t perfect. It feels exciting, fun and very very nervous.