Hållare för washitejp –
Washi tape dispenser

Washi tape dispenser - by Craft & Creativity

Min vän Karin tipsade mig om Esther på Crafts Unleashed som pysslat ihop en hållare för washitejp av en husformad ask. Eftersom jag gillar både washitejp och husformer kändes det här som en himla kul kombination. Hållare och förvaring i ett! Små husaskar hade jag redan hemma.
———–
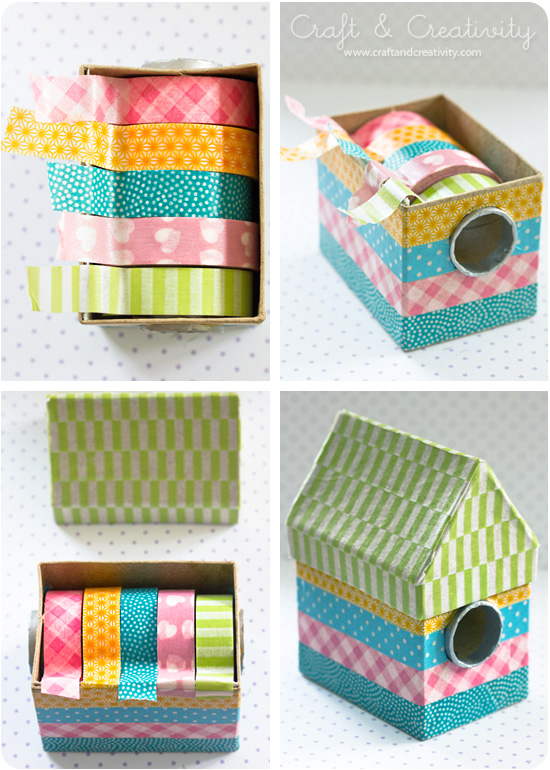
My friend Karin told me about Esther at Crafts Unleashed who made a dispenser for washi tape out of a house-shaped box. Since I’m a fan of both washi tape and house shapes, this felt like a really great combination. Holder and storage in one! I already had small house boxes at home.

Washi tape dispenser - by Craft & Creativity

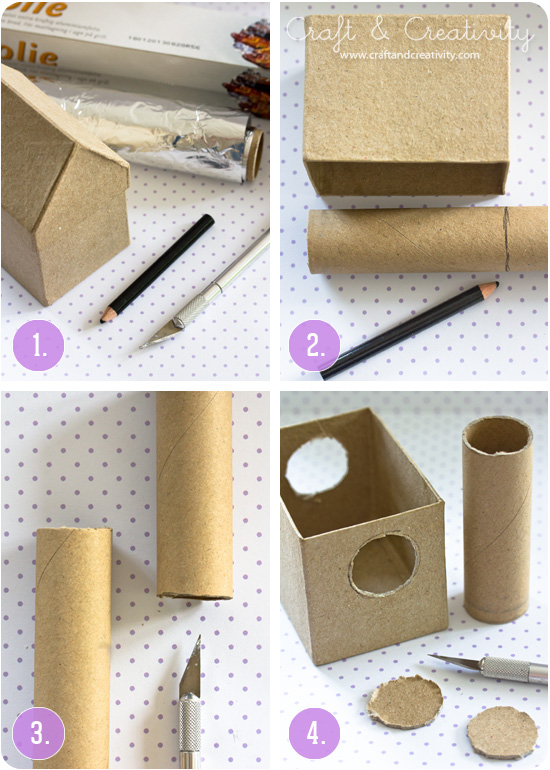
  • Esther använde rundstav till sin ask men någon sådan hade jag inte hemma. Efter att ha rotat runt i lådorna hittade jag istället en rulle ugnsfolie som det bara var lite folie kvar på. Perfekt diameter och den var dessutom lättare att kapa än en rundstav i trä.
  • Jag måttade rullen mot asken och ritade ett streck ca 6 mm bredare än långsidan, eftersom rullen ska sticka ut en liten bit på båda sidor.
  • För att kapa rullen använde jag en hobbykniv. Akta fingarna!
  • Med rullen måttade jag fram de två runda hålen på askens kortsidor. Tänk på att tejpen ska få plats på rullen också. Se till så att det finns drygt 1 cm plats från utkanten av hålet till hörnet av asken och ca 1 cm plats upp till överkanten (måtta själv så det blir rätt för just dina tejprullar). Jag skar ut hålen med min hobbykniv.
  • Esther used a round wooden rod for her box but I didn’t have one at hand. Having rummaged through my drawers, I found an almost empty roll of tinfoil instead. It had the perfect diameter and was easier to cut than wood.
  • I measured the roll with the length of the box and drew a line about 6 mm wider then the box, since the roller should stick out a little bit on both sides.
  • To cut the roll, I used a hobby knife. Be careful!
  • With the roll I traced two round holes on opposite sides of the box. Remember to leave space for the tape. Make sure there’s a little bit more then 1 cm space from the edge of the hole to the corner of the box and about 1 cm space to the top. I cut out the holes with my hobby knife. 

Washi tape dispenser - by Craft & Creativity

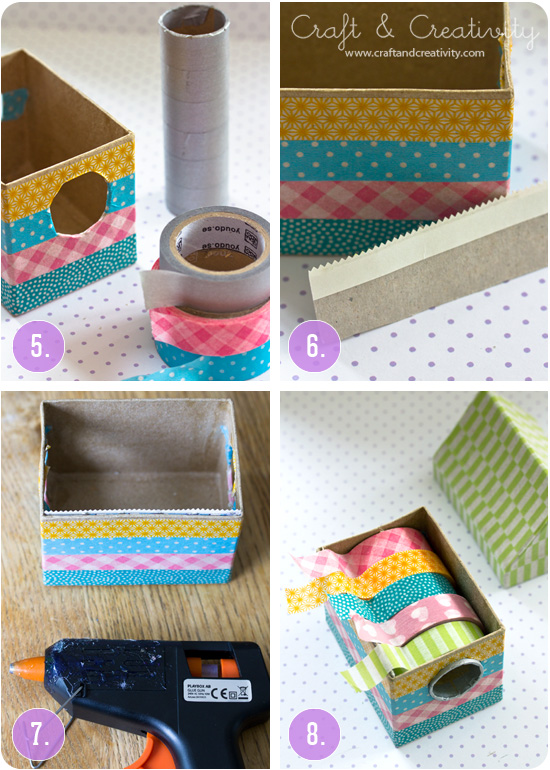
  • Hur ska man dekorera en hållare för washitejp om inte med… washitejp. 😉
  • Förpackningar för ugns- och plastfolie har ofta en taggig kant för att riva av folien. Jag återanvände en liten bit av en sådan. Här snackar vi återvinning!
  • Den taggiga kanten limmade jag fast på asken med en limpistol.
  • I med tejpen på rullen och in med allt i asken. Så var min washitejphållare klar!
  • What better way to decorate a washi tape dispenser if not with … washi tape. 😉
  • Tinfoil and plastic film boxes often comes with a cutting strip for tearing the foil. I used a piece of cutting strip from my box. Talk about recycling! 
  • I glued the cutting strip onto the box with a glue gun.
  • Time to put the tape on the reel and put the reel in place in the box. Now my washi tape holder is ready to use! 

Washi tape dispenser - by Craft & Creativity

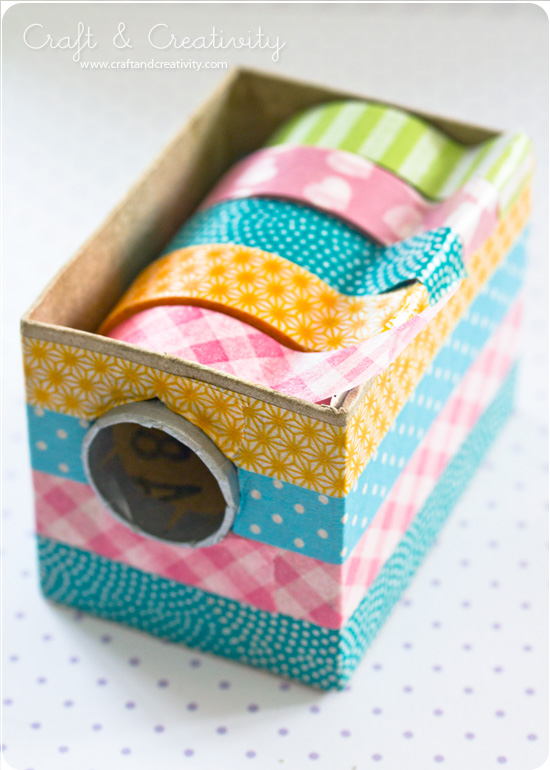
Nu råkar jag ha liiite mer tejp än så här men den här får innehålla mina favoritmönster! 🙂 Besök gärna Crafts Unleashed för att se Esthers fina washitejphållare och många andra roliga DIY-projekt.
———-
I happen to have a bit more tape than this, but here I can store my favorite patterns! 🙂 Be sure to pay a visit to Crafts Unleashed for a look at Esther’s pretty washi tape dispenser and many other fun DIY projects.

Burkar med tavelfolie –
Blackboard foil on jars

Blackboardfoil on jars - by Craft & Creativity

Jag är inne i en period där jag tycker det är roligt att organisera upp saker hemma. Jag har städat mitt pysselrum och märkt upp alla lådor. Jag har sorterat barnens kläder, plockat bort allt som är för litet och ordnat snyggt i deras garderober och nu har jag även fixat fint ovanpå kylen & frysen. En plats som tidigare var ett katastrofområde. Känns skönt!
——–
I’m in a period where I think it’s fun to organize stuff in our house. I have tidied up my craft room and labeled all my boxes. I have sorted the kids’ clothes, picked out everything that’s too small and arranged the rest neatly in their closets. In addition to all of this, I’ve also organized on top of the fridge and the freezer, which was previously a disaster area. Feels great!

Blackboardfoil on jars - by Craft & Creativity

Min man kläckte idén att vi skulle sätta upp en hylla ovanför vår halvhöga kyl & frys, ett svårdisponerat utrymme som hittills utnyttjats till förvaring av allt möjligt jox. Aha, tänkte jag! Där kan vi ha burkar med våra basvaror, lättillgängligt och snyggt. Vi styrde kosan mot Ikea och inhandlade hylla, konsoler och ett gäng billiga burkar.

Under tiden maken satte upp hyllan gjorde jag etiketter till burkarna av tavelfolie/dekor-plast från Make & Create. Lätt som en plätt! Jag använde dricksglas som mall, ritade runt dem på baksidan av plasten och klippte ut. Sedan tog jag bort skyddspapperet, fäste etiketterna på burkarna och ritade med en permanent vit penna – Poster Hobby Marker. Klart! Det går förstås även att skriva med tavelkritor på tavelfolien, men vi ville ha en permanent lösning.
———–
My husband came up with the idea to put up a shelf above our fridge and freezer, a space that’s been hard to dispose and where we’ve been storing all kind of stuff, in a total mess.  I thought his idea was great! Why not use this space to store jars with our basic groceries, in a neat and presentable way. We headed over to Ikea and bought a shelf, brackets and a whole bunch of affordable jars. 

Meanwhile my husband put up the shelf, I made labels for the jars with blackboard foil from my shop, Make & Create. It was a piece of cake!  I used a drinking glasses as templates, drew around them with a pen on the back of the plastic and cut. I then removed the protective paper, mount the labels on the jars and wrote on them with a permanent white hobby marker. That was it! You could also use chalk on the blackboard foil, but we wanted a permanent solution. 

Blackboardfoil on jars - by Craft & Creativity

Maken hade fler goda idéer på lager och kom på att vi skulle tejpa fast förpackningarnas kokanvisningar på insidan av locken! En smart lösning eftersom jag aldrig kommer ihåg hur länge man ska koka saker och ting… 😉
———
My husband had more good ideas in stock and suggested that we should tape the boiling instructions from the packages inside the lids! A smart solution since I never can remember for how long you should cook different things … 😉

Blackboardfoil on jars - by Craft & Creativity

Ordning på torpet! / Everything neat and organized! 

Ägg med mustasch – Mustache Eggs

Mustache Eggs - by Craft & Creativity

Att mustascher är i ropet i inrednings- och pysselvärlden är inget nytt under solen. Jag kan inte heller säga att jag är först med att måla mustascher på ägg. Men det spelar ingen roll – det är värt att upprepas. Ett snabbare påskpyssel är svårt att hitta och jag tycker att äggubbarna blev galet söta! Det blev lite Hercule Poirot över dem!
———-
That mustaches are trendy in the design and craft world, isn’t exactly new. And I can’t claim to be the first to put mustaches on eggs. But it doesn’t matter – it’s worth repeating. A quicker Easter craft is hard to find and I think my egg-men turned our crazy cute! They kind of look like Hercule Poirot! 

Mustache Eggs - by Craft & Creativity

Idén har jag, som sagt, sett på flera ställen, bland annat hos No. 2 Pencil, fast hon färgade sina ägg och gjorde mustascherna i svart självhäftande vinyl och de blev supersnygga! Jag var lite lat och målade mina med tusch istället. 😉
———–
As mentioned, I’ve seen this idea around, for example at No. 2 Pencil, although she colored her eggs and made the mustaches out of black adhesive vinyl and they turned out fantastic! Since I’m a bit lazy, I simply painted mine with a fiber pen. 😉 

Mustache Eggs - by Craft & Creativity

Glad Påsk på er mina kära bloggläsare! Hoppas ni får en riktigt mysig påsk med trevligt sällskap, god mat & en och annan sockerchock. Själv ska jag umgås med familj, släkt & vänner och på påskafton blir det påskpyssel hemma hos mamma, som traditionen bjuder.
———-
Happy Easter to you my dear blog readers! I wish you a nice Easter holiday. I will be spending mine with family & friends and on Easter Saturday we will be Easter crafting at my mum’s house, as a part of our Easter tradition. 

Hylla för nagellack – Nail polish shelf

Nail polish shelf (decorated with washi tape) - by Craft & Creativity

Ett roligt sätt att använda prylhyllor är som förvaring för nagellack. Nagellacksflaskor är ofta dekorativa så varför gömma undan dem? Jag vet att åsikterna går isär, huruvida man ska förvara dem i kylskåp eller ej. Jag har för min del aldrig märkt någon skillnad.
——-
A fun way to use small shelves like these is to use them for nail polish storage. Nail polish bottles are often decorative so why not display them? I’m aware that opinions differ, whether to store them in the fridge or not. However, I never noticed any difference.

Nail polish shelf (decorated with washi tape) - by Craft & Creativity  Nail polish shelf (decorated with washi tape) - by Craft & Creativity

Den här hyllan är målad vit och dekorerad med washitejp. Man kan även använda bitar av tapetprover, mönstrat papper, decoupagepapper eller fina servetter. /
This shelf is painted white and decorated with washi tape. You could also use pieces of wallpaper samples, scraps of patterned paper, decoupage paper or pretty paper napkins.

Nail polish shelf (decorated with washi tape) - by Craft & Creativity  Nail polish shelf (decorated with washi tape) - by Craft & Creativity

Fäst tejpen på en bit papper som du klipper till i rätt storlek. Mönsterpassa tejpen för snyggast resultat. Limma sedan fast papperet i de olika facken. Det är enklare än att tejpa direkt på hyllan. Lacka ytan om du vill. /
Add the washi tape to a piece of paper and cut the paper to fit the box. Align the tape pattern for best result. Then glue the paper to the back of each box. It’s much easier than to tape directly on the shelf. If you like you can seal the surface with laquer. 

Nail polish shelf (decorated with washi tape) - by Craft & Creativity

Voilà! Hyllan är klar. Missade du när vi gjorde nyckelskåp av hushyllor, så kan du klicka här. / Voila! You’re done. If you missed out on our house shaped key cabinet, please click here

Nyckelskåp – Key cabinet

Key house - by Craft & Creativity

keycabinet8Jag har sett fina hushyllor lite här och var på sistone, som på Formex-mässan och på mässan i Frankfurt förra helgen. Hyllorna till vänster kommer t ex från Dijk Natural Collections. Inspirerad av dessa och andra hyllor har jag och min kollega gjort ett par egna varianter. Idag tänkte jag visa den första – ett nyckelskåp. Vårt skåp blev mer som en tavla eller ett tittskåp eftersom nycklarna är gamla och ur bruk, men ändå snygga att ha framme. Spikar man däremot dit krokar så kan man göra ett nyckelskåp för nycklar som används, en krok för hemmanyckeln, en för bilnyckeln o s v.
——————
I’ve been noticing house-shaped shelves a bit here and there lately. For example at the Formex fair in Stockholm and at the Frankfurt fair, last weekend. Like these ones to the upper left, from Dijk Natural Collection. This has inspired me and my colleague to decorate our own shelves. Today I’ll show you the first one – a key cabinet. Our shelf works more like a display, since the keys are old and not in use, but still pretty to look at. If you, on the other hand, attach hooks to your shelf, you can use it for everyday keys, i e your house keys, car keys, etc. 

Key house - by Craft & Creativity  Key house - by Craft & Creativity

Huset har vi målat med vit hobbyfärg.
————-
We painted the house with white hobby color. 

Key house - by Craft & Creativity

Vi valde att sätta diskret mönstrade decoupagepapper i de olika facken. Man kan också välja låta den vara helt vit, beroende på tycke & smak.
————-
We chose to cover the back of the compartments with patterned decoupage paper. Or you can choose to keep it white and plain, depending on your preference and taste.

Key house - by Craft & Creativity  Key house - by Craft & Creativity

Key house - by Craft & Creativity

Hjärthänge med droppärlor –
Wired heart ornament

Wired heart - by Craft & Creativity

Jag tänkte visa er ett sött hjärthänge som man kan göra och ge bort till någon man håller kär på alla hjärtans dag (eller vilken dag som helst på året) ;-). Jag har flera liknande hjärthängen hemma och de hänger framme året om, på dörrhandtag och på spjällhandtaget på öppna spisen. Här har jag använt små färdiga metallhjärtan (6 x 6,5 cm) som jag dekorerade med glaspärlor. Man kan också forma hjärtat själv av tjock aluminumtråd t ex.
——
I thought I’d show you these cute heart ornaments that you can make and give away to someone you love. Either on Valentine’s Day or some other day of the year. 😉 I have heart ornaments like these hanging in my house, or door knobs and on our fireplace. Here I’ve used small metal hearts (6 x 6.5 cm) and decorated them with glass beads. You can also form the heart yourself using aluminum wire, for example.

Wired heart - by Craft & Creativity

Jag trädde pärlorna på tunn metalltråd och virade runt metallhjärtat. Droppärlor i glas skapar en fin effekt eftersom de är oregelbundna i formen och finns i olika storlekar. /
I threaded glass beads on thin metal wire and wrapped around the metal heart. Glass drop beads create a pretty effect with their irregular shapes and variety in size.

Wired heart - by Craft & Creativity

Kartonghus-askar –
Paper mache house boxes

Painted papier maché house boxes - by Craft & Creativity

Jag är väldigt förtjust i husformer av alla de slag och dessa söta hus i papier-machè fungerar dessutom som askar. Taket går att lyfta av och i askarna kan man till exempel förvara smycken, barnens små skatter eller pysselmaterial.
————-
I’m a big fan of house shapes of all kinds, and these cute houses can also act as boxes. The roof work as a lid and the boxes can, for example, be used for storing jewelry, small treasures or craft supplies.

Painted papier maché house boxes - by Craft & Creativity  Painted papier maché houses - by Craft & Creativity

Husen levereras omålade. Jag målade mina sparsamt och använde matta pastellfärger som jag tyckte blev fina i kontrast mot den “råa” kartongen. Vissa målade jag endast botten på och andra bara taket.
——-
The houses come unpainted. I painted mine partly and used mat pastel colors, which I thought would look nice in contrast to the “raw” paper mache. I chose to paint either the base of the house or the roof. 

Painted papier maché house boxes - by Craft & Creativity

Ett hus fick bli sparbössa. Jag skar ut ett rektangulärt hål i taket med hjälp av en hobbykniv. Eftersom taket på dessa hus har en liten botten så skar jag bort den också, annars skulle inte pengarna kunna ramla ner i huset.
———–
I turned one of the houses into a money bank. I cut a rectangular hole in the roof with a hobby knife. Since the roof of these houses comes with a bottom, I removed this also. Otherwise the money would not fall down into the house, like I wanted it to. 

Painted papier maché house boxes - by Craft & Creativity  Painted papier maché houses - by Craft & Creativity

Painted papier maché house boxes - by Craft & Creativity  Painted papier maché house boxes - by Craft & Creativity

En annan idé jag fick var att täcka husaskar med washitejp (som med askarna jag dekorerade i höstas). Drömmer man, som jag, om en resa kan man göra ett “sparhus” för reskassan och täcka den med sidor ur en gammal kartbok.

Jag har fler planer för mina hus, plus att jag lovat barnen att de ska få dekorera några. Husaskarna kommer alltså säkert dyka upp fler gånger på bloggen framöver. Tänk er att skära ut fönster och dörr och lägga en liten ljusslinga i eller ett batteridrivet värmeljus. Kan bli fint, tror ni inte? Så många idéer – så lite tid. 😉 Ps. Apropå det, ta en titt på det här ljuvliga katthuset av flyttkartonger… ett sådant vill jag göra!
——
Another idea I got was to cover house boxes with washi tape (like the boxes I decorated last autumn). If you like me, have travelling plans, you can make a money bank for your travel cash and cover it with maps from an old atlas. 

I have additional plans for my houses, plus I promised the kids that they could decorate their own. In other words, the house boxes will probably turn up on the blog again in the future. Imagine cutting out windows and a door and add string lights or a battery-operated tea light inside. Wouldn’t that look nice, you think? So many ideas – so little time. 😉 Ps. Speaking of which, have you seen this cute and original cat playhouse made of cardboard boxes? I need to make one!  

Advent i huset – Christmas in the house


Första advent och dags att julpynta huset. Jag pyntar inte överdrivet mycket men plockar fram mina favoriter som är en blandning av gamla och nya saker.
—–
It’s the first Advent before Christmas and time to decorate the house. My favorite Christmas decorations are a mix of old an new stuff. 

Hyllan i köket ändrar utseende efter säsong. Vissa saker står där året om, som mitt GreenGate och Cath Kidston-porslin. De passar lika bra vår som vinter, tycker jag.

Our kitchen shelf changes look through the seasons. Some of the things have their place there all year round, as my Greengate and Cath Kidston-kitchenware. I think they look nice, winter as well as spring. 


Öppna spisen med blockljus, spraymålad trollhassel och julmattorna är på plats./
The open fireplace with pillar candles and spray-painted witch-hazel.

Jag önskar er alla en riktigt trevlig 1:a advent! För vår del firas den traditionsenligt med julpyssel och julbak hos mamma.
——-
I wish you all a nice first Advent! We will spend it at my mum’s house, baking and crafting for Christmas. As we aways do on this particular Sunday. 

Bokåtervinning – Recycling old books

Efter pärlträffen förra helgen var jag och mamma på loppis. Jag var på jakt efter gamla böcker och fick med mig sju tunga, tjocka uppslagsböcker hem. Jag ville testa en pyssel med utklippta pappershus runt ljushållare, som jag sett bland annat hos Sweet Paul.

After the bead meet last weekend, my mom and I went to a flea market. I was on the search for old books and I brought seven heavy encyclopedias with me home. The plan was to make paper house candle holders, like those I’ve seen at Sweet Paul’s.   

Det var egentligen fotografier på hus jag var ute efter men de lexikon och historieböcker jag fick med mig hem innehöll även vackra bilder på växter, djur, målningar och kartor. Massor med pysselmaterial för framtiden! Som den bokälskare jag är gjorde det lite ont i hjärtat att riva sönder böckerna men jag tröstade mig själv med att de var slitna och att de bara kostade 1 krona styck. Plus att de antagligen kommer sprida mer glädje som inredningsdetaljer än som dammiga gamla böcker på en loppis.
—–
It was originally looking for pictures of old houses, but the dictionaries and history books I came home with also contained beautiful illustrations of flowers, animals, paintings and maps. Lots of material for future crafting! Being the bookwork I am, it was with a little sadness in my heart that I tore the books apart. I consoled myself with the fact that the books were worn and only cost me 1 SEK (10 cent) each. Plus, they are likely to spread more joy as interior accents than dusty old books at a flea shop. 

Jag klippte ut husen med en sax och skar ut några av fönstren med en hobbykniv, för att skapa en genomlysningseffekt. Sedan satte jag papperet runt dricksglas och tejpade ihop på baksidan. Slutligen klippte bort överflödigt papper för att passa glasets form. En annan idé för återvinning kan vara att använda gammal glasburkar.
—-
I cut out the houses with a pair of scissors and cut out a couple of the windows with an exacto knife to create a transparency effect. I wrapped the paper around small drinking glasses and and secured with tape at the back. Finally, I cut away any access paper. Another idea for recycling could be to use old jars instead of glasses. 

   
När jag väl var varm i kläderna fortsatte jag med kartorna och gjorde likadant med dem. /
While I was on a roll, I did the same with the maps. 


En gammal florabok som jag loppisfyndat tidigare fick också vara med och bidra till samlingen av ljuslyktor. De blev nästan finast av alla, tycker jag. Florabilder har jag använt förut när jag tejpade upp dem i hallen på övervåningen. /
An old botanical book from a previous flea market bargain-hunt also contributed to my collection of votives. I think they turned out to be the prettiest of them all. I’ve used botanical pictures before when I taped them to a wall in our upstairs hallway. 

Lego-nyckelhållare – Lego key holder

Med två legotokiga tjejer hemma blir man lätt lite legofantast själv. När jag såg den här roliga nyckelhållaren hos minieco.co.uk och insåg att jag hade alla bitar som krävdes hemma så var det bara att sätta igång. Nu återstår bara att övertala maken att jag ska få sätta upp den på väggen i hallen. Behöver jag lägga till att döttrarna gillar idéen? 🙂
—-
With two lego-loving girls in the house it’s easy to get a bit Lego enthusiastic yourself. When I saw this creative key-holder over at minieco.co.uk and realized that we had all the necessary pieces at home, I got started right away. Now all I have to do is to persuade my husband so I can hang it on the wall … Needless to say, I have the girls on my side. 🙂

Det här är bitarna du behöver. Sedan är det bara att bygga ihop. Inga verktyg och inget klister behövs. För närmare beskrivning, besök gärna mineco.co.uk. /
These are all the pieces you need. Then you can start building. No tools and no glue needed. For further instructions, please take a look att mineco.co.uk