Barnens pennburkar –
The kids’ pen holders

Kid's pen holders - by Craft & Creativity

När jag fixade till mina nya pennburkar för ett par helger sedan så hade jag trevligt pysselsällskap av mina döttrar och två av deras kompisar. Jag tycker deras burkar blev supersnygga!
———-
A couple of weeks ago, while I was making my new pen holders, I had the pleasure of the company of my daughters and two of their friends. I think their pen holders turned out gorgeous!

Kid's pen holders - by Craft & Creativity

Med pennställ i papper, washitejp, prickiga papper och självhäftande djur av mossgummi har tjejerna skapat sina personliga pennburkar, helt efter eget huvud.
———-
With paper pen holders, a mix of washi tape, polka dotted paper and self-adhesive foam rubber animals, the girls created their own personal pen holders using just their imagination. 

Kid's pen holders - by Craft & Creativity

Här har Ellen 4 år målat sin pennburk i olika nyanser av blått och grönt och satt på en liten giraff. Jag tycker att den ser ut som om den är ute i djungeln och äter blad. 😉
———-
Here 4-year-old Ellen has painted her pencil holder in various shades of blue and green, and decorated it with a foam rubber giraffe. I think it looks like he’s out in the jungle eating leaves. 😉

Dekorerade pennburkar –
Decorated pen holders

Decorated pen holder - by Craft & Creativity

Jag vet inte hur det är hemma hos er men vi har alltid brist på pennburkar. De burkar som finns är överfulla med tuschpennor, blyertspennor, saxar, linjaler, penslar och annat småplock. När jag städade barnens pysselhyllor blev jag inspirerad att fixa till ny pennförvaring.

Jag använde pennställ i papp och dekorerade dem med ett mönstrat handgjort papper i turkosa nyanser som jag tycker är fint. Man kan också använda gamla konservburkar och täcka dem med fina papper. En av mina burkar pimpade jag med papperstejp och ett silvrigt band.
—————-

I don’t know about you, but in our house we always have a shortage of pen holders. The ones we have are overfull with felt pens, pencils, scissors, brushes and other little things. When organizing the kids’ craft shelves, I got inspired to create some additional pen storage.

I used cardboard pen holders (you could also use old tin cans) and decorated them with a turquoise patterned handmade paper that I really like. I pimped one of the pen holders with washi tape and a silver ribbon.

Decorated pen holder - by Craft & Creativity

För att fästa papperet på burken använde jag dubbelhäftande tejp. Ett annat alternativ kan vara att använda limstift eller papperslim. Nu är det ordning och reda på våra pennor & penslar!
———-
In order to attach the paper to the paper can, I used adhesive tape. Another way could be to use glue stick or paper adhesive. Voilà! Now all our pens, pencils and brushes are in order! 

Hushyllor på fler sätt –
House shelves in more ways

House shelves - by Craft & Creativity

Jag har visat dessa små söta hushyllor tidigare och då använt dem som förvaring för gamla nycklar och för nagellacksflaskor. Här kommer ytterligare ett par sätt att dekorera prylhyllor och olika användningsområden för dem.
————
I’ve blogged about these cute little shelves before. I then used them as a Key cabinet and a Nail polish shelf. Now I’m going to show you some additional ways to decorate small shelves and different ways to use them.

House shelves - by Craft & Creativity

Hyllan är ursprungligen träfärgad men har målats vit med vanlig hobbyfärg. Jag dekorerade en hylla med en blandning av designpapper och små tapetprover. Längst ner till höger ser ni barnens nallar som min duktiga mamma virkat.
————–
This particular shelf is comes unpainted and I painted it with regular white hobby paint. I decorated the back of one of the house shelves with a mix of paper scraps and wallpaper samples. At the bottom right you can se my girls’ tiny teddy bears, crocheted by my talented mum

House shelves - by Craft & Creativity  House shelves - by Craft & Creativity

Hyllan till vänster är fylld med fina band på trådrullar och har fått en girland med vimplar av washitejp. Jag girlanden på samma sätt som till dotterns upplysta fågelholk. Till höger används hyllan till små flaskor med parfymprover.
———
The shelf to the left is filled with pretty ribbons on spools and decorated with a pennant garland made of washi tape. I made the garland the same way I made the one for my daughter’s birdhouse lamp. The shelf to the right is used to store small bottles of perfume samples. 

Se även: / See also: 
Key Cabinet - by Craft & Creativity  Nail polish shelf - by Craft & Creativity  Birdhouse lamp - by Craft & Creativity

Hylla för nagellack – Nail polish shelf

Nail polish shelf (decorated with washi tape) - by Craft & Creativity

Ett roligt sätt att använda prylhyllor är som förvaring för nagellack. Nagellacksflaskor är ofta dekorativa så varför gömma undan dem? Jag vet att åsikterna går isär, huruvida man ska förvara dem i kylskåp eller ej. Jag har för min del aldrig märkt någon skillnad.
——-
A fun way to use small shelves like these is to use them for nail polish storage. Nail polish bottles are often decorative so why not display them? I’m aware that opinions differ, whether to store them in the fridge or not. However, I never noticed any difference.

Nail polish shelf (decorated with washi tape) - by Craft & Creativity  Nail polish shelf (decorated with washi tape) - by Craft & Creativity

Den här hyllan är målad vit och dekorerad med washitejp. Man kan även använda bitar av tapetprover, mönstrat papper, decoupagepapper eller fina servetter. /
This shelf is painted white and decorated with washi tape. You could also use pieces of wallpaper samples, scraps of patterned paper, decoupage paper or pretty paper napkins.

Nail polish shelf (decorated with washi tape) - by Craft & Creativity  Nail polish shelf (decorated with washi tape) - by Craft & Creativity

Fäst tejpen på en bit papper som du klipper till i rätt storlek. Mönsterpassa tejpen för snyggast resultat. Limma sedan fast papperet i de olika facken. Det är enklare än att tejpa direkt på hyllan. Lacka ytan om du vill. /
Add the washi tape to a piece of paper and cut the paper to fit the box. Align the tape pattern for best result. Then glue the paper to the back of each box. It’s much easier than to tape directly on the shelf. If you like you can seal the surface with laquer. 

Nail polish shelf (decorated with washi tape) - by Craft & Creativity

Voilà! Hyllan är klar. Missade du när vi gjorde nyckelskåp av hushyllor, så kan du klicka här. / Voila! You’re done. If you missed out on our house shaped key cabinet, please click here

Washitejpmagneter –
Washi tape magnets

Washi tape magnets - by Craft & Creativity

Du behöver: Magnetark, washitejp/papperstejp och en sax.
Gör så här: Avlägsna det vita skyddspapperet från magnetarket och tejpa på den självhäftande undersidan. Följ tejpens konturer och klipp runt.
———-
You will need: Adhesive magnetic sheets, washi tape / paper tape and scissors.
Do like this: Peel the paper backing off the magnetic sheets, and add your washi tape on the sticky side of the sheet. Cut around, while tracing the contours of the tape.

Washi tape magnets - by Craft & Creativity

Om du vill att magneterna verkligen ska se ut som tejp kan du klippa kanterna lite ojämnt, för att efterlikna avriven tejp. Det här är nog bland de snabbaste pysslen jag gjort och nu ser vårt kylskåp mycket roligare ut!
———-
If you like your magnets to look more like tape, you can trim the edges unevenly, to imitate torn tape. This is probably one of the quickest craft I’ve made, and our fridge now looks a lot prettier! 

Washi tape magnets - by Craft & Creativity  Washi tape magnets - by Craft & Creativity

Eftersom magnetarken har en självhäftande undersida kan kan även använda vanligt papper och då är variationsmöjligheterna oändliga. Här har jag använt prickigt Color bar papper (100 g) i rosa och grönt. Vykorten ovan kommer från Bea’s of Bloomsbury, Nest Pretty Things och Ryland Peters.
———-
Since the magnetic sheets are adhesive you can also use plain paper. The possibilities are endless. Here I’ve used polka dotted color bar paper, in pink and green. The postcards above comes from Bea’s of Bloomsbury, Nest Pretty Things and Ryland Peters.

Kartonghus-askar –
Paper mache house boxes

Painted papier maché house boxes - by Craft & Creativity

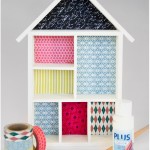
Jag är väldigt förtjust i husformer av alla de slag och dessa söta hus i papier-machè fungerar dessutom som askar. Taket går att lyfta av och i askarna kan man till exempel förvara smycken, barnens små skatter eller pysselmaterial.
————-
I’m a big fan of house shapes of all kinds, and these cute houses can also act as boxes. The roof work as a lid and the boxes can, for example, be used for storing jewelry, small treasures or craft supplies.

Painted papier maché house boxes - by Craft & Creativity  Painted papier maché houses - by Craft & Creativity

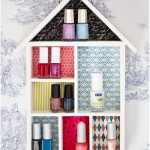
Husen levereras omålade. Jag målade mina sparsamt och använde matta pastellfärger som jag tyckte blev fina i kontrast mot den “råa” kartongen. Vissa målade jag endast botten på och andra bara taket.
——-
The houses come unpainted. I painted mine partly and used mat pastel colors, which I thought would look nice in contrast to the “raw” paper mache. I chose to paint either the base of the house or the roof. 

Painted papier maché house boxes - by Craft & Creativity

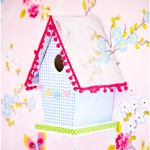
Ett hus fick bli sparbössa. Jag skar ut ett rektangulärt hål i taket med hjälp av en hobbykniv. Eftersom taket på dessa hus har en liten botten så skar jag bort den också, annars skulle inte pengarna kunna ramla ner i huset.
———–
I turned one of the houses into a money bank. I cut a rectangular hole in the roof with a hobby knife. Since the roof of these houses comes with a bottom, I removed this also. Otherwise the money would not fall down into the house, like I wanted it to. 

Painted papier maché house boxes - by Craft & Creativity  Painted papier maché houses - by Craft & Creativity

Painted papier maché house boxes - by Craft & Creativity  Painted papier maché house boxes - by Craft & Creativity

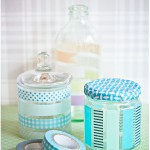
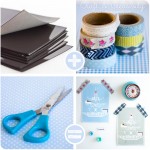
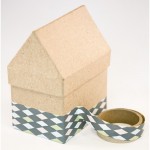
En annan idé jag fick var att täcka husaskar med washitejp (som med askarna jag dekorerade i höstas). Drömmer man, som jag, om en resa kan man göra ett “sparhus” för reskassan och täcka den med sidor ur en gammal kartbok.

Jag har fler planer för mina hus, plus att jag lovat barnen att de ska få dekorera några. Husaskarna kommer alltså säkert dyka upp fler gånger på bloggen framöver. Tänk er att skära ut fönster och dörr och lägga en liten ljusslinga i eller ett batteridrivet värmeljus. Kan bli fint, tror ni inte? Så många idéer – så lite tid. 😉 Ps. Apropå det, ta en titt på det här ljuvliga katthuset av flyttkartonger… ett sådant vill jag göra!
——
Another idea I got was to cover house boxes with washi tape (like the boxes I decorated last autumn). If you like me, have travelling plans, you can make a money bank for your travel cash and cover it with maps from an old atlas. 

I have additional plans for my houses, plus I promised the kids that they could decorate their own. In other words, the house boxes will probably turn up on the blog again in the future. Imagine cutting out windows and a door and add string lights or a battery-operated tea light inside. Wouldn’t that look nice, you think? So many ideas – so little time. 😉 Ps. Speaking of which, have you seen this cute and original cat playhouse made of cardboard boxes? I need to make one!  

Julkort på lina –
Christmas card display

Vad gör man med alla fina kort som förhoppningsvis dimper ner i brevlådan i juletid? Jag brukar hänga upp våra på en lina under tavellisten i köket.
——–
How do you display all those lovely Christmas cards that you receive around Christmas time? I usually hang mine on a wire, underneath the picture ledge in our kitchen.

Spänn en tunn ståltråd eller lina runt en tavellist eller under en hylla och använd klädnypor för att fästa julkorten.
————-
String a piece of thin wire around a picture ledge or under a shelf, and use clothespins to display the Christmas cards.

Vill man pynta till klädnyporna så går det enkelt med en bit dubbelhäftande tejp och lite presentsnöre eller ett fint papper. Eller så täcker man klädnypan med en bit washitejp.
———
If you wish to decorate your clothespins, you can easily do so with some double sided adhesive tape and a piece of gift ribbon (or paper scraps). Or simply cover the clothespins with some washi tape.


Adventsstjärnor i ny skrud –
Advent star makeover

Förra fredagen fick vi fint besök av Karin och hennes dotter Freja från Pysselbolaget. Vi pysslade och bollade idéer tillsammans en hel eftermiddag och kreativiteten sprutade, både bland vuxna & barn. Så roligt! Dessa omgjorda adventsstjärnor är ett av många resultat av denna dag. Idén var att pynta färdiga adventsstjärnor på olika sätt. Antingen köper man nya eller så gör man om gamla som man har hemma.
—–
Last Friday we got a nice visit from Karin and her daughter Freja from Pysselbolaget. We crafted together and exchanged ideas an entire afternoon. There was a flow of creativity in the air, both among us adults and the children. We had so much fun! These pimped Advent stars are one of many result of this day. The idea was to decorate pre-made Advent stars in different ways. You could either buy new ones or use old ones from your stash. 

Jag valde att täckte en stjärna med boksidor från en gammal uppslagsbok och limmade och lackade med decoupagelack. Enklast är att börja med att klippa ut en trekantig mall som passar formen av stjärnans udd. Använd sedan mallen för att få rätt form på papperet. Se bilderna ovan. Pensla limmet på stjärnan, lägg papperet på plats och släta ut eventuella ojämnheter med fingrarna. Täck en udd i taget och vänd sedan på stjärnan och ta andra sidan. Blir kanterna ojämna kan du putsa dem med en sax. När stjärnan är helt täckt, lacka ytan med samma decaupagelack som du använde för att limma med. Jag använde blank lack men så här i efterhand hade jag hellre använt den matta varianten. Men det är ju en smaksak.
—–
I chose to cover one star with book pages from an old encyclopedia and used decoupage lacquer (i.e. Mod Podge) for glue and finish. I found that the easiest way is to start by cutting out a triangular template that fit the shape of the points of the star. Then use the template to get the correct shape when cutting the book pages. See the pictures for guidance. Brush decoupage laquer on the star, put the paper in place and smooth out any irregularities with your fingers. Cover one point at a time and then turn the star around and do the other side. If the edges get uneven, you can trim them with a pair of scissors. When the star is completely covered, paint the surface with the same decoupage laquer you used to glue with. I chose the glossy kind, but in retrospect, I would rather have used the matte one. But that’s just a matter of taste. 


A comment for you non-Swedish readers: In Sweden it’s very common to hang these Advent stars in the windows on the first Advent before Christmas. 

Blinka lilla stjärna. Vår andra stjärna tejpade vi med papperstejp, s k washitejp. Ganska effektfullt det också och mindre kladdigt att jobba med än lim/lack. /
Twinkle twinkle little star. We decorated our second star with paper tape, so called washi tape. Pretty effect-full, and less messy to work with compared to glue/laquer. 

Tejpa hela eller delar av stjärnan. Trimma bort överflödig tejp med en sax och du är klar! Tips: Ta även en titt hos Pysselbolaget och se vad Karin & Freja gjorde med sina stjärnor!
——
Tape the whole or parts of the star. Trim off excess tape with scissors and you’re done! Tip: Take a look at Pysselbolaget and see what Karin & Freya made with their stars!

21 sätt att använda washitejp –
21 ways to use Washi Tape

Make & Create - Washitejp

iphonefix2  Washi taped Christmas tree  washitapedboxes5 partybag3  Washi Tape Bunting  washiglas7  Simple birthday crowns - by Craft & Creativity  nailpolishshelf6  iphonefix2  washimagnets1  Painted papier maché houses - by Craft & Creativity

Mer washi-inspiration:

http://www.kellyoshiroevents.co http://www.atypicaltypea.com http://minifanfan.com

1. Bordsdekoration, Santa Barbara Chic (hittat via Ellas Inspiration)
2. Washi-tejp-kylskåps-magnets-klädnypor, Atypical Type A
3. Annorlunda tangentbord…, Minifanfan

http://twirlingbetty.wordpress.com   http://bentozen.wordpress.com   http://ninainvorm.punt.nl

4. Washi-magneter, Twirling Betty
5. Tandpetsflaggor, Bento Zen
6. Snygg upphängning, Ninainvorm

http://ninainvorm.punt.nl   http://www.enmammasdag.com   http://craftapalooza.typepad.com

7. Washi-vägg med beskrivning, Ninainvorm
8. Moodboard, Weronica, En mammas dag
9. Halsband, Craftapalooza

http://www.atypicaltypea.com   http://blog.casa-di-falcone.d   http://www.flickr.com/photos/citychiccountrymouse

10. Washi-vimpel-girland, Atypical Type A
11. Presentetiketter, Casa di Falcone
12. Födelsedagskort, City Chic Country Mouse

http://vivadesignblog.blogspot.com   http://www.flickr.com/photos/60098835@N05   http://howaboutorange.blogspot.com

13. Tejpad bok, Vivá Design
14. Flasketiketter, Leila Bacchi
15. Dekorerad kanna, How About Orange

http://picnic.typepad.com   http://decor8blog.com   http://zakkalife.blogspot.com

16. Pennburk, Picnic 
17. Washi-pimpade ramar, Decor8
18. Presentpåse, Zakka Life

http://www.freshhomeideas.co   http://www.mintdesignblog.com   http://www.aspoonfulofsugardesigns.com

19. Perfekta partyglas, Fresh Home Ideas
20. Ovanliga visitkort, Mint
21. Fint förpackat, A Spoonful of Sugar

Make & Create
Washitejp Papperstejp Washitejp Washitejp
Make & Create - logo