Hur man gör en papperstårta
How to make a paper cake

How to make a Paper Cake - by Craft & Creativity

Paper Cake - by Craft & CreativityNär vi hade vår pysselträff för några veckor sedan visade Karin på Pysselbolaget mig en tidning som heter Simply Handmade och jag fastnade direkt för en bild på en fantastisk tårta av papper och en idé om en egen papperstårta började gro i mitt huvud.
————
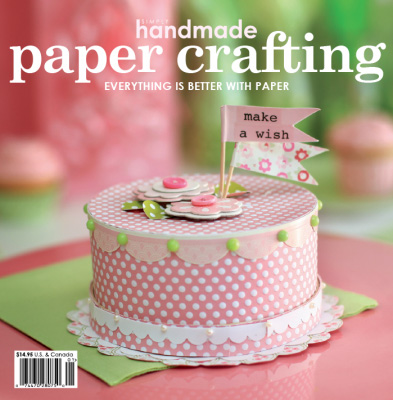
At our craft meet some weeks ago, Karin at Pysselbolaget showed me a magazine called Simply Handmade and I was immediately drawn to a picture of an amazing paper cake. The idea to make my own paper cake began to grew in my mind. 

How to make a Paper Cake - by Craft & Creativity

Tårtan i sig är egentligen en rund ask som jag vänt upp och ned och täckt med designpapper, på samma sätt som jag gjorde med mina naturtrogna askar. Sedan har jag gått loss på att dekorera asken med allt möjligt. Tårtan ska min dotter få när hon fyller 6 år i sommar och när hon öppnar den kommer det ligga en present inuti.
————
The cake itself is actually a round box that I turned upside down and dressed with design paper, in the same way as I did with my natural looking boxes. I then decorated the box with paper flowers, butterflies and buttons etc. The cake is for my daughter’s 6th birthday and when she opens it there will be a gift inside.

How to make a Paper Cake - by Craft & Creativity

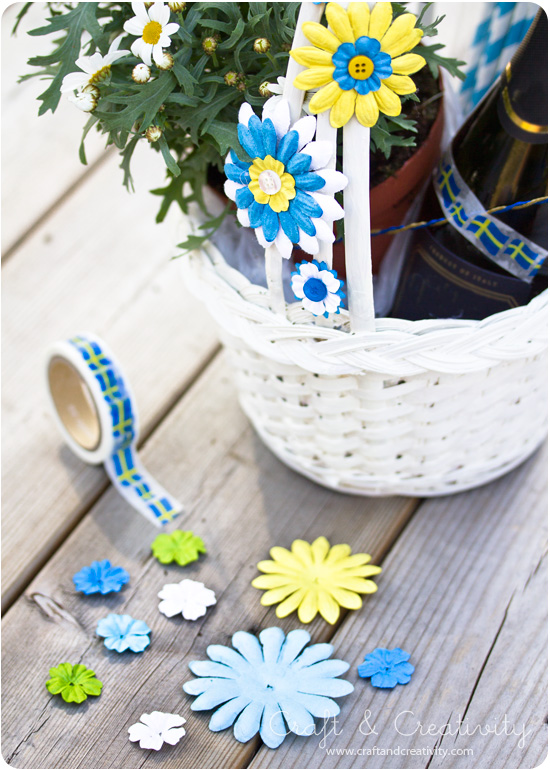
Papperstårtan kan också vara fin att ha som dekoration på ett dukat kalasbord och håller till många kalas. Fyll bara på med ännu ett ljus för varje år som går.
——–
The paper cake can also be pretty to display as decoration on a party table setting and can be used for many parties to come. Simply add a candle for every year that passes. 

How to make a Paper Cake - by Craft & Creativity

Jag måste säga att det här var bland det roligaste jag gjort på länge. Jag gick verkligen loss på dekorationerna och hade vansinnigt roligt när jag mixade och matchade färger, mönster och motiv. Man kan använda allt tänkbart material, det är bara fantasin som sätter gränser. Nedan ser ni en lista på vad jag använde mig av.
———
I must say that this was one of the most satisfying crafts I’ve made in a long time. I really went overboard on the decorations and had a great time mixing and matching colors, patterns and embellishments. You can use all kinds of material, just use your imagination. Below you can see a list of the stuff I used.

How to make a Paper Cake - by Craft & Creativity

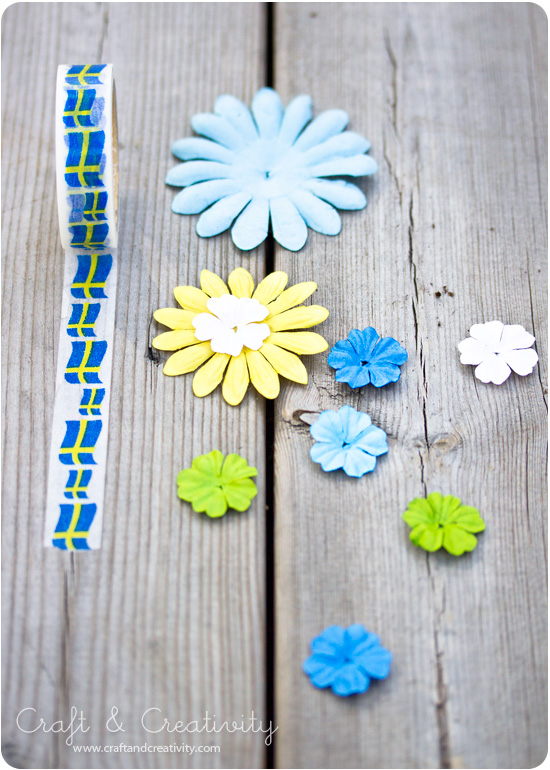
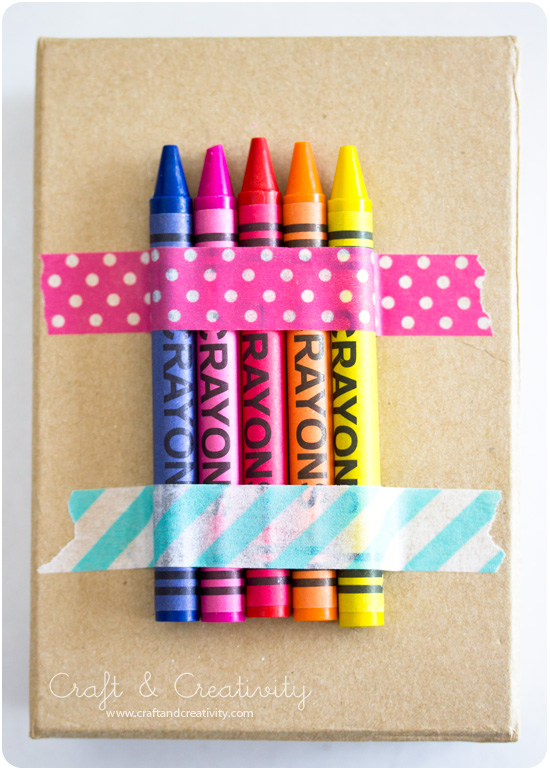
Tårtingredienser: 1. Bokstavsnitar, 2. Sugar dots, 3. Universallim, 4. Washitejp,
5. Laserark fjärilar, 6. Runda askar i fyrapack, 7. Nålar blommor/fjärilar, 8. Knappar,
9. Tandpetare, 10. Pappersblommor, 11. Glitterpapper, 12. Designpapper,
13. Papperssugrör.
————-
Cake Ingredients: 1. Letter brads, 2. Sugar dots, 3. All purpose glue, 4. Washi tape,
5. Laser sheet butterflies, 6. Round boxes, 7. Needles flowers / butterflies,
8. Buttons, 9. Toothpicks, 10. Paper Flowers, 11. Glitter Paper, 12. Design Paper,
13. Paper Straws.

Paper Cake - by Craft & Creativity  Paper Cake - by Craft & Creativity

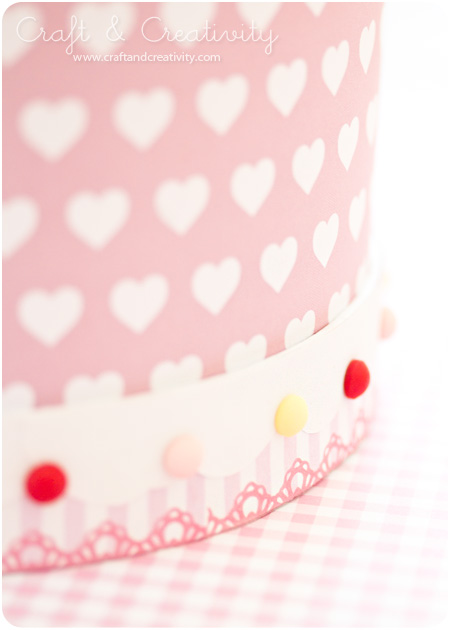
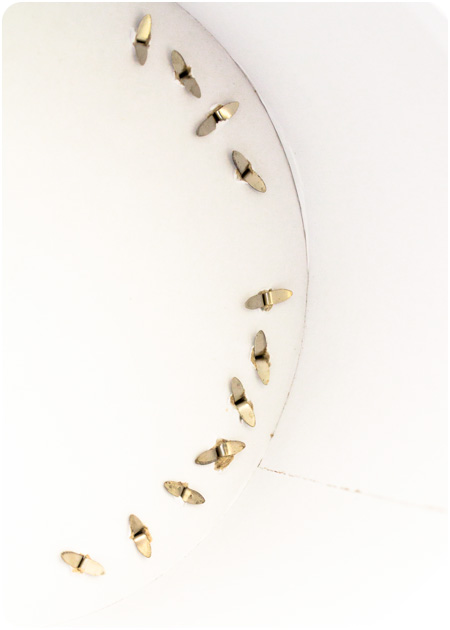
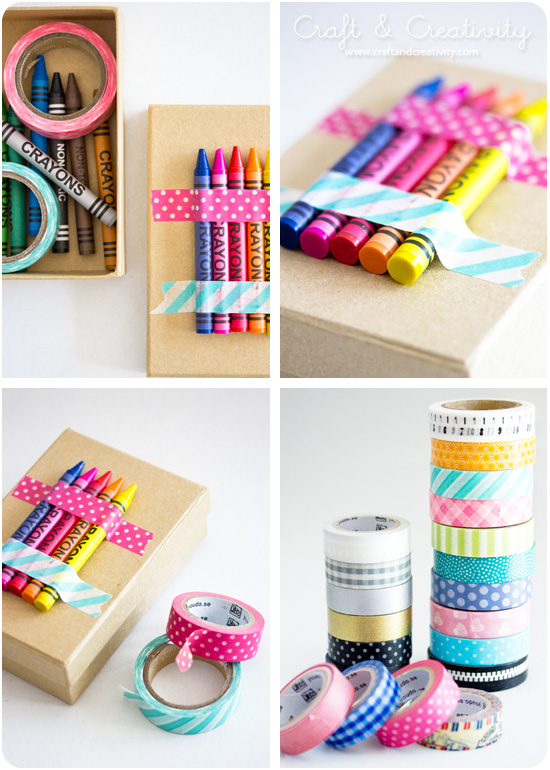
Eftersom asken är upp och hamnar locket längst ner och skapar en botten. Jag dekorerade botten med remsor från ett papper som heter Rose Garden och en vit bård som jag klippte till för hand. Ovanpå alltsammans fäste jag små självhäftande sugar dots. Till höger ser ni insidan av asken där “benen” på bokstavsnitarna syns. Stick hål i asken med en syl eller en sticka och tryck nitarna genom hålen. Böj ut metallbenen på undersidan och nitarna sitter på plats.
———–
Since the box is upside down, the lid becomes the bottom. I decorated the bottom with strips of paper and a white border that I cut by hand. On top of it all, I added small adhesive sugar dots. To the right you can see the inside of the box, where the “legs” of the letter brads are visible. Pierce the box with an awl or a thick needle and push the brads through the holes. On the inside of the box, bend the metal legs outwards to keep the brads in place. 

Paper Cake - by Craft & Creativity  How to make a Paper Cake - by Craft & Creativity

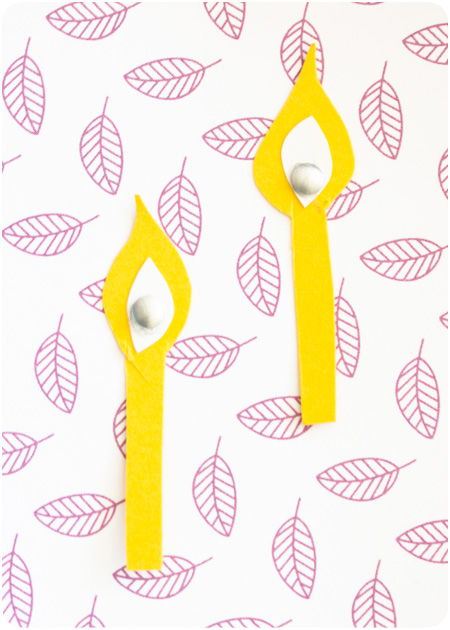
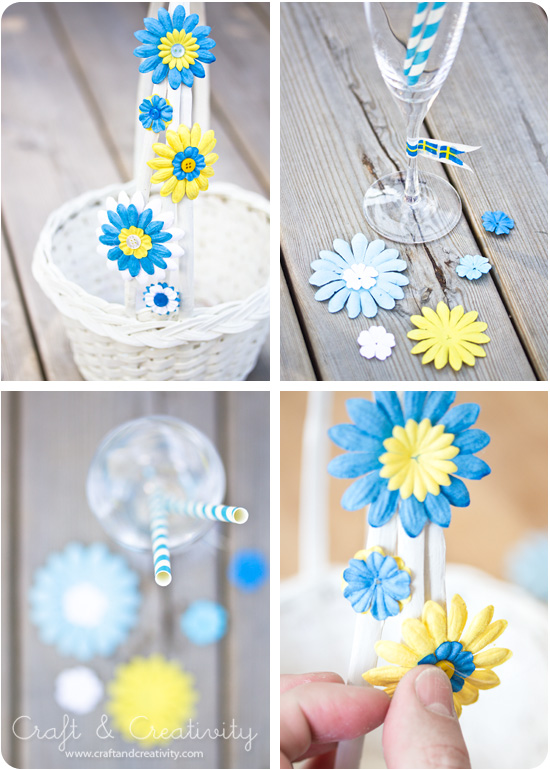
Födelsedagsljusen gjorde jag av papperssugrör som jag klippte av i lagom längd. Av gult och vitt papper klippte jag ut ljuslågor som jag stack ner i sugrören. Som sista moment limmade jag fast ljusen. Nu gäller det att gömma tårtan på ett bra ställe tills dottern fyller år!
———
I made the birthday candles out of paper straws that I cut at proper length. Out of yellow and white paper I cut imaginary flames and stuck them inside the paper straws. I finished off by gluing the candles on the cake. Now all I have to do is hide away the cake until it’s time for my daughter’s birthday! 

Papperståg – Paper train

Papperståg / Paper train - Craft & Creativity

Att bygga modeller är roligt, det tycker både jag och mina legoentusiaster till barn. Därför blev jag populär när jag kom hem med det det här papperståget.
———-
Both me and my lego loving girls think model building is fun. Me brining home this paper train from work for testing became a great success.

Papperståg / Paper train - Craft & Creativity

Vi samlades runt köksbordet för att montera ihop vagnarna och loket. Åttaåringen fixade instruktionerna utan problem och femåringen & jag hjälptes åt. Delarna är utstansade och enkla att trycka ut och vika ihop. Tydliga steg-för-steg beskrivningar ingår i paketet och ark med pappersbokstäver så barnen kan dekorera vagnarna med sina namn om de vill. Små konduktörer följer också med. Det enda man behöver komplettera med är dubbelhäftande tejp och limstift/papperslim om man inte har det hemma redan.
————
We gathered around the kitchen table to mount the wagons and the locomotive. My eight year old girl had no trouble following the instructions by herself while me and the five year worked together as a team. All the parts are pre-cut and easy to fold and mount. Step-by-step instructions are included as well as a sheet of paper letters for the kids to use when decorating the train with their names. The only thing not included is double-sided adhesive tape and a glue stick or paper glue. 

Papperståg / Paper train - Craft & Creativity

Mina tjejer har mest lekt med tågen men jag tänker mig också att det skulle vara fint att fylla ett tåg med godis till ett kalas och låta det vara en del av dukningen till exempel.
————
My girls have been using the train to play with, but another idea is to use it for a birthday party table setting and fill it with candy for example.

Små presentpåsar – Small gift bags

Small gift bags - by Craft & Creativity

Jag har alltid tyckt att det är lite synd att gömma fina gratulationskort i kuvert när man istället kan låta korten få vara en dekorativ del av en presentinslagning. Jag använder därför sällan kuverten när jag köper färdiga kort. Ett idé som nyligen slog mig var att dekorera kuverten istället. Eller som här, pynta små påsar med washitejp och att de blir som minigåvor i sig. I påsarna stoppade jag en lapp med själva hälsningen. Om man ger bort en liten present, som ett smycke t ex, kan man till och med få plats med själva presenten i påsen. Idén till vimpeln av washitejp på paketet kommer från Mormorsglamour, en av mina favoritbloggar.
———–
I’ve always thought it’s kind of a pity to hide pretty greeting cards in the envelope when you can instead allow the cards to be a decorative part of the gift wrapping. That’s why I tend not to use the envelopes at all, when buying ready-made cards. I suddenly realized that perhaps that’s a waste, when I could decorate the envelopes instead. Or like this, decorate small bags with washi tape and turn them almost into small gifts themselves. In the bags I put my greeting notes. If you’re giving away a small gift, you could even fit the gift in the bag. The idea for the washi tape bunting comes from one of my favorite blogs, Mormorsglamour (in English & Swedish).

Small gift bags - by Craft & Creativity

Här ser ni några exempel på olika sätt man kan skapa festliga motiv med washitejp. Det kan vara enklare att tejpa på en bit papper, klippa ut motivet och limma fast det – som med hjärtat till exempel. Inspirationen har jag bland annat hämtat från SAS does och A step in the journey. Med en liten klädnypa kan man fästa påsen på paketet.
——–
Here you can see some examples of different ways to create fun designs with washi tape. It can be easier to tape on a piece of paper, cut out the design and glue it in place – as with the heart, for example. The inspiration comes from SAS does and A step in the journey, among other creative blogs. 

Fixa fint till festen –
Pretty party decorations

Pretty party decorations - by Craft & Creativity

Det närmar sig studenttider och midsommar och jag tänkte visa er några idéer för sommarens fester. Washitejp runt foten på ett glas är dekorativt och tejpen är att både enkel att sätta dit och ta bort. Den lilla blomsterbuketten är gjord av virad ståltråd, pappersblommor och knappar – enligt samma princip som knappblommorna jag visat tidigare. Med en liten klädnypa kan man fästa pappersblommor eller placeringskort på gästernas glas.
————-
Graduation time and Midsummer Eve is a big deal here in Sweden and on these special occasions it’s common to decorate with the colors of the Swedish flag, blue and yellow. I thought I’d show you some pretty party decorations, and you can use any color combination you like. Washi tape around the foot of a glass is decorative and is easy to add and remove. The small flower bouquet consist of wire, paper flowers and buttons – made in the same way as the button flowers I’ve shown you before. With small clothes pins you can pin a paper flower or a place card on your guest’s glasses. 

Pretty party decorations - by Craft & Creativity

Pretty party decorations - by Craft & Creativity

En vitmålad korg kan fungera antingen som bordsdekoration eller till att fylla med presenter. På korgen har jag limmat pappersblommor och knappar med limpistol. Fint mönstrade papperssugrör piggar upp vilken dukning som helst. Nu önskar jag mig en lång, solig och vacker svensk sommar med många tillfällen till fest.
———
Paint a basket white and use it either as a table decoration or fill it with gifts. I attached paper flowers to the basket with a glue gun. Pretty patterned paper straws will brighten up any table setting. Now I wish for a long, sunny and beautiful Swedish summer, with many causes for celebration. 

Pretty party decorations - by Craft & Creativity

Pysslig presentidé – Crafty gift idea

Crafty gift idea - by Craft & Creativity

Jag såg en så söt presentidé hos Lines Across som jag blev inspirerad av. Varför inte ge bort en ask som mottagaren själv kan dekorera! Fyll den t ex med tejp, kritor, paljetter, lim och annat pysselmaterial. Tejpa fast några av kritorna på locket. Passar till både stora och små födelsedagsbarn!
—————
I saw this cute gift idea over at Lines Across and it really inspired me. Why not give away a box which the receiver can decorate him or her self. Fill it with washi tape, crayons and other craft supplies. Tape some of the crayons on the lid. Suitable for big and small crafters! 

Crafty gift idea - by Craft & Creativity

Jag vet precis vem som ska få min ask! <3
———-
I know exactly who I’m going to give this to! <3

Gör egna kort – Make your own cards

Make your own cards - by Craft & Creativity

Våra kontinuerliga träffar med våra pysselvänner från Pysselbolaget är alltid lika uppskattade! Vuxna och barn pysslar tillsammans och vi utbyter idéer och har roligt. Nu senast vi träffades gjorde vi kort. Nu har vi ett helt lager med gratulationskort här hemma som vi kan använda till framtida bemärkelsedagar.
———-
Our ongoing craft fests with our friends from Pysselbolaget are always appreciated! Adults and kids craft together and we exchange ideas and have fun. At our latest meeting, we made cards. Now we’re fully stocked with greeting cards for many future parties to come. 

Make your own cards - by Craft & Creativity

Jag använde pastellfärgade kort från Make & Create som bas och dekorerade dem med washitejp, knappar, pärlor och papper. Origamiklänningen har jag bloggat om tidigare och där finns en länk till beskrivningen. Blöjan längst ner till höger gjorde jag efter Martha Stewarts beskrivning och mall.
————
I used pastel pearlescent cards as a base and decorated them with washi tape, buttons, beads and paper. I’ve blogged abut the origami dress before and there you can find a link to a video tutorial. The diaper to the bottom right I made from Martha Stewart’s description and template.

Make your own cards - by Craft & Creativity

Av kreativa Karin fick jag en vacker papier mache-skål som hon gjort av mönstrade papper. Vi pysslade tillsammans en hel dag och jag kan lova att bordet var belamrat av pysselmaterial och fina alster! Karin & min yngsta dotter gjorde fina prinsesskort med veckade kjolar. Hur man gör dessa kan ni se om ni klickar er vidare till Pysselbolagets sida, där de också skriver om vår roliga dag och visar sina fina kort! Bilden på pysslande tjejer har Karin tagit.
———–
My creative friend Karin gave me this beautiful papier mache bowl she made out of patterned paper. We crafted together for a whole day and I can promise you the kitchen table was cluttered with craft material and pretty creations! Karin & my youngest daughter made beautiful princess cards with pleated skirts. You can see how they went about making them over at Pysselbolaget, where Karin also writes about our day and shows pictures of the pretty cards they made! Karin took the photo of the girl’s crafting. 

Make your own cards - by Craft & Creativity

Förutom kort så skapade barnen konstverk! Som installationen ovan, en fantasifull miljö gjord av pappersugrör, mjuka pärlor i mossgummi, glitterlim, filtblommor och en limpistol. Fullkomligt underbar, tycker jag!
———
In addition to making cards the kids created art! Like the installation above, an imaginative setting made of paper straws, soft beads, glitter glue, felt flowers and a glue gun. I think i’ts absolutely adorable! 

Enkla kalaskronor – Simple party crowns

Simple birthday crowns - by Craft & Creativity

Med toalettrullar kan man göra mycket skoj. Som till exempel prins- och prinsesskronor till ett kalas! Duka med en krona på varje tallrik eller låt barnen göra egna på kalaset. Idén hittade jag hos Lilla A, men istället för att måla kronorna använde jag och dottern washitejp.
————
You can make lots of fun stuff with toilet papper rolls. For example these birthday party  crowns! Place a crown on each plate when you set the table or let the kids make their own at the party. I found this idea at Lilla A, but instead of painting the painting the rolls, me and my daughter used washi tape. 

Simple birthday crowns - by Craft & Creativity

Du behöver: Toapappersrullar, washitejp, sax, elastisk snodd och en håltång (det går också bra att göra hål med en stoppnål eller liknande).
Gör så här: Tejpa med washitejpen runt rullen. Klipp till spetsarna. Gör två hål längst ner. Trä i den elastiska snodden och knyt en dubbelknut på lagom avstånd för att passa ett barns huvud.
———-
You will need: Toilet paper rolls, washi tape, scissors, elastic cord and hole punch pliers (you could also use a darning needle or pricker to make the holes).
Do like this: Tape with the washi tape around the paper roll. Cut the points of the crown. Make two holes at the bottom. Thread the elastic cord through the holes and tie a double knot to fit a child’s head.  

Simple birthday crowns - by Craft & Creativity

Min femåriga dotter gjorde ett antal kronor helt själv och tyckte det var väldigt roligt.
———
My five year daughter made a number of crowns all by herself and she really enjoyed it. 

Honeycomb pappersbollar –
Honeycomb pom-poms

DIY Honeycomb paper ball - by Craft & Creativity

Idag tänkte jag visa hur man gör eget honeycomb-papper (dragspelspapper) och hur man sedan kan göra fina pompom-bollar av papperet. Bollarna är snygga till kalas, bröllop, dop eller bara hängande hemma som en inredningsdetalj. Min beskrivning nedan visar hur man gör ett 25×35 cm stort honeycomb-papper som räcker till tre bollar (18 cm i diameter). Du behöver 9 ark silkespapper och minst en rulle dubbelhäftande tejp för att göra 3 bollar.

Inspirationen kommer från den inspirerande sidan Mr. Printables. Jag har dock gjort om idén lite efter eget huvud. Bland annat använder jag dubbelhäftande tejp eftersom jag märkt att det håller mycket bättre än att limma med limstift.
————
Today I thought I’d show you how to make your own honeycomb paper and how to make pretty pom pom paper balls out of it. These paper balls are great for parties, weddings, christenings or simply use them as an interior detail in your home. My tutorial shows you how to make a 25×35 cm lagre honeycomb paper which is enough for three paper balls (18 cm in diameter).

This craft was inspired by a great tutorial over at Mr. Printables. However, I made mine a bit differently. For example, I used double sided adhesive tape after noticing that it holds better then glue stick. 

DIY Honeycomb paper ball - by Craft & Creativity

  1. Du behöver: 9 ark silkespapper 50×70 cm, en stor rulle dubbelhäftande tejp (min är 6 mm bred), vass sax, två ex av min mall (ladda ner här), sytråd, nål och en bit vanlig tejp för at tejpa ihop mallarna.
  2. Gör så här: Välj färg/färger på ditt silkespapper. Den här gången valde jag tre olika färger, tre ark av varje (vit, rosa & orange/korall). Vik arken på hälften och sedan en gång till = 36 lager silkespapper med måttet 25×35 cm.
  3. Klipp i viken så du får 36 separata ark.
  4. Mixa färgerna. Jag valde att växla färg efter 4 ark för att få randiga bollar.
  5. Nu ska alla ark tejpas. Skriv ut 2 ex av min färdiga mall för att underlätta arbetet. Tejpa ihop de två mallarna som bilden visar ovan. Min mall passar ark som är 25×35 cm. Vill du göra större eller mindre bollar får du göra en anpassad mall med dina egna mått.
  6. Lägg ditt första ark silkespapper på plats. Tejpa med den dubbelhäftande tejpen mellan varje O. Det blir totalt 3 linjer. Ta bort skyddspapperet från tejpen.
  7. Lägg nästa ark silkespapper ovanpå det första. Detta ark tejpar du mellan varje X, det blir totalt 2 linjer.
  8. Fortsätt med alla 36 ark, vartannat ark tejpas mellan X:en och vartannat ark tejpas mellan O:na. Oroa dig inte om silkespapperet hamnar lite på snedden eller om allt inte ser perfekt ut, resultatet kommer bli bra ändå.

—–

  1. You will need: 9 sheets of 50×70 cm tissue paper, one big roll of double sided adhesive tape (mine is 6 mm wide), sharp scissors, two copies of my template (download here), sewing thread,a needle and a piece of tape to assemble the two templates. 
  2. Do like this: Select the color / colors of your tissue paper. This time, I chose three different colors, three sheets of each (white, pink & coral). Fold the sheet in half and then again = 36 layers tissue paper with the dimension 25×35 cm.
  3. Cut through all the papers in the fold to get 36 separate sheets.
  4. Mix the colors. I chose to change color after 4 sheets to get a striped effect.
  5. Now, time to tape all of the sheets. Print two copies of my template to simplify your work. Tape the two templates together as shown above. My template is adapted for sheets that are 25×35 cm. If you wish to make larger or smaller paper balls, you need to make a custom template with your own measurements. 
  6. Put the first sheet of tissue paper in place. Tape with double sided adhesive tape between each O. There will be a total of three lines. Remove the backing from the tape.
  7. Place the next sheet of tissue paper on top of the first. This time tape between each X and there will be a total of two lines. 
  8. Continue with all 36 sheets. Every other sheet is to be taped between the X’s and every other sheets is to be taped between Os. Do not worry if the tissue paper ends up a bit crooked or if not everything looks perfect, the result will be fine anyway.

DIY Honeycomb paper ball - by Craft & Creativity

  1. Nu är ditt honeycomb-papper klart. Det är dags att göra bollarna!
  2. Skriv ut mina mallar (ladda ner här). Klipp ut 1 ex av halvmånen och 3 ex av den runda. Det fungerar bra med vanligt skrivarpapper.
  3. Lägg halvmånemallen på honeycomb-papperet och måtta så du får ut tre halvmånar. Notera att mallarna måste ligga åt samma håll som mina ovan.
  4. Klipp ut dina tre halvmånar.
  5. Vik det ena runda papperet på mitten. Lägg honeycomb-papperet i mitten av viket. Fäst det insidan av det vita papperet mot silkespapperet med dubbelhäftande tejp (eller limstift), först på den ena sidan…
  6. … och sedan på den andra sidan.
  7. Så här ska det se ut när du tejpat klart.
  8. Trä nålen med sytråd. Stick den genom alla lager papper i ena hörnet av halvmånen. Knyt en knut ca 1 cm ut på tråden, annars går inte bollen att fälla ut. Klipp av tråden. Gör likadant med andra hörnet men klipp inte av tråden utan spara den till upphängning.
  9. Fäst dubbelhäftande tejp på ena sidan av din halvmåne. Eller limma med limstift. Tag bort skyddspapperet från tejpen. Fäll upp bollen så att de vita utsidorna sidorna möter varandra och tejpen fäster.
  10. Volià, en boll! Upprepa punkt 5-9 för de andra två pappersbollarna.

———

  1. Now your honeycomb paper is ready. It’s time to make the honeycomb pom-poms!
  2. Print my templates (download here). Cut one example of the half circle and three copies of the round. Plain printer paper will work just fine. 
  3. Place the half circle template on top of your honeycomb paper and measure so you get three half circles. Note that the templates must lie in the same direction as mine above.
  4. Cut out your three half circles.
  5. Fold one of the round papers in half. Add one of your honeycomb paper half circles in the middle of the fold. Tape the inside of the white paper to the honeycomb paper with adhesive tape (or glue sticks), first on one side …
  6. … and then on the other side.
  7. This is how it should look when your done taping.  
  8. Thread the needle. Stick the needle through all the layers of paper in one corner of half circle. Tie a knot about 1 cm out on the thread, otherwise the ball won’t open. Cut the thread. Do the same with the other corner, but don’t cut the thread, save it for hanging.
  9. Attach double-sided adhesive tape on one side of your half circle. Or glue with glue stick. Remove the backing from the tape. Open up the ball so that the white sides of the paper face each other and the tape sticks. 
  10. Volia, your pom-pom is ready! Repeat steps 5-9 for the other two paper balls.

DIY Honeycomb paper ball - by Craft & Creativity

Jag ska inte sticka under stol med att det är pilligt och tidskrävande att göra honeycomb-papper men för färdiga pompom-bollar kan man få betala ganska mycket pengar, så det kanske kan vara värt det? Att göra dessa tre bollar tog mig drygt en timme. Det hade kanske gått snabbare om jag inte hade haft så mycket hjälp av katten Minus… 😉
——–
I will not deny that making honeycomb paper is a bit tricky and time consuming. But on the other hand buying ready-made ones can be quite expensive and I really think it’s worth it. Making these three pom-poms took me just over an hour. Perhaps it would have gone quicker if I hadn’t had so much help from our cat Minus… 😉 

Glittrande ljushållare –
Sparkling tea light holders

Sparkling tea light holders - by Craft & Creativity

Med lite dubbelhäftande tejp och glitterströssel kan man glittra till gamla glasburkar och använda dem som ljushållare. Idén till detta pyssel fick jag via en bild på Pinterest. Jag har tyvärr inte lyckats hitta källan, trots detektivarbete från min sida.
———-
With a bit of double-sided adhesive tape and glitter sprinkles you can make old glass jars sparkle. Use them for candle holders for example. I got the inspiration for this craft from a picture on Pinterest. Unfortunately I haven’t managed to find the source, even after some detective work on my part. 

Sparkling tea light holders - by Craft & Creativity

Klipp bitar av tejpen och tejpa fast den på en rendiskad glasburk. Ta bort skyddspapperet lite i taget och häll på glitter i önskad färg. Blås bort överflödigt glitter, ta bort mer skyddspapper och fortsätt med nästa färg.
———–
Cut pieces of the tape and tape it on a clean glass jar. Remove the protective paper a little at a time and add glitter in the color you like. Blow away excess glitter, remove more protective paper and continue with the next color.

Sparkling tea light holders - by Craft & Creativity

Det går att göra alla möjliga sorters mönster med tejpen och använder man ark med klisterfolie kan man även klippa ut olika former – som prickar, hjärtan eller stjärnor t ex.
——–
You can make all sorts of patterns with the tape and if you use sheets of adhesive foil you can also cut out different shapes – like dots, hearts or stars, for example.

Hjärtliga kort – Valentine Cards

Valentine cards - by Craft & Creativity

Vare sig man firar Alla Hjärtans Dag eller inte så är det förstås trevligt att visa kärlek och omtanke för dem man tycker om. Ett hjärtkort med en fin hälsning kan vara ett sådant sätt. Jag har pyntat mina kort med tårtpapper, träbokstäver på snöre och spetsmönstrade rub-ons. Dessa kort kommer hjärtformade i 10-pack med kuvert. Eller så klipper du till egna kort av papper.
————-
Whether you celebrate Valentine’s Day or not, it’s nice to show love and care for those you near and dear to you. A heart shaped card with some kind words can be such a way. I decorated my cards with paper doily, wooden bead letters on a string and lace patterned rub-ons. These heart-shaped cards came in a pack of 10, including envelopes. But you could also make your own cards.

Valentine cards - by Craft & Creativity

Om man vill kan man göra kort som går att “låsa”. Sy först fast en knapp på framsidan. Fäst ett snöre på baksidan med lim och en pappersblomma eller liknande. Gör en ögla av snöret och trä den över knappen för att låsa kortet.
———-
If you like you can make your cards “lockable”. First sew a button on the front of the card. Attach a string to the back and secure it with glue and perhaps a paper flower. Make a loop with the string and slip it over the button to lock the card.

Valentine cards - by Craft & Creativity  Valentine jar - by Craft & Creativity

Jag avslutar med att visa er min gamla glasburk som jag pyntade för ett år sedan med lite tårtpapper, ett hjärta som jag klippte ut av filt och ett snöre. Den skulle man kunna fylla med något gott och ge bort i present. Fast min burk behöll jag. Den står alltjämt på en hylla i köket. 😉
———–
Last but not least I’d like to show you this old glass jar that I decorated a year ago. I used paper doily, a felt heart and some baker’s twine. You could fill it with something sweet and give it away as a gift. Although I kept mine for myself.  😉