Målade fågelhus i miniatyr –
Painted miniature bird houses

Painted miniature birdhouses - by Craft & Creativity

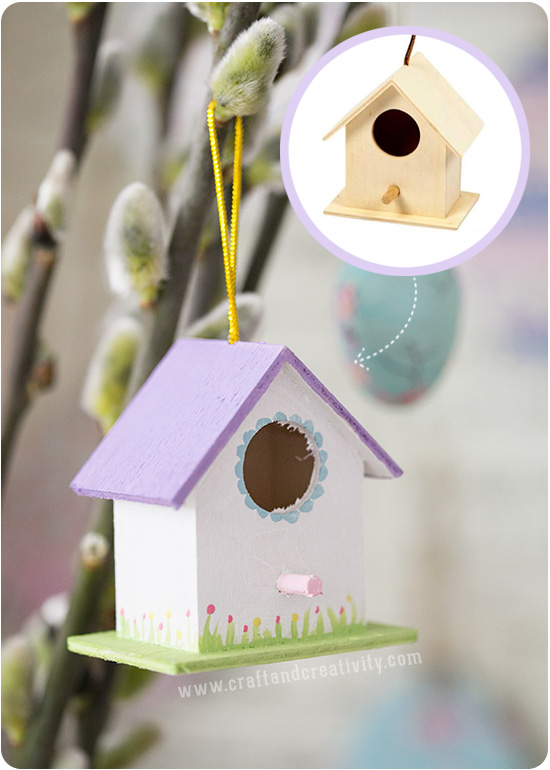
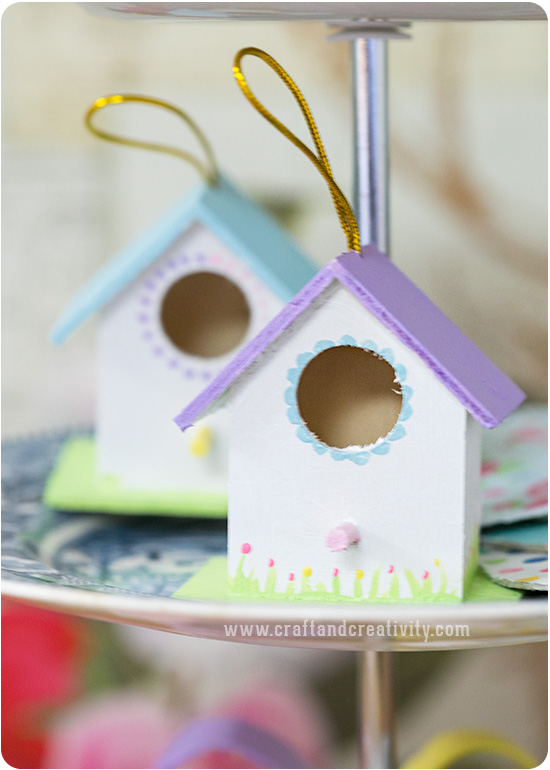
I förra inlägget såg ni kanske några små målade fågelhus skymta förbi. Jag tänkte visa dem lite närmare. Husen var roliga att måla och blev söta att hänga i påskriset tillsammans med minikorgarna och de små påskäggen.
———-
Perhaps you saw a glimpse of these painted miniature bird houses in my latest blog post. The houses were fun to paint and looks pretty hanging together with my mini baskets and eggs in our Easter twig. 

Painted miniature birdhouses - by Craft & Creativity

Jag målade husen med färg från Martha Stewart Crafts®. Ovan ser ni även en liten träfågel som jag målat vit och använt vita kalkonfjädrar som vingar. Fågelhusen är tillverkade av trä. Mitt hemmagjorda våningsfat har jag skrivit om i ett tidigare inlägg.
——–
I painted the wooden houses with satin paint from Martha Stewart Crafts®. In the pictures above you can also see a small wooden bird that I painted white and put white turkey feathers for wings. I have written about my homemade cake stands in a previous blog post.

Painted miniature birdhouses - by Craft & Creativity

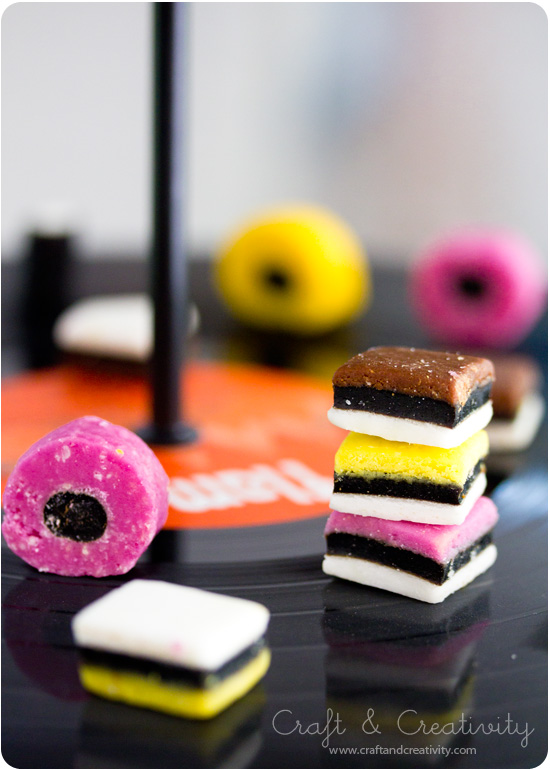
Eftersom husen är ihåliga går de att fylla med något smått, som t ex godis som barnen kan skaka ut på påskafton.
————
Since the houses are hollow, they can be filled with for example candy and the kids can empty them on Easter Sunday.

Painted wooden bird - by Craft & Creativity

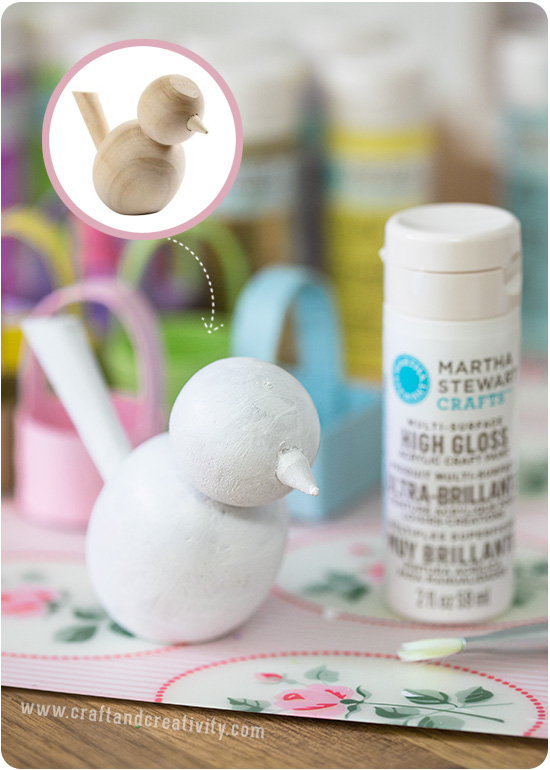
Här är en lite närmare bild på fågeln efter första lagret färg. Av misstag tappade jag dock pippin i golvet och näbben blev lite ledsen… ajaj.
———
Here is a closer view of the wooden bird, after the first coat of paint. I happened to drop the bird by accident and it’s beak got a bit crooked … ouch! 

Fler kalasidéer – Birthday Party DIYs

Birthday party DIYs - by Craft & Creativity

Vår yngsta dotter fyllde 6 år i söndags och vi bjöd in till kalas för släkt & vänner. Det blev en rolig dag och lilla E blev verkligen ordentligt firad. Förutom kalasgirlangen som jag visade i förra inlägget pysslade vi ihop lite annat smått & gott dagen till ära. Jag tänkte visa er ett smakprov. 🙂

Ovan: Tårtan med alla frukter & bär är en pavlova och receptet kommer från bakboken Smilla bakar glutenfritt. Den blev otroligt god! Grattispinnen ovan är egentligen en blompinne men jag tyckte den passade fint i bullarna.
———-
Our youngest daughter turned six last Sunday and we had a party for family & friends. We had a great time and little E was celebrated all day long. Besides the party garland that I wrote about the other day, we made some other party decorations in honor of her day. I thought I’d show you some of them. 🙂

Above: The birthday cake with all the fruits and berries is a pavlova and the recipe comes from a Swedish cookbook called Smilla bakes gluten-free. It turned out yummy! The heart-shaped is actually ment for flowers but I thought it looked cute among the cinnamon buns.

Birthday party DIYs - by Craft & Creativity

  1. Papperstårta med present inuti (dottern fick ett gosedjur som stack ut tassarna när hon öppnade tårtan). Beskrivning för tårtan finns i ett tidigare inlägg.
  2. Papperståg som tjejerna byggt tillsammans och som vi fyllde med godis till kalaset.
  3. Mitt kakfat av gammalt porslin och kakfatsdelar.
  4. Ljushållare målade med glas- & porslinspennor.
  5. Dotterns hemmagjorda lemonad och min & svägerskans flädersaft märkte vi upp med vår Label Maker.
  6. Alla mina papperssugrör har fått fin förvaring i en loppisfyndad burk. Perfekt för kalas!

Och om en månad är det storasysters tur att fylla år. Vi får väl se vad det blir för kalaspyssel då…

—-

  1. A paper cake with a gift inside (our daughter got a stuffed animal that surprised her when she opened the cake). A tutorial on the paper cake can be found in a previous post
  2. The girls build the paper train together and we filled it with candy for the party.
  3. My cake stand made of old porcelain and a cake stand kit.
  4. Candle holders painted with glass & porcelain pens. The one to the left painted with semi-transparent colored pens and the two to the right with a solid white one.
  5. Our oldest daughter’s homemade lemonade and my & my sister-in-law’s elderberry juice marked with our label maker.
  6. All my paper straw nicely stored in a tin can I found at the flee market. Perfect for a party! 

A month from now it’s big sister’s turn to get a year older. Let’s see what we’ll come up with for her party…  

Våningsfat av vinylskivor –
Vinyl record cake stand

Vinyl Record Cake Stand - by Craft & Creativity

Jag är så glad för mina kakfat av gammalt porslin som jag gjorde i vintras! Ända sedan dess har jag varit sugen på att även göra ett kakfat att gamla skivor. Den uppenbara fördelen med vinylskivor är att du slipper borra hål – hålen finns ju redan där. 😉 Inte för att det är svårt att borra i porslin men det blir ju trots allt ett moment mindre. Nu var det bara till att skruva ihop delarna och fatet var klart på under fem minuter. Jag valde en rund variant av kakfatsdelar i svart utförande men det finns en mängd olika kakfatsdelar att välja mellan.
——–
I’m very fond of those porcelain cake stands I made last winter! Ever since I made them I’ve been wanting to make cake stands out of old vinyl records. One advantage of using vinyl records is that you don’t need to drill holes – they’re already there. 😉 Not that it’s difficult to drill in china, but this was quicker. All I had to do was to screw the cake stand parts together and the cake stand was ready in less then five minutes. For those of you non-Scandinavian, Etsy is probably a good place to look for cake stand kits. 

Vinyl Record Cake Stand - by Craft & Creativity

LP-skivor, 10″-skivor och singlar i vinyl kan du hitta billigt på loppis (om du inte redan har ett gäng i garaget…). Ju tjockare vinylskivor desto bättre. Då tål kakfatet mer tyngd. När det gäller singlar så leta efter skivor som har litet centrumhål. I mitt fall var hålet 1/2 mm för stort och jag fick förstärka med en limklick. Det går också bra att sätta en liten metallplatta under. Tips: Sätt fyra möbeltassar eller limkuddar i botten för att få ett stadigt kakfat.
———
You can find old vinyl records at the flea market for a bargain (if you don’t already have a bunch stucked away in your garage …). The thicker the vinyl the better and the cake stand will withstand more weight. When it comes to 7″ singles, look for vinyls with a small center hole. In my case the hole was a tiny bit too big and I had to reinforce with a dab of glue.  Tip: Put four felt pads or glue dots underneath to make the cake stand more stable. 

Vinyl Record Cake Stand - by Craft & Creativity

Ett alternativ är att forma en eller flera vinylskivor som en skål genom att värma dem i ugnen. Nu ska jag smaska Engelsk konfekt! 🙂
——–
Another option is to shape one or two of the vinyl like a bowl by heating them in the oven. Now I’m off to enjoy some Licorice Allsorts! 🙂

Rosa whoopies – Pink whoopie pies

I helgen var vi bjudna på knytkalas och alla familjer skulle ta med en varmrätt och en efterrätt. Jag var sugen på att baka något sött och bestämde mig för att försöka mig på att baka whoopies. Receptet kommer från den underbart inspirerande och alltid lika sprudlande Yesmin på bloggen Vardaxlyx. Kakorna var inte svåra att baka även om det tog lite tid. Men goda blev de!

——-

Last weekend we were invited to a potluck dinner and all the families invited contributed with a main dish and a dessert. I felt like baking and decided to try to make whoopie pies. The recipe (in Swedish) comes from the wonderfully inspiring and ever-ebullient Yesmin at the Swedish blog Vardaxlyx. The cookies wasn’t hard to make but it took some time. However they were delicious! 

Florsockerströaren i bakgrunden kommer från Cath Kidston. Fatet köpte jag i Odense på vår Danmarksresa i somras och tapeten som jag använt som bakgrund kommer från Pip Studio. /
The icing sugar shaker in the background is from Cath Kidston. I bought the cake stand in Odense on our trip to Denmark last summer and the wallpaper that I used for backdrop comes from Pip Studio.