Fler kalasidéer – Birthday Party DIYs

Birthday party DIYs - by Craft & Creativity

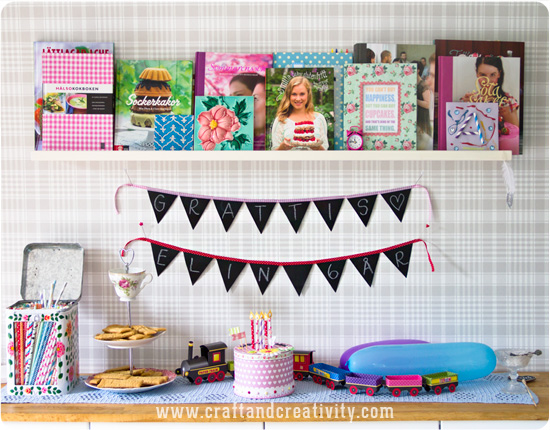
Vår yngsta dotter fyllde 6 år i söndags och vi bjöd in till kalas för släkt & vänner. Det blev en rolig dag och lilla E blev verkligen ordentligt firad. Förutom kalasgirlangen som jag visade i förra inlägget pysslade vi ihop lite annat smått & gott dagen till ära. Jag tänkte visa er ett smakprov. 🙂

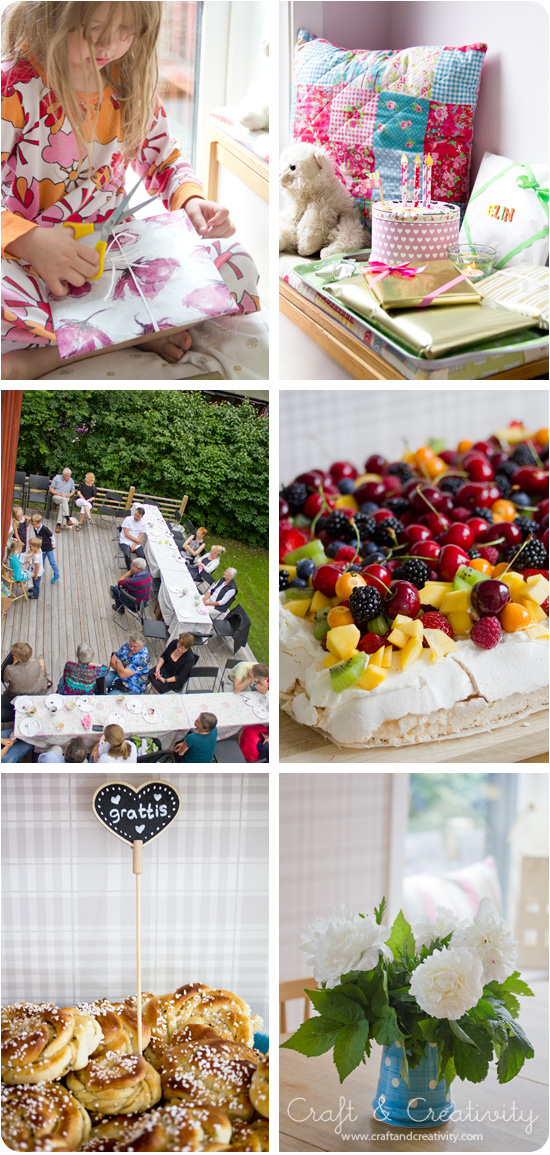
Ovan: Tårtan med alla frukter & bär är en pavlova och receptet kommer från bakboken Smilla bakar glutenfritt. Den blev otroligt god! Grattispinnen ovan är egentligen en blompinne men jag tyckte den passade fint i bullarna.
———-
Our youngest daughter turned six last Sunday and we had a party for family & friends. We had a great time and little E was celebrated all day long. Besides the party garland that I wrote about the other day, we made some other party decorations in honor of her day. I thought I’d show you some of them. 🙂

Above: The birthday cake with all the fruits and berries is a pavlova and the recipe comes from a Swedish cookbook called Smilla bakes gluten-free. It turned out yummy! The heart-shaped is actually ment for flowers but I thought it looked cute among the cinnamon buns.

Birthday party DIYs - by Craft & Creativity

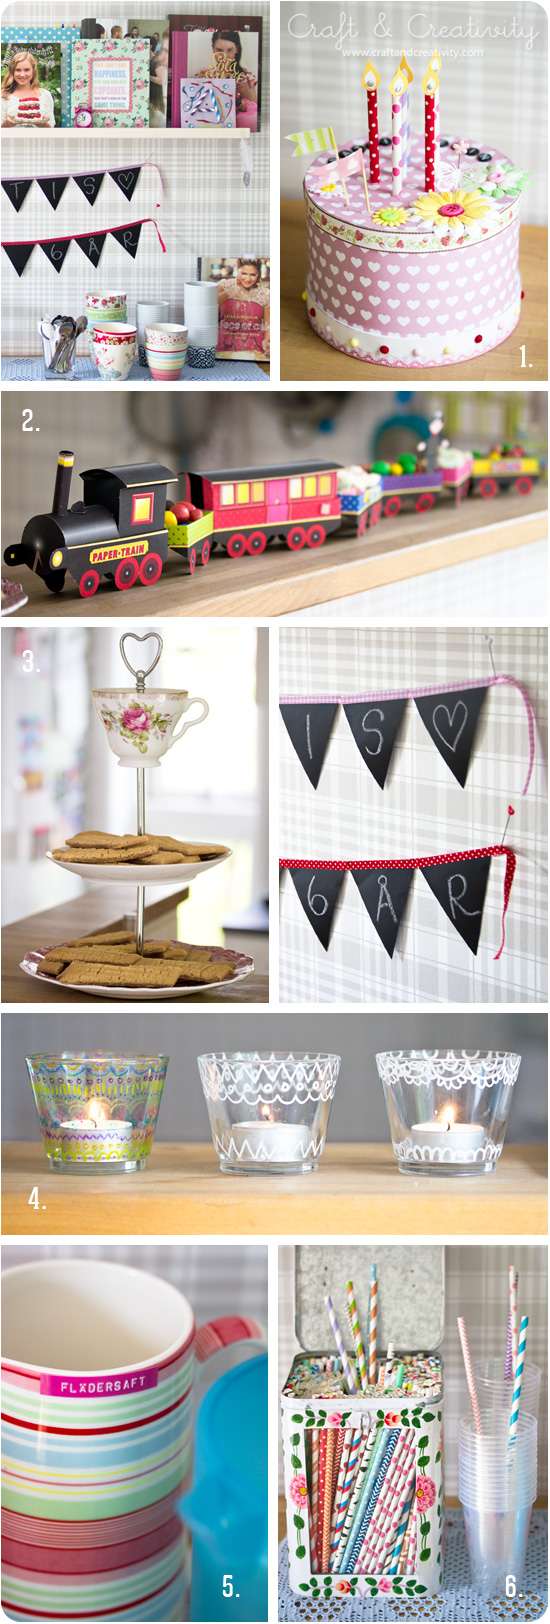
  1. Papperstårta med present inuti (dottern fick ett gosedjur som stack ut tassarna när hon öppnade tårtan). Beskrivning för tårtan finns i ett tidigare inlägg.
  2. Papperståg som tjejerna byggt tillsammans och som vi fyllde med godis till kalaset.
  3. Mitt kakfat av gammalt porslin och kakfatsdelar.
  4. Ljushållare målade med glas- & porslinspennor.
  5. Dotterns hemmagjorda lemonad och min & svägerskans flädersaft märkte vi upp med vår Label Maker.
  6. Alla mina papperssugrör har fått fin förvaring i en loppisfyndad burk. Perfekt för kalas!

Och om en månad är det storasysters tur att fylla år. Vi får väl se vad det blir för kalaspyssel då…

—-

  1. A paper cake with a gift inside (our daughter got a stuffed animal that surprised her when she opened the cake). A tutorial on the paper cake can be found in a previous post
  2. The girls build the paper train together and we filled it with candy for the party.
  3. My cake stand made of old porcelain and a cake stand kit.
  4. Candle holders painted with glass & porcelain pens. The one to the left painted with semi-transparent colored pens and the two to the right with a solid white one.
  5. Our oldest daughter’s homemade lemonade and my & my sister-in-law’s elderberry juice marked with our label maker.
  6. All my paper straw nicely stored in a tin can I found at the flee market. Perfect for a party! 

A month from now it’s big sister’s turn to get a year older. Let’s see what we’ll come up with for her party…  

Suddbar kalasgirlang –
Erasable party garland

Erasable no-sew party garland - by Craft & Creativity

Allt du behöver för att göra den här suddbara kalasgirlangen är självhäftande tavelfolie
(d v s matt svart dekorplast), tygtejp, sax och vanligt skrivarpapper. Du behöver inte sy ett stygn. Det tar bara några minuter och du kan använda den till många födelsedagar och kalas framöver! Skriv texten med tavelkrita och du kan sudda bort med en fuktig bit papper och skriva ny.
——–
All you need to make this erasable no-sew garland is adhesive blackboard foil, fabric tape, a pair of scissors and ordinary print paper. It only takes a few minutes and you can use it for many birthdays and parties to come! Write on it with chalk crayons and you can erase the text with damp paper and write new letters.

Craft & Creativity - Download

Erasable no-sew party garland - by Craft & Creativity

  1. Skriv ut min mall för vimplar eller klipp ut egna om du önskar annan form/storlek. Jag använde vanligt 80 g skrivarpapper. Använd tjockare papper om du vill. Det är fem mallar på en sida, skriv ut fler ex av sidan beroende på hur många vimplar du vill ha. Mina mallar är ca 9 cm breda och ca 9 cm höga.
  2. Klipp ut mallarna.
  3. Tag bort skyddspapperet på tavelfolien och placera mallarna en och en på den självhäftande sidan av tavelfolien. Det fungerar bättre än att lägga hela papperet oklippt för då kan plasten bubbla sig.
  4. Klipp ut vimplarna. De har nu vit pappersbaksida och svart tavelfolie på framsidan.
  5. För att slippa sy använde jag självhäftande tygtejp. Den fungerar som washitejp fast det är tyg istället för papper.
  6. Tag bort skyddspapperet på tejpen och placera ut vimplarna jämnt fördelat på tejpen, men täck bara halva tejpen – som på bilden.
  7. Vik över tejpen på andra sidan av vimplarna.
  8. Fortsätt och gör likadant med alla vimplar. Spara en bit tejp på varje sida om girlangen för upphängning. Vik den också på mitten (klister mot klister) så blir det som ett band. Gör en eller flera girlanger.
  9. När girlangen är klar kan du vika ihop den och den tar minimalt med plats.
  10. Skriv på vimplarna med krita. Sudda bort med en bit fuktigt papper om du vill ändra texten. Precis som med en griffeltavla!
  11. Fäst din girlang på väggen med nålar eller tejp. Eller knyt upp den på önskat ställe.

———

  1. Print my pennant template or cut your own if you desire other shape or size. I used standard print paper. Use heavier paper if you like. There are five templates on one page, print more copies depending on how many pennants you want to make. My pennants are approximately 9 cm (3,5 in) wide and 9 cm high.
  2. Cut out the templates.
  3. Remove the protective sheet from the blackboard foil and place the templates one by one on the adhesive side of the foil. This works better than placing the whole uncut paper, which can cause the foil to wrinkle. 
  4. Cut out the pennants. They will turn out with white paper backing and blackboard foil on the front.
  5. To avoid having to sew, I used adhesive fabric tape. Much like washi tape but with fabric instead of paper.
  6. Remove the protective paper from the tape and place the pennants evenly on the tape, but cover only half the tape – as shown in the picture above.
  7. Fold the tape over on the other side of the pennants.
  8. Continue to do the same with all the pennants. Save a piece of tape on each side of the garland for hanging. Make one or more garlands.
  9. When your garland is done, you can fold it together and it takes up minimal space.
  10. Write on the pennants with chalk crayons. Erase the chalk with a piece of damp paper if you want to change the text. 
  11. Hang your garland on the wall with pins or washi tape or tie it to a shelf.