Karamellformade presentaskar –
Candy shaped boxes

Candy shaped boxes - by Craft & Creativity

För att göra dessa karamellaskar i papper har jag använt en stansmall. Askarna kan användas som presentaskar eller varför inte fylla med godis och använda som ett alternativt påskägg? De skulle också vara söta att lägga på gästernas tallrikar vid ett dop eller bröllop, med en liten gåva eller sötsak inuti.
————
I used a punch board to create these candy boxes out of paper. The boxes can be used as gift boxes or why not fill them with candy for Easter, instead of Easter eggs? They would also look great as decoration at a wedding or baby shower, with a small gift or treat inside. 

Candy shaped boxes - by Craft & Creativity

Stansmallen kommer från We R Memory Keepers.
————-
The brand of the punch board is We R Memory Keepers.

Candy shaped boxes - by Craft & Creativity

Candy shaped boxes - by Craft & Creativity

Jag fyllde mina askar med godis som jag först rullade in i silkespapper, som söta smällkarameller.
———
I filled my boxes with candy rolled in tissue paper, kind of like crackers. 

Candy shaped boxes - by Craft & Creativity

Pappersskålar – Paper bowls

Paper bowls - by Craft & Creativity

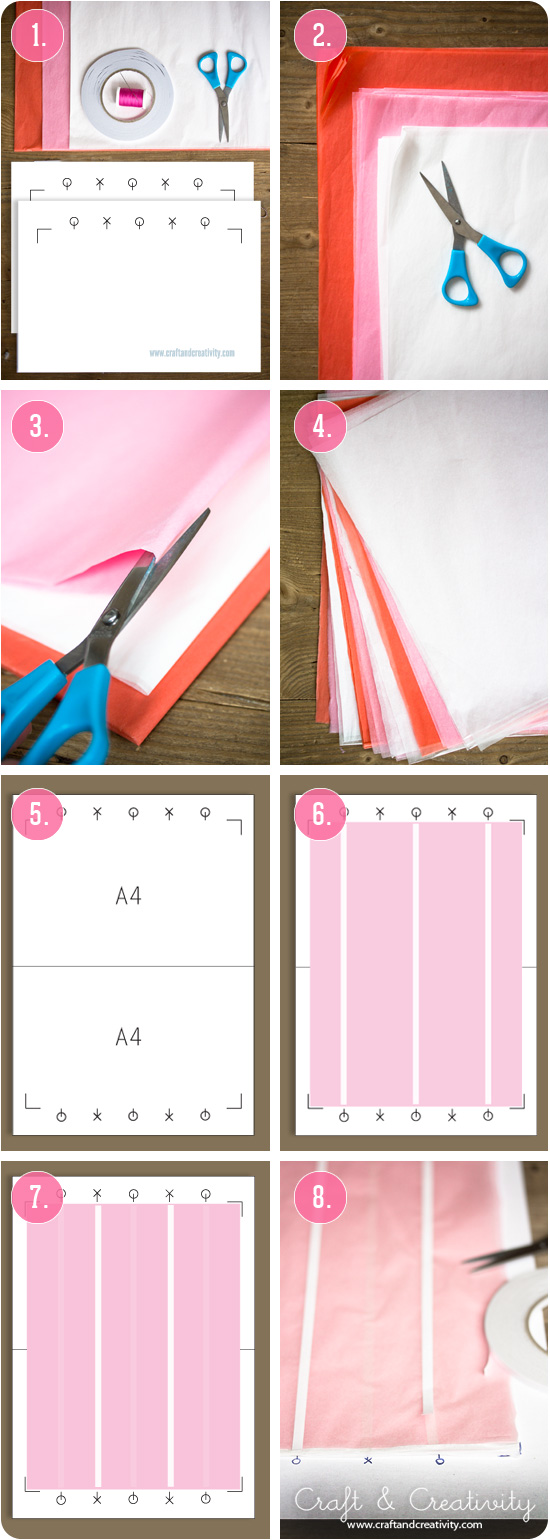
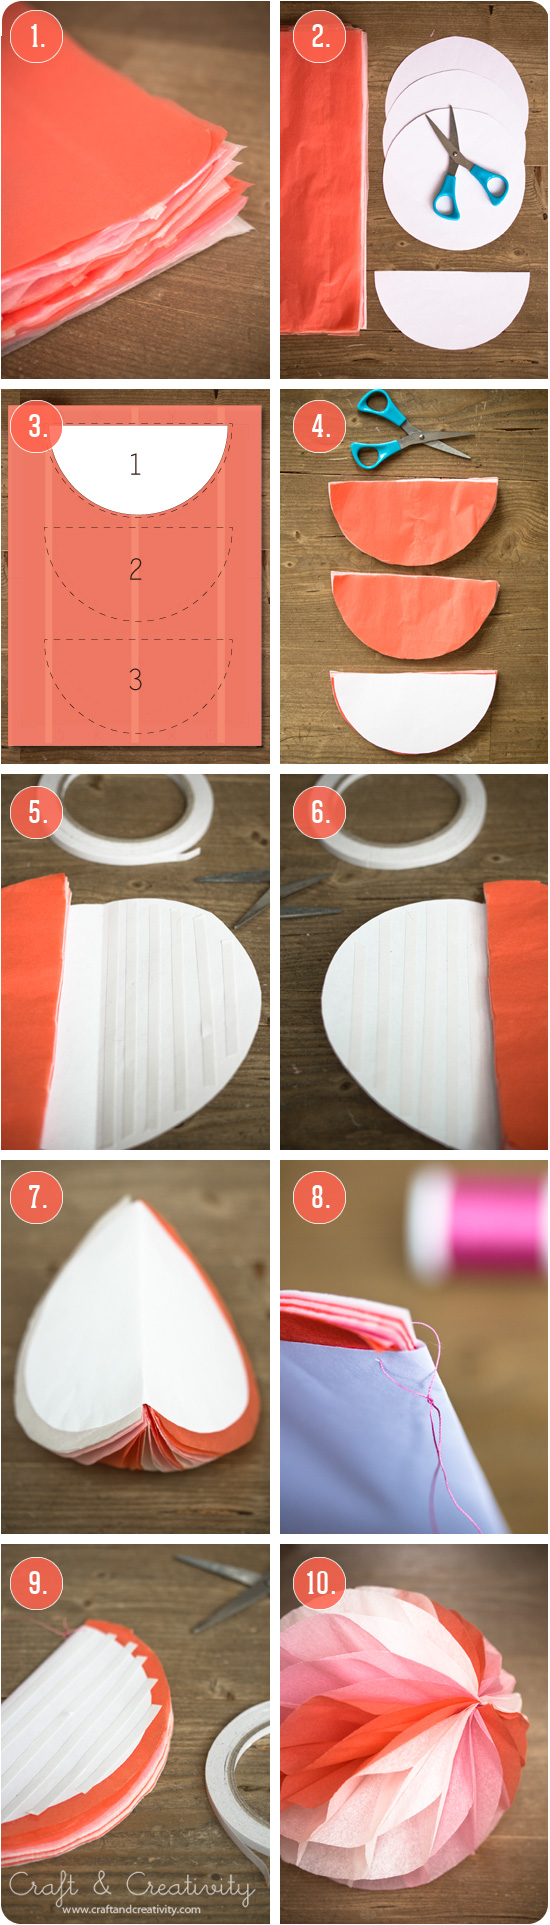
Principen är enkel och det enda du behöver för att göra pappersskålar liknande mina är små bitar av mönstrat papper (kanske har du restbitar av fina papper hemma?), tapetklister (eller hemmagjort papier-maché lim), pensel, plastfolie och skålar som du använder som mall. Vill du lacka utsidan på skålarna behöver du även lack (t ex decoupagelack) och vill du måla insidan behöver du färg och min favorit är Martha Stewart Crafts® fina täckande färger.

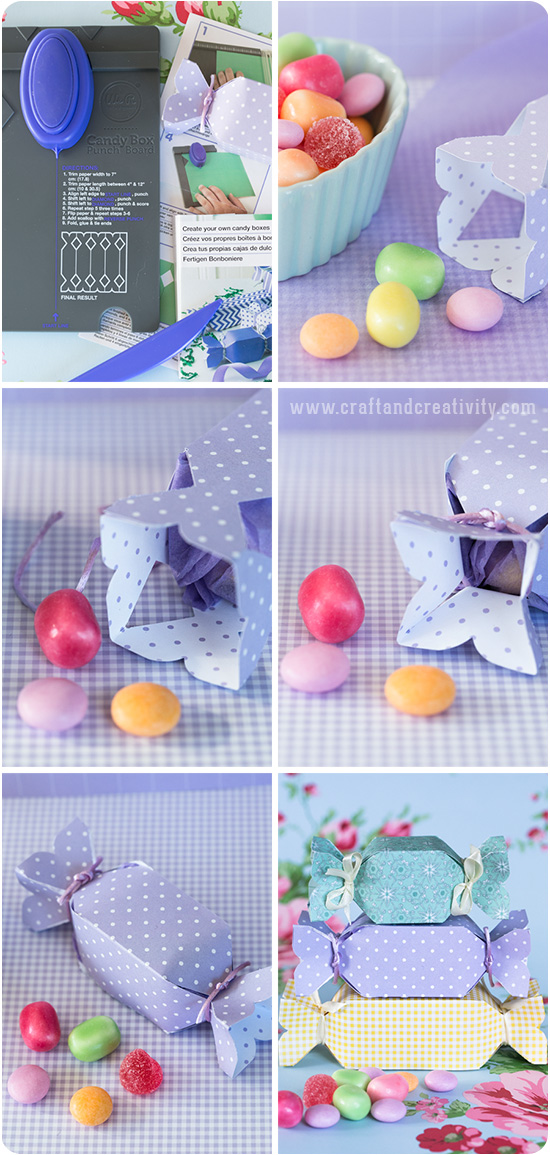
Gör så här: Ta en skål som du gillar, vänd den upp och ner och täck den med plastfolie. Limma fast papperet, bit för bit med tapetklister och täck hela utsidan av skålen. Låt torka ordentligt innan du lossar på skålen och försiktigt drar bort plastfolien. Det tar ca 1 dygn för torkningen. För er mer utförlig steg-för-steg beskrivning rekommenderar jag er att ni besöker Pysselbolaget och Carolyns homework och tar del av deras utmärkta beskrivningar. Det var därifrån min inspiration kom och en än gång får jag tacka Karin & Freja för ett roligt pysseltips! ♥
————–
It’s a simple procedure, all you need to make paper bowls like mine are scraps of paper, wallpaper paste (or homemade papier-maché), a brush, plastic wrap and bowls to use as a templates. If you like you can add extra lacquer to the outside and decorate the inside of the bowls with paint and my favorite is Martha Stewart Crafts® paint. 

Do like this: Take a bowl you like, turn it upside down and cover it with plastic wrap. Glue the paper, piece by piece with wallpaper paste and cover the entire outside of the bowl. Let it dry completely before loosening the bowl and carefully removing the plastic wrap. It takes about 24 h to dry. For more detailed step-by-step directions, I recommend you that you visit Pysselbolaget and Carolyns homework and their excellent tutorials. That’s where I got my inspiration and once again I have Karin & Freja to thank for a fun craft tip! ♥

Paper bowls - by Craft & Creativity

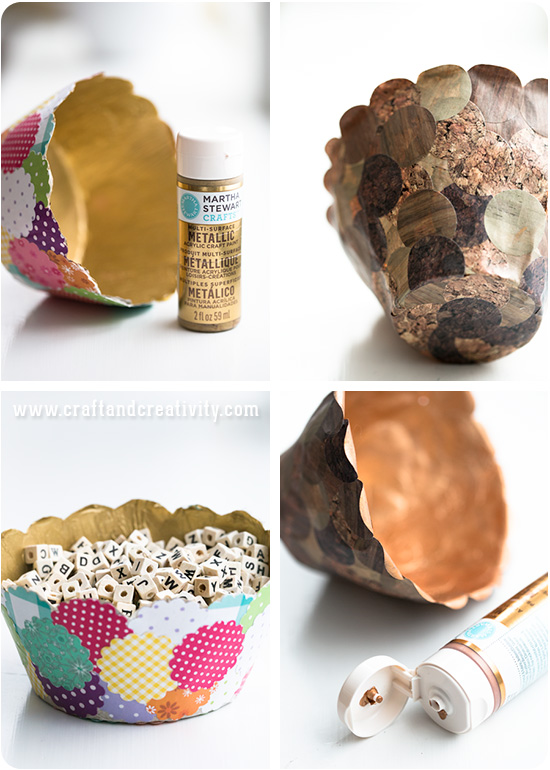
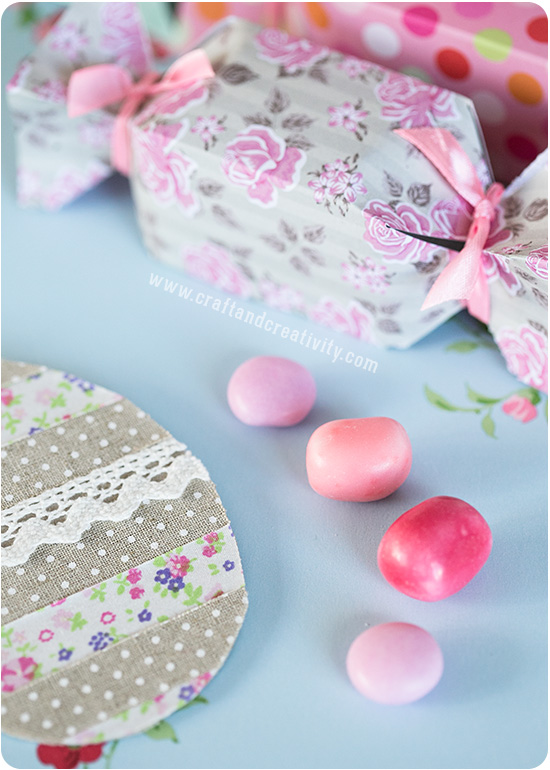
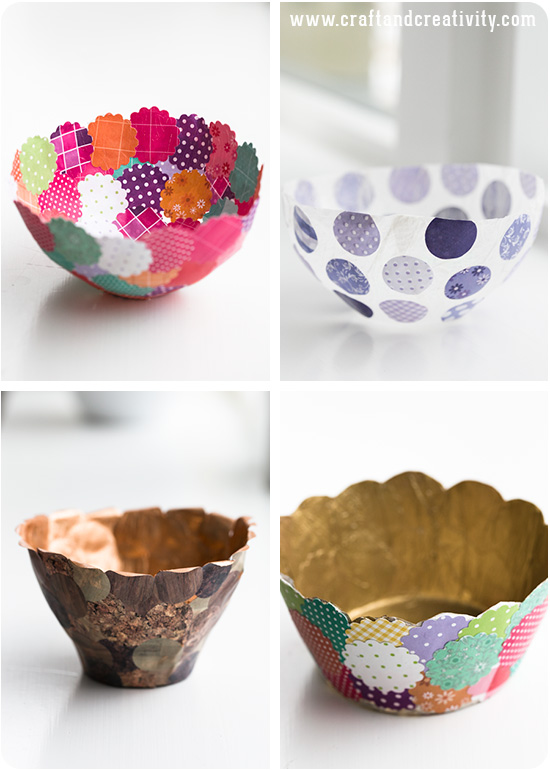
Jag målade insidan på några av mina skålar med metallicfärg i nyanserna guld och koppar. Ett lager färg räcker och den torkar snabbt. Penseln gör du rent med vanligt vatten och tvål eller med penseltvätt. Utsidan lackade jag med matt decoupagelack för att få extra stadga och en fin finish. Den naturfärgade skålen är gjord av figurstansat origamipapper. Skålen med platt botten är gjord av designpapper som jag stansat ut med en handpunch.
—————–
I painted the inside of some of my bowls with metallic color in shades of gold and copper.. One coat of paint is enough and it dries quickly. Clean the brush with soap and water or Brush & Stencil Cleaner. I added a coat of matte decoupage lacquer to the outside of the bowl for extra stability and a nice finish. The natural-colored bowl was made by circle punched origami paper. The bowl with flat bottom was made of design paper and the scalloped circle shapes where made with a squeese punch.

Paper bowls - by Craft & Creativity

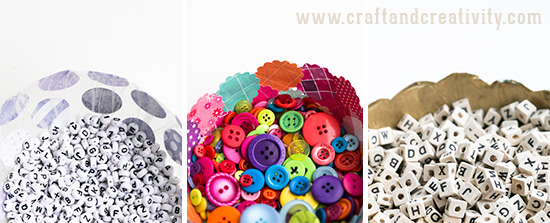
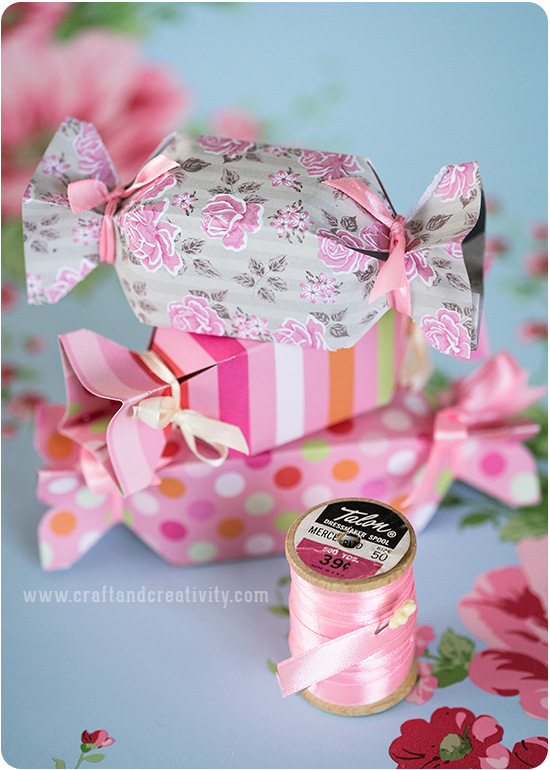
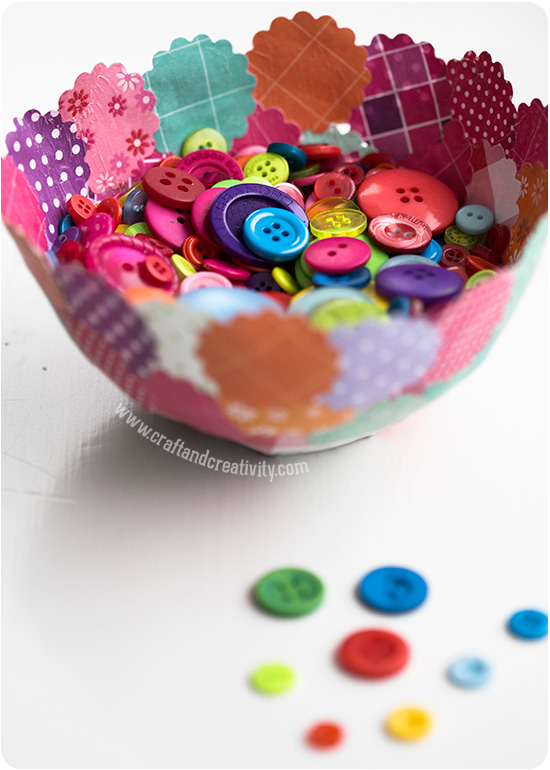
Pappersskålarna blir extremt lättviktiga och tål inget tungt eller blött innehåll men är perfekta till att förvara pysselmaterial eller smågodis. Ju tjockare papper (eller ju fler lager) desto stabilare skål.
————-
The paper bowls will turn out extremely lightweight and will not withstand heavy or wet content, but is perfect for storing craft supplies or sweets. The ticker the paper (or the more layers), the more stable the bowl. 

Paper bowls - by Craft & Creativity

Paper bowls - by Craft & Creativity

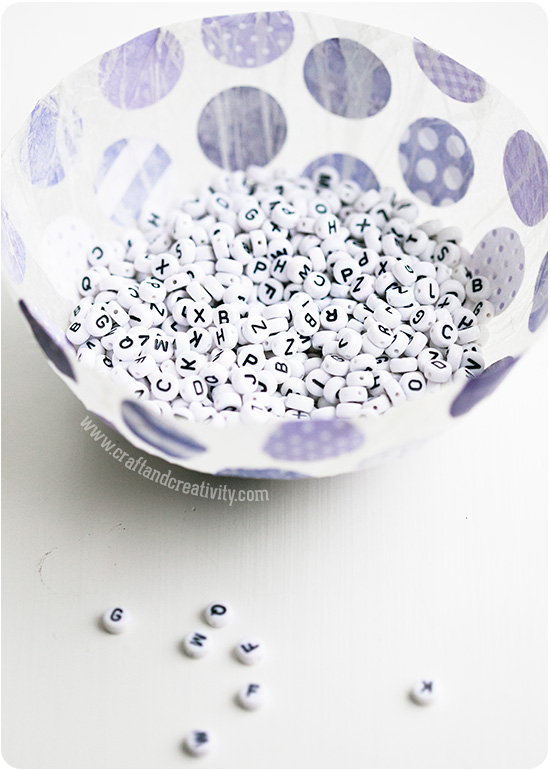
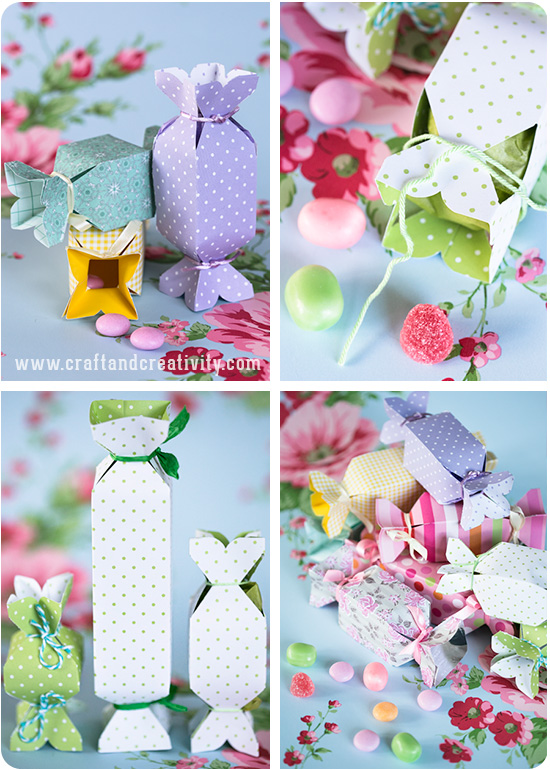
För att göra den vita halvtransparenta skålen med lila prickar började jag med att täcka skålen och plastfolien med vitt silkespapper i tre lager (tapetklister mellan) och avslutade med att limma fast pappersprickar av lila origamipapper som jag stansat ut med en figurstans.
—————
To make the white semi-transparent bowl with purple dots, I started with covering the bowl and the plastic wrap with white tissue paper in three layers (wallpaper paste between) and finished by gluing paper dots of purple origami paper evenly on the bowl. 

Paper bowls - by Craft & Creativity

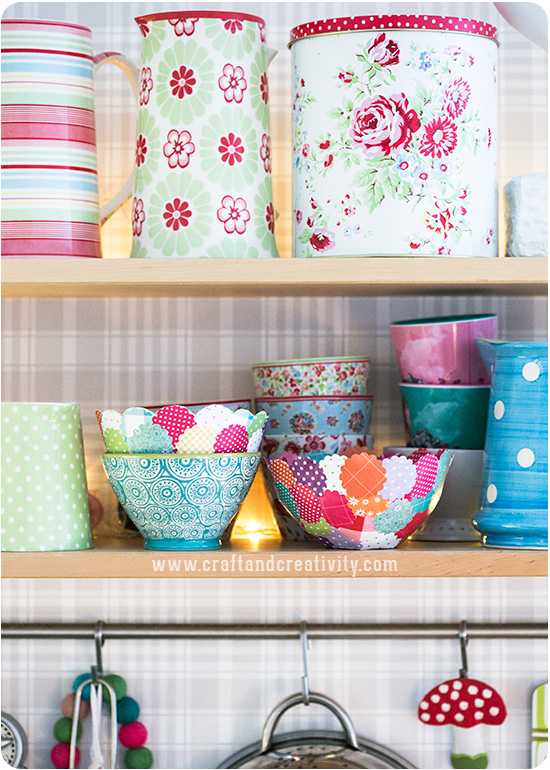
Skålarna pryder vår hylla i köket när de inte används.
———-
When not in use, the bowls look pretty on our kitchen shelves.

Suddbar kalasgirlang –
Erasable party garland

Erasable no-sew party garland - by Craft & Creativity

Allt du behöver för att göra den här suddbara kalasgirlangen är självhäftande tavelfolie
(d v s matt svart dekorplast), tygtejp, sax och vanligt skrivarpapper. Du behöver inte sy ett stygn. Det tar bara några minuter och du kan använda den till många födelsedagar och kalas framöver! Skriv texten med tavelkrita och du kan sudda bort med en fuktig bit papper och skriva ny.
——–
All you need to make this erasable no-sew garland is adhesive blackboard foil, fabric tape, a pair of scissors and ordinary print paper. It only takes a few minutes and you can use it for many birthdays and parties to come! Write on it with chalk crayons and you can erase the text with damp paper and write new letters.

Craft & Creativity - Download

Erasable no-sew party garland - by Craft & Creativity

  1. Skriv ut min mall för vimplar eller klipp ut egna om du önskar annan form/storlek. Jag använde vanligt 80 g skrivarpapper. Använd tjockare papper om du vill. Det är fem mallar på en sida, skriv ut fler ex av sidan beroende på hur många vimplar du vill ha. Mina mallar är ca 9 cm breda och ca 9 cm höga.
  2. Klipp ut mallarna.
  3. Tag bort skyddspapperet på tavelfolien och placera mallarna en och en på den självhäftande sidan av tavelfolien. Det fungerar bättre än att lägga hela papperet oklippt för då kan plasten bubbla sig.
  4. Klipp ut vimplarna. De har nu vit pappersbaksida och svart tavelfolie på framsidan.
  5. För att slippa sy använde jag självhäftande tygtejp. Den fungerar som washitejp fast det är tyg istället för papper.
  6. Tag bort skyddspapperet på tejpen och placera ut vimplarna jämnt fördelat på tejpen, men täck bara halva tejpen – som på bilden.
  7. Vik över tejpen på andra sidan av vimplarna.
  8. Fortsätt och gör likadant med alla vimplar. Spara en bit tejp på varje sida om girlangen för upphängning. Vik den också på mitten (klister mot klister) så blir det som ett band. Gör en eller flera girlanger.
  9. När girlangen är klar kan du vika ihop den och den tar minimalt med plats.
  10. Skriv på vimplarna med krita. Sudda bort med en bit fuktigt papper om du vill ändra texten. Precis som med en griffeltavla!
  11. Fäst din girlang på väggen med nålar eller tejp. Eller knyt upp den på önskat ställe.

———

  1. Print my pennant template or cut your own if you desire other shape or size. I used standard print paper. Use heavier paper if you like. There are five templates on one page, print more copies depending on how many pennants you want to make. My pennants are approximately 9 cm (3,5 in) wide and 9 cm high.
  2. Cut out the templates.
  3. Remove the protective sheet from the blackboard foil and place the templates one by one on the adhesive side of the foil. This works better than placing the whole uncut paper, which can cause the foil to wrinkle. 
  4. Cut out the pennants. They will turn out with white paper backing and blackboard foil on the front.
  5. To avoid having to sew, I used adhesive fabric tape. Much like washi tape but with fabric instead of paper.
  6. Remove the protective paper from the tape and place the pennants evenly on the tape, but cover only half the tape – as shown in the picture above.
  7. Fold the tape over on the other side of the pennants.
  8. Continue to do the same with all the pennants. Save a piece of tape on each side of the garland for hanging. Make one or more garlands.
  9. When your garland is done, you can fold it together and it takes up minimal space.
  10. Write on the pennants with chalk crayons. Erase the chalk with a piece of damp paper if you want to change the text. 
  11. Hang your garland on the wall with pins or washi tape or tie it to a shelf.

Honeycomb pappersbollar –
Honeycomb pom-poms

DIY Honeycomb paper ball - by Craft & Creativity

Idag tänkte jag visa hur man gör eget honeycomb-papper (dragspelspapper) och hur man sedan kan göra fina pompom-bollar av papperet. Bollarna är snygga till kalas, bröllop, dop eller bara hängande hemma som en inredningsdetalj. Min beskrivning nedan visar hur man gör ett 25×35 cm stort honeycomb-papper som räcker till tre bollar (18 cm i diameter). Du behöver 9 ark silkespapper och minst en rulle dubbelhäftande tejp för att göra 3 bollar.

Inspirationen kommer från den inspirerande sidan Mr. Printables. Jag har dock gjort om idén lite efter eget huvud. Bland annat använder jag dubbelhäftande tejp eftersom jag märkt att det håller mycket bättre än att limma med limstift.
————
Today I thought I’d show you how to make your own honeycomb paper and how to make pretty pom pom paper balls out of it. These paper balls are great for parties, weddings, christenings or simply use them as an interior detail in your home. My tutorial shows you how to make a 25×35 cm lagre honeycomb paper which is enough for three paper balls (18 cm in diameter).

This craft was inspired by a great tutorial over at Mr. Printables. However, I made mine a bit differently. For example, I used double sided adhesive tape after noticing that it holds better then glue stick. 

DIY Honeycomb paper ball - by Craft & Creativity

  1. Du behöver: 9 ark silkespapper 50×70 cm, en stor rulle dubbelhäftande tejp (min är 6 mm bred), vass sax, två ex av min mall (ladda ner här), sytråd, nål och en bit vanlig tejp för at tejpa ihop mallarna.
  2. Gör så här: Välj färg/färger på ditt silkespapper. Den här gången valde jag tre olika färger, tre ark av varje (vit, rosa & orange/korall). Vik arken på hälften och sedan en gång till = 36 lager silkespapper med måttet 25×35 cm.
  3. Klipp i viken så du får 36 separata ark.
  4. Mixa färgerna. Jag valde att växla färg efter 4 ark för att få randiga bollar.
  5. Nu ska alla ark tejpas. Skriv ut 2 ex av min färdiga mall för att underlätta arbetet. Tejpa ihop de två mallarna som bilden visar ovan. Min mall passar ark som är 25×35 cm. Vill du göra större eller mindre bollar får du göra en anpassad mall med dina egna mått.
  6. Lägg ditt första ark silkespapper på plats. Tejpa med den dubbelhäftande tejpen mellan varje O. Det blir totalt 3 linjer. Ta bort skyddspapperet från tejpen.
  7. Lägg nästa ark silkespapper ovanpå det första. Detta ark tejpar du mellan varje X, det blir totalt 2 linjer.
  8. Fortsätt med alla 36 ark, vartannat ark tejpas mellan X:en och vartannat ark tejpas mellan O:na. Oroa dig inte om silkespapperet hamnar lite på snedden eller om allt inte ser perfekt ut, resultatet kommer bli bra ändå.

—–

  1. You will need: 9 sheets of 50×70 cm tissue paper, one big roll of double sided adhesive tape (mine is 6 mm wide), sharp scissors, two copies of my template (download here), sewing thread,a needle and a piece of tape to assemble the two templates. 
  2. Do like this: Select the color / colors of your tissue paper. This time, I chose three different colors, three sheets of each (white, pink & coral). Fold the sheet in half and then again = 36 layers tissue paper with the dimension 25×35 cm.
  3. Cut through all the papers in the fold to get 36 separate sheets.
  4. Mix the colors. I chose to change color after 4 sheets to get a striped effect.
  5. Now, time to tape all of the sheets. Print two copies of my template to simplify your work. Tape the two templates together as shown above. My template is adapted for sheets that are 25×35 cm. If you wish to make larger or smaller paper balls, you need to make a custom template with your own measurements. 
  6. Put the first sheet of tissue paper in place. Tape with double sided adhesive tape between each O. There will be a total of three lines. Remove the backing from the tape.
  7. Place the next sheet of tissue paper on top of the first. This time tape between each X and there will be a total of two lines. 
  8. Continue with all 36 sheets. Every other sheet is to be taped between the X’s and every other sheets is to be taped between Os. Do not worry if the tissue paper ends up a bit crooked or if not everything looks perfect, the result will be fine anyway.

DIY Honeycomb paper ball - by Craft & Creativity

  1. Nu är ditt honeycomb-papper klart. Det är dags att göra bollarna!
  2. Skriv ut mina mallar (ladda ner här). Klipp ut 1 ex av halvmånen och 3 ex av den runda. Det fungerar bra med vanligt skrivarpapper.
  3. Lägg halvmånemallen på honeycomb-papperet och måtta så du får ut tre halvmånar. Notera att mallarna måste ligga åt samma håll som mina ovan.
  4. Klipp ut dina tre halvmånar.
  5. Vik det ena runda papperet på mitten. Lägg honeycomb-papperet i mitten av viket. Fäst det insidan av det vita papperet mot silkespapperet med dubbelhäftande tejp (eller limstift), först på den ena sidan…
  6. … och sedan på den andra sidan.
  7. Så här ska det se ut när du tejpat klart.
  8. Trä nålen med sytråd. Stick den genom alla lager papper i ena hörnet av halvmånen. Knyt en knut ca 1 cm ut på tråden, annars går inte bollen att fälla ut. Klipp av tråden. Gör likadant med andra hörnet men klipp inte av tråden utan spara den till upphängning.
  9. Fäst dubbelhäftande tejp på ena sidan av din halvmåne. Eller limma med limstift. Tag bort skyddspapperet från tejpen. Fäll upp bollen så att de vita utsidorna sidorna möter varandra och tejpen fäster.
  10. Volià, en boll! Upprepa punkt 5-9 för de andra två pappersbollarna.

———

  1. Now your honeycomb paper is ready. It’s time to make the honeycomb pom-poms!
  2. Print my templates (download here). Cut one example of the half circle and three copies of the round. Plain printer paper will work just fine. 
  3. Place the half circle template on top of your honeycomb paper and measure so you get three half circles. Note that the templates must lie in the same direction as mine above.
  4. Cut out your three half circles.
  5. Fold one of the round papers in half. Add one of your honeycomb paper half circles in the middle of the fold. Tape the inside of the white paper to the honeycomb paper with adhesive tape (or glue sticks), first on one side …
  6. … and then on the other side.
  7. This is how it should look when your done taping.  
  8. Thread the needle. Stick the needle through all the layers of paper in one corner of half circle. Tie a knot about 1 cm out on the thread, otherwise the ball won’t open. Cut the thread. Do the same with the other corner, but don’t cut the thread, save it for hanging.
  9. Attach double-sided adhesive tape on one side of your half circle. Or glue with glue stick. Remove the backing from the tape. Open up the ball so that the white sides of the paper face each other and the tape sticks. 
  10. Volia, your pom-pom is ready! Repeat steps 5-9 for the other two paper balls.

DIY Honeycomb paper ball - by Craft & Creativity

Jag ska inte sticka under stol med att det är pilligt och tidskrävande att göra honeycomb-papper men för färdiga pompom-bollar kan man få betala ganska mycket pengar, så det kanske kan vara värt det? Att göra dessa tre bollar tog mig drygt en timme. Det hade kanske gått snabbare om jag inte hade haft så mycket hjälp av katten Minus… 😉
——–
I will not deny that making honeycomb paper is a bit tricky and time consuming. But on the other hand buying ready-made ones can be quite expensive and I really think it’s worth it. Making these three pom-poms took me just over an hour. Perhaps it would have gone quicker if I hadn’t had so much help from our cat Minus… 😉 

Julgranskulor i papper –
3D paper ball ornaments

För ett år sedan såg jag en sådan fiffig beskrivning på flätade pappersbollar hos How About Orange. De dyker upp då och då på Pinterest och påmint mig om att de finns där på min mentala vill-pyssla-lista. I helgen skred jag till verket och så här blev resultatet.
——
One year ago, I spotted a clever tutorial on how to make these braided paper balls at How About Orange. These 3D paper balls pop up now and then on various Pinterest boards, and have reminded me that they are on my mental to-craft-list. This weekend I actualized my plan and here’s the result. 


Kulan till vänster är saxad ur en gammal loppisfyndad uppslagsbok och den till höger ur en gammal kartbok. Återvinning till 100%. Jag tänkte att de kan vara fina att hänga i granen. /
The ball on the left is cut out from an old encyclopedia I found at the flee market and the one on the right from a vintage atlas. 100% recycling. I thought they might look nice hanging in the Christmas tree.


Mallarna ser ut som blommor Jag skrev ut mallen för den minsta pappersbollen och då blev min boll ca 8 cm i diameter. Det finns två större mallar också om man vill göra lite maffigare bollar. De var inte alls svåra att göra. För att göra en boll behöver man tolv “blommor” och för att effektivisera så lade jag mallen på boksidorna och klippte två i taget.  Det finns tydliga och bra instruktioner på How About Orange där du även laddar ner mallarna i pdf-format.
——–
The templates look kind of like flowers. I printed the templates for the smallest paper ball and mine turned out to be about 3 inches (8 cm) in diameter. There are two larger sizes of templates available to print if you want to make lager ones. Thea are not at all difficult to make. You will find excellent instructions over at How About Orange, where you also can download the templates.