Rislampa blir luftballong –
Paper lantern turned into hot air balloon

Paper lantern hot air ballons - by Craft & Creativity

Jag tänkte visa er hur man kan göra söta luftballonger av enkla rislampor. Det du behöver är först och främst en (eller flera) rislampor. Mina är 20 cm i diameter, d v s inte jättestora. Lamporna dekoreras med decoupagepapper (silkespapper eller mönstrade servetter funkar också utmärkt) och till det behövs decoupagelack och en bred platt pensel. Till snören har jag använt tvinnat bomullssnöre, “Bakers twine”. Små korgar kan man hitta på loppis för en billig slant, eller använd en papperspåse eller en gammal konservburk. Min korg är målad med hobbyfärg och dekorerad med en bit bomullssnöre och vimplar gjorda av tygtejp.
———
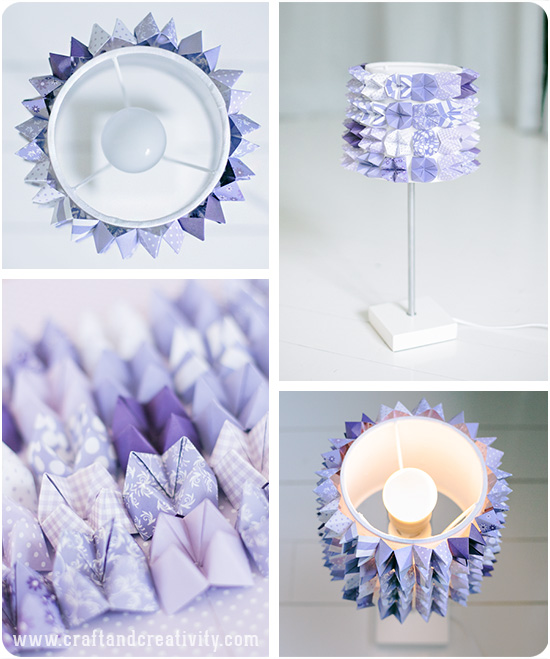
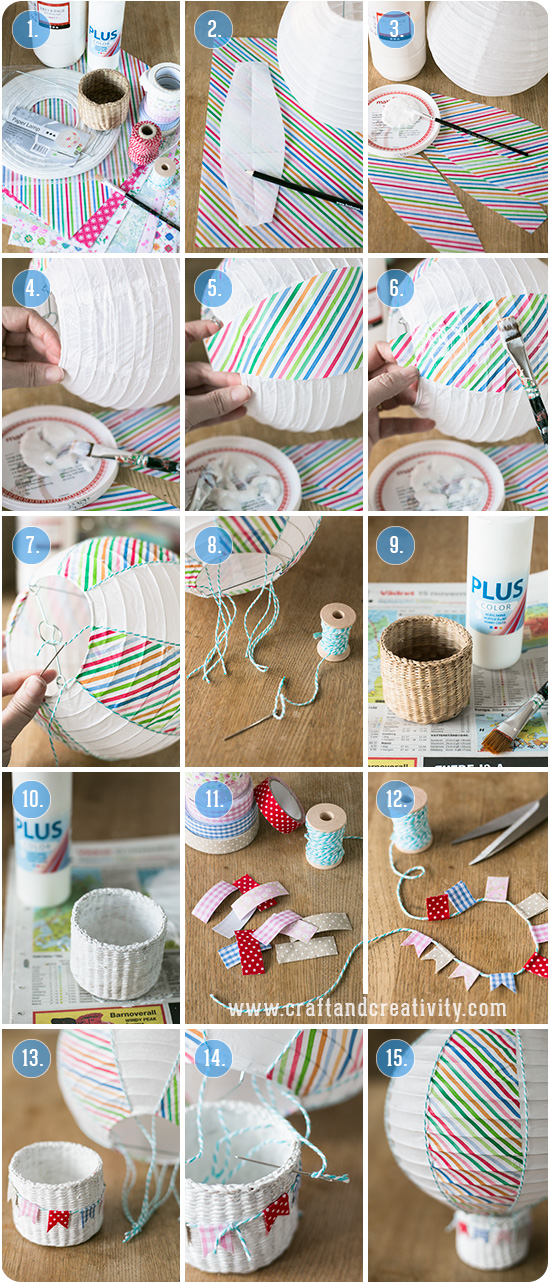
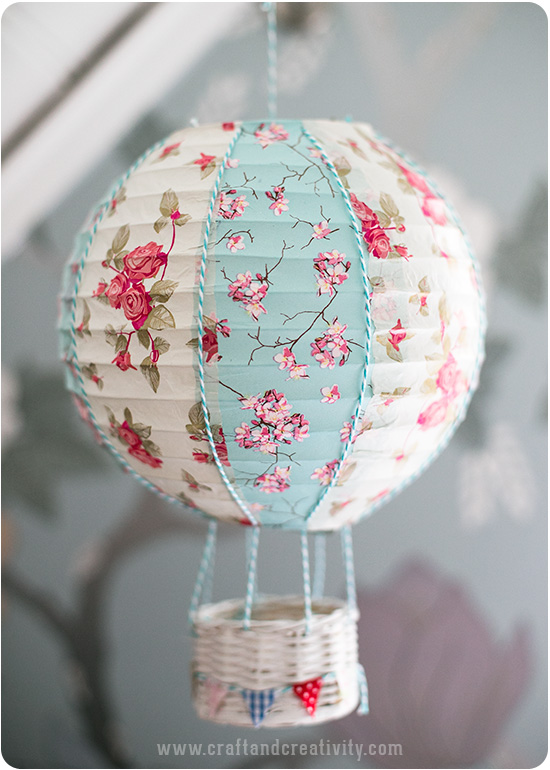
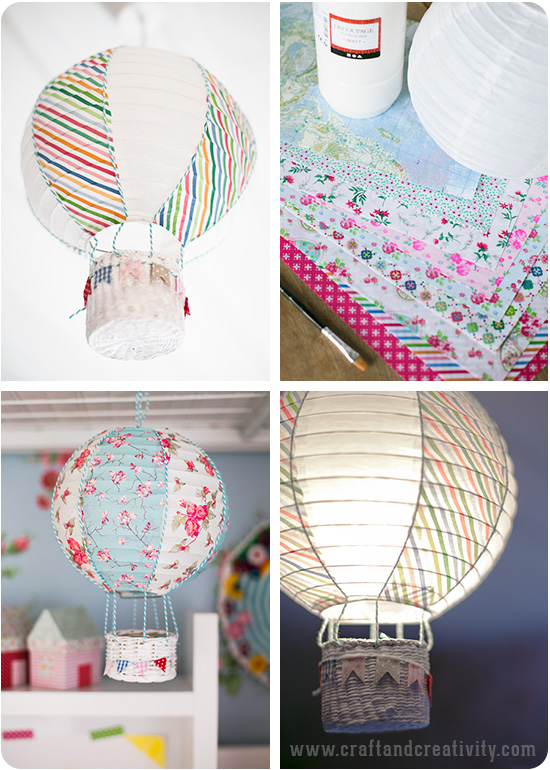
I thought I’d show you how you can make pretty hot air balloons out of plain paper lamps (Chinese lanterns). What you need is first and foremost one or several round paper lanterns. The lanterns will be covered with decoupage paper (tissue paper or patterned napkins also work well) and in addition to that you need decoupage lacquer (or Mod Podge) and a brush. I used Baker’s twine for strings. Small baskets can be found at the flea market for a small penny, or you can use a paper bag or an old tin can. My basked was painted with white acrylic paint and decorated with a piece of Baker’s twine and pennants made of fabric tape. 

Paper lantern hot air ballons - by Craft & Creativity

Gör så här
Bild 1-3: Börja med att veckla ut lampan. Det är enklast om du gör en mall för att få till själva ellipsformen. Jag lade en bit servett över rislampan, ritade på servetten med blyerts genom att följa lampans lodräta linjer och klippte till min mall. Det behöver inte vara noga, resultatet blir fint ändå men gör gärna mallen lite längre än höjden på själva lampan. Måtta med mallen och klipp till dina bitar. Här använde jag 4 bitar ellipsformat decoupage-papper men om du vill täcka hela behöver du 8 bitar, förslagsvis i två olika mönster.
Bild 4-6: Pensla på ett relativt tjockt lager decoupagelack på rislampan. En del i taget. Lägg på den första biten mönstrat papper och pensla ytterligare ett lager decoupagelack ovanpå ditt papper. Vik över de bitar av papperet som sticker ut uppe och nere, till insidan av rislampan. Släta ut papperet med penseln så det fäster överallt. Det slätar ut sig ytterligare när det torkar. Gå varvet runt och täck hela eller vartannat “fält” av lampan.
Bild 7-8: När lampan torkat är det dags att fästa trådarna som ska korgen ska hänga i. Sy fast snöret uppe och nere på lampan vid varje “skarv” och lämna ca 15 cm av tråden kvar längst ner, totalt 8 snörstumpar.
Bild 9-12: Dags att fixa till korgen. Måla korgen med t ex vit Plus Color hobbyfärg och under tiden färgen torkar kan du göra vimplarna. Klipp tygtejpen i ca 4 cm långa bitar, ungefär 10 bitar. Ta bort skyddspapperet och vik tejpen över snöret så att sidorna med klister möts. Klipp till formen på vimpeln som du vill ha den. Jag gjorde två olika varianter på mina lampor. Knyt din girlang runt korgen när den torkat.
Bild 13-14: Sy fast var och en av snörstumparna jämnt fördelat runt korgen. Reglera dina snören för att korgen ska hänga rakt. Det är lite trixigt och enklast är att hänga upp ballongen i något och gärna ha ett par extra händer till hands. Knyt ihop stumparna två och två för att fästa tråden. Nu är luftballongen klar och kan monteras på en lampsockel eller bara användas som dekoration, utan belysning.
———–
How to:
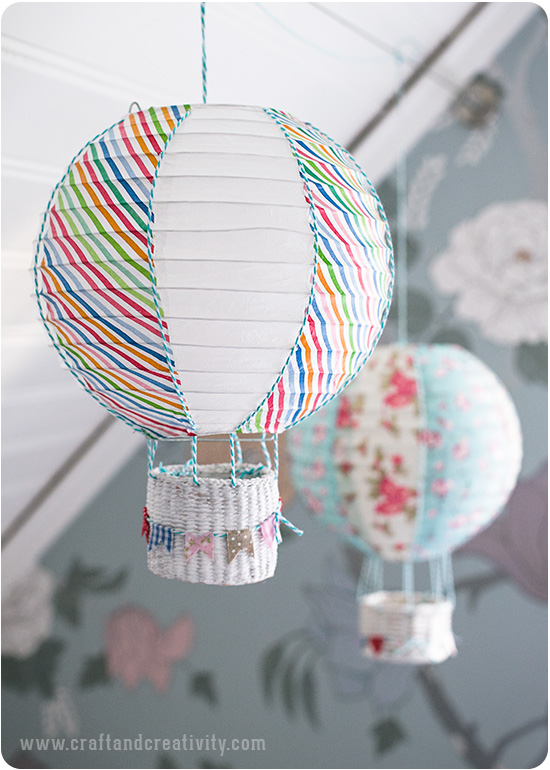
Pictures 1-3: Start by unfolding your lamp. It’s easiest if you make a template to use on your decoupage paper to get the correct elliptical shape. I put a piece of napkin over my paper lantern and traced the vertical lines of the lantern onto the napkin with a pencil. I then cut out my template and used it to cut my decoupage paper into elliptical shaped pieces. It doesn’t have to be exact, the result will look nice anyway. But be sure to make your pieces of paper a bit longer then the height of the lamp. On this lamp I used 4 pieces of elliptical shaped decoupage paper, but if you want to cover the whole lamp you need 8 pieces, preferably in two different patterns. 
Pictures 4-6 : Brush a relatively thick layer of decoupage lacquer on top of the paper lantern, one part at a time. Add the first piece of decoupage paper and brush another layer on top of the paper, smoothing out any creases or wrinkles. Fold the access paper on the bottom and the top to the inside of the lamp. The paper will smooth out when it dries. Go the full circle around and cover it completely or every other ellipse. 
Pictures 7-8: When the lantern has dried, it’s time to add the strings in which to hang the basket. Fixate the cotton string by sewing it in place at each joint at the bottom and the top of the lantern and leave about 6″ (15 cm) of string at the bottom, a total of 8 strings.
Pictures 9-12: Time to decorate the basket. Paint it with hobby paint and while the paint dries, you can make the pennants. Cut 10 pieces of fabric tape, approx 4 cm long. Remove the backing paper and fold the tape over the string letting the adhesive sides meet. Make pennants by cutting the fabric tape into the shapes you like. I made two different versions for my baskets. Tie the string of pennants around the basket when dry.
Pictures 13-14: Sew each of the eight strings in place evenly around the basket. Adjust the length of the strings to make the basket hang straight. It’s a bit tricky and the easiest way is to hang the balloon into something and have an extra pair of helping hands. Tie up the strings in pairs to secure. Now the balloon is ready and can be mounted on a lamp base or simply be used as decoration, without lighting.

Paper lantern hot air ballons - by Craft & Creativity

Idén fick jag efter att ha länge beundrat Taj Wood & Scherer och deras fantasifulla lampor. Om man googlar runt lite går det att hitta fler exempel på papperslampor omgjorda till luftballonger. Besök gärna The Joyeful Journey där Joye använt papperspåsar som ballongkorgar. Jättefint! Det finns också exempel där man valt att målat sin rislampa, se t ex Hands Occupied.
———-
I got this idea after having long admired Taj Wood & Scherer and their fantastic lamp shades. If you google, you can find more examples of paper lanterns made into hot air balloons. Take a look at The Joyeful Journey where Joye used paper bags as balloon baskets. So pretty! I’ve also seen examples of painted paper lanterns, for example over at Hands Occupied.

Paper lantern hot air ballons - by Craft & Creativity

Barnens leksaker står på kö för att testa luftballongerna och här är det min mammas lilla virkade docka och nalle som får ta en provtur. Besök gärna hennes blogg Annie’s Granny Design för fler av hennes virkade alster. På Etsy säljer hon virkbeskrivningar och färdigvirkade dockor, nallar och bokmärken i frivolitet.
————-
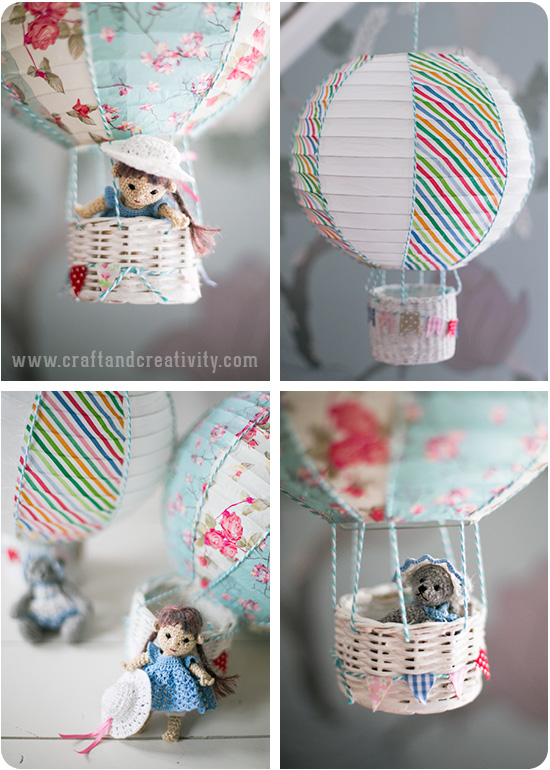
My kids’ toys are queuing up to try the hot air balloons and here it’s my mom’s tiny crocheted doll and teddy’s turn to take a test flight. Please visit her blog Annie’s Granny Design for more of her crocheted creations. She sells crochet patterns and crocheted dolls, teddy bears and tatted bookmarks over on Etsy

Paper lantern hot air ballons - by Craft & Creativity

Jag tycker att tygtejpen ger en fin textur till vimplarna och de ser nästan sydda ut. Det går förstås även bra att använda vanlig washitejp.
————-
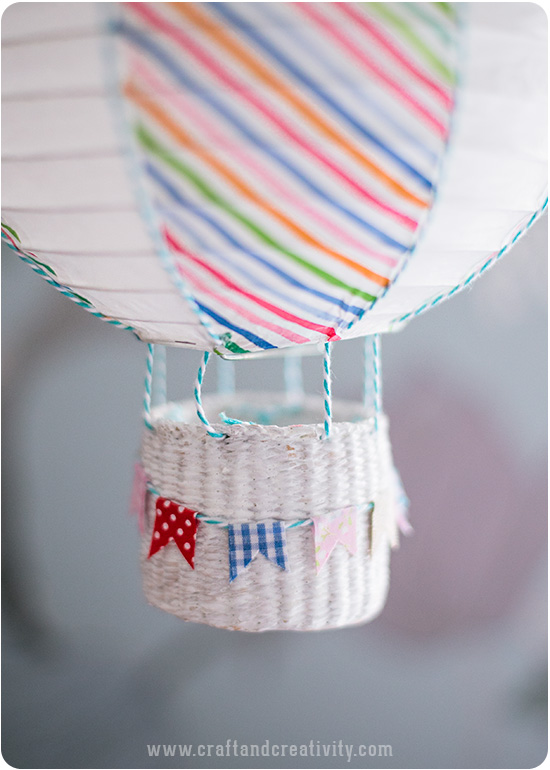
I think the fabric tape adds a nice texture to the pennants and they look almost sewn. You can also use ordinary washi tape. 

Paper lantern hot air ballons - by Craft & Creativity

Till mina rislampor som är 20 cm i diameter behövde jag 1 ark decoupagepapper (30×42 cm) för att täcka ballongen till hälften och 2 ark för att täcka den helt.
———–
My paper lamps are 8″ (20 cm) in diameter and I used one sheet of decoupage paper (12×16,5″) to cover the ballon in half and two sheets to cover it completely. 

Lopplampa – Fortune teller lamp

DIY Fortune teller lamp - by Craft & Creativity

Som jag nämnde tidigare blev det en del loppvikande vid vårt senaste besök hemma hos Karin & Freja på Pysselbolaget. Det var Freja som började och inspirationen spred sig. Jag hade glömt hur roligt det är! Lopptillverkningen resulterade i lampskärmar och jag tycker absolut ni ska klicka er över till Pysselbolaget och se hur fin deras blev!
———–
As I mentioned earlier, one of the things we did on our latest visit to Karin & Freja was to fold fortune tellers. Freja had already started and she inspired me. I had forgotten how fun it is. The folding resulted in lampshades and I recommend that you head over to Pysselbolaget and take a look at theirs! 

DIY Fortune teller lamp - by Craft & Creativity

DIY Fortune teller lamp - by Craft & Creativity

De flesta av oss har säkert vikt pappersloppor som barn. För er som glömt hur man gör har jag gjort en liten skiss ovan. Till min lampskärm gick det åt 44 små loppor och jag använde origamipapper som var 7,5×7,5 cm stort, d v s jag delade 15×15 papper i fyra lika delar. Barnen och mamsen hjälpte mig med de sista lopporna. 🙂
———
Most of us have probably folded paper fortune tellers as kids. For those of you who have forgotten how to, I’ve made ​​a simple drawing above. I needed 44 small fortune tellers to cover my lampshade and I used origami paper that was 3×3 inch (7,5 x7,5 cm) wide, which means I cut 6×6 inch (15×15 cm) paper into four equal parts. To help me make the last ones I had great help from my children and my mum. 🙂

DIY Fortune teller lamp - by Craft & Creativity

Efter att alla lopporna var vikta limmade vi fast dem på lampskärmen med en limpistol. Det är lätt att bränna fingrarna när du jobbar med varmt lim och ett tips är att ha ett glas kallt vatten bredvid dig när du jobbar. Det är lite klurigt att få en jämn fördelning på lopporna som nästan lever sitt eget liv. Å andra sidan så gör det inget om det inte blir perfekt.
———
After folding all the fortune tellers, we glued them to the lampshade with a glue gun. You can easily burn your fingers when working with hot glue, and I recommend you have a glass of cold water beside you while you work. It’s a bit tricky to spread the fortune tellers evenly, but on the other hand it really doesn’t have to be perfect.

DIY Fortune teller lamp - by Craft & Creativity

Jag valde att limma mina loppor på en enkel cylinderformad lampskärm men jag har sett flera exempel på rislampor limmade med vita loppor, vilket blir väldigt fint.
———-
I chose to glue my fortune tellers on a simple cylindrical lampshade, but I have seen several examples of paper lanterns covered with white fortune tellers, which looks very nice.

DIY Fortune teller lamp - by Craft & Creativity

Äldsta dottern vann kampen om vem som skulle få ha lampan i sitt rum. Hennes kompisar är väldigt imponerade och vill alla ha likadana. 🙂
——-
My oldest daughter won the battle over who would get to have the lamp in her room. Her friends are very impressed and all want one just like it. 🙂

Bokåtervinning – Recycling old books

Efter pärlträffen förra helgen var jag och mamma på loppis. Jag var på jakt efter gamla böcker och fick med mig sju tunga, tjocka uppslagsböcker hem. Jag ville testa en pyssel med utklippta pappershus runt ljushållare, som jag sett bland annat hos Sweet Paul.

After the bead meet last weekend, my mom and I went to a flea market. I was on the search for old books and I brought seven heavy encyclopedias with me home. The plan was to make paper house candle holders, like those I’ve seen at Sweet Paul’s.   

Det var egentligen fotografier på hus jag var ute efter men de lexikon och historieböcker jag fick med mig hem innehöll även vackra bilder på växter, djur, målningar och kartor. Massor med pysselmaterial för framtiden! Som den bokälskare jag är gjorde det lite ont i hjärtat att riva sönder böckerna men jag tröstade mig själv med att de var slitna och att de bara kostade 1 krona styck. Plus att de antagligen kommer sprida mer glädje som inredningsdetaljer än som dammiga gamla böcker på en loppis.
—–
It was originally looking for pictures of old houses, but the dictionaries and history books I came home with also contained beautiful illustrations of flowers, animals, paintings and maps. Lots of material for future crafting! Being the bookwork I am, it was with a little sadness in my heart that I tore the books apart. I consoled myself with the fact that the books were worn and only cost me 1 SEK (10 cent) each. Plus, they are likely to spread more joy as interior accents than dusty old books at a flea shop. 

Jag klippte ut husen med en sax och skar ut några av fönstren med en hobbykniv, för att skapa en genomlysningseffekt. Sedan satte jag papperet runt dricksglas och tejpade ihop på baksidan. Slutligen klippte bort överflödigt papper för att passa glasets form. En annan idé för återvinning kan vara att använda gammal glasburkar.
—-
I cut out the houses with a pair of scissors and cut out a couple of the windows with an exacto knife to create a transparency effect. I wrapped the paper around small drinking glasses and and secured with tape at the back. Finally, I cut away any access paper. Another idea for recycling could be to use old jars instead of glasses. 

   
När jag väl var varm i kläderna fortsatte jag med kartorna och gjorde likadant med dem. /
While I was on a roll, I did the same with the maps. 


En gammal florabok som jag loppisfyndat tidigare fick också vara med och bidra till samlingen av ljuslyktor. De blev nästan finast av alla, tycker jag. Florabilder har jag använt förut när jag tejpade upp dem i hallen på övervåningen. /
An old botanical book from a previous flea market bargain-hunt also contributed to my collection of votives. I think they turned out to be the prettiest of them all. I’ve used botanical pictures before when I taped them to a wall in our upstairs hallway. 

Dagens pyssel, filthjärtan –
Craft of the Day, felt hearts

Ja då var det dags för fler hjärtan. 🙂 Jag gillar rött och vitt i granen och då kommer dessa filthjärtan förhoppningsvis passa bra. Jag hade vit filt över efter marängerna och hus-ljuslyktorna. Dessa hjärtan är enkla att göra. Du behöver vit filt, sax, sytråd (eller broderitråd), nål och ett band att hänga hjärtat i.

För att måtta hjärtana kan man använda en pepparkaksform till exempel, eller rita för hand. Klipp ut två hjärtan. Sy runt kanten med langettstygn men spara en liten öppning. Fyll med vadd och sy igen det sista. Fäst ett band för upphängning.

It’s about time for some new hearts. 🙂 I like the combination of red and white in the Christmas tree and these felt hearts will hopefully fit right in. I had some scraps of white felt left from the meringues and the felt house lanterns.The hearts are really easy to make. You need white felt, scissors, sewing thread (or embroidery thread), a needle and string or yarn for the hanging. 

In order to get the right heart shape, you can use a cookie cutter, or simply draw by hand. Cut out two hearts. Sew around the edge with blanket stitch, but leave a small opening. Fill the heart with cotton wool and close the gap. Attach a string for hanging. 

Dagens pyssel, glaslykta –
Craft of the Day, glass lantern

Det är mysigt med många tända ljus denna mörka årstid. Jag har gjort en ljuslykta av en gammal glasburk, vit sprayfärg, tårtpapper och ståltråd.

Det här behöver du:
– Glasburk
– Ståltråd
– Avbitartång
– Tårtpapper eller gammal spetsduk
– Vit sprayfärg
– Tejp, dubbelhäftande och vanlig
– Eventuellt ett bit band eller spets

Jag gjorde så här: 
Jag började med att ta bort den gamla etiketten från glasburken. Först lät jag den ligga en stund i ljummet vatten tills etiketten lossnade. De sista klisterresterna tog jag bort med lite aceton. Sedan fäste jag tårtpapperet på burken med hjälp av dubbelhäftande tejp och maskerade de delar jag inte ville ha färg på med vanlig tejp. Jag gick utomhus när det var dags att spraymåla burken för att minimera lukten. Jag använde ganska lite färg eftersom jag bara ville att det skulle bli lite “dimmigt”. När färgen torkat tog jag bort tejpen och tårtpapperet och virade ståltråd runt öppningen. Jag böjde till en båge av en ny bit ståltråd som jag fäste på var sin sida av glasburken. Till sist klistrade jag på ett vitt bomullsband som jag hade i mina gömmor. Så var det klart!

It’s cozy to have many lighted candles this time of year, when it’s so dark outside.
I made a glass lantern  of an old jar, white spray paint, cake paper and wire.

You will need:
– Glass jar
– Steel wire
– Wire cutter
– Cake paper doily or old lace doily
– White spray paint
– Tape, double-sided, and regular
– Possibly a piece of ribbon or lace

I did like this: 
I started by removing the old label from the jar. At first I let it soak in warm water for a while until the label was easy to pile off. I removed the last of the glue residue with some nail polish remover. Then I placed the cake paper on the jar using double-sided tape and masked the parts I didn’t want paint on with ordinary tape. When it was time to spray paint I went outside to avoid the fuses. I didn’t use much color because I just wanted a “frosty” feeling. When the paint had dried, I removed the tape and cake paper and wrapped the wire around the jar opening. I bent another piece of wire into a loop that I attached on either side of the jar. Finally, I glued on a white cotton band that I had stashed. And that’s it!